How I fixed my 30 year old standing desk
These days standing desks aren't uncommon, but in the late 90's I had never heard of such a thing. My dad picked up a few surplus Steelcase Dyna-Lift standing desks, and I've been lucky to use one ever since! My trusty desk followed me across the country to California, and held my iMac in my apartment in San Francisco for a decade before finally moving with me to Palo Alto in 2020. Unfortunately it didn't survive that final move, for as soon after I loaded it up with my usual desk accessories one side sank down towards the floor…and it was apparently leaking oil?!
While working at home during the pandemic a desk was critical and they were in short supply. Besides, having traveled with me for so many years, of course I was going to fix it. Here's how I did it:
Background & Investigation
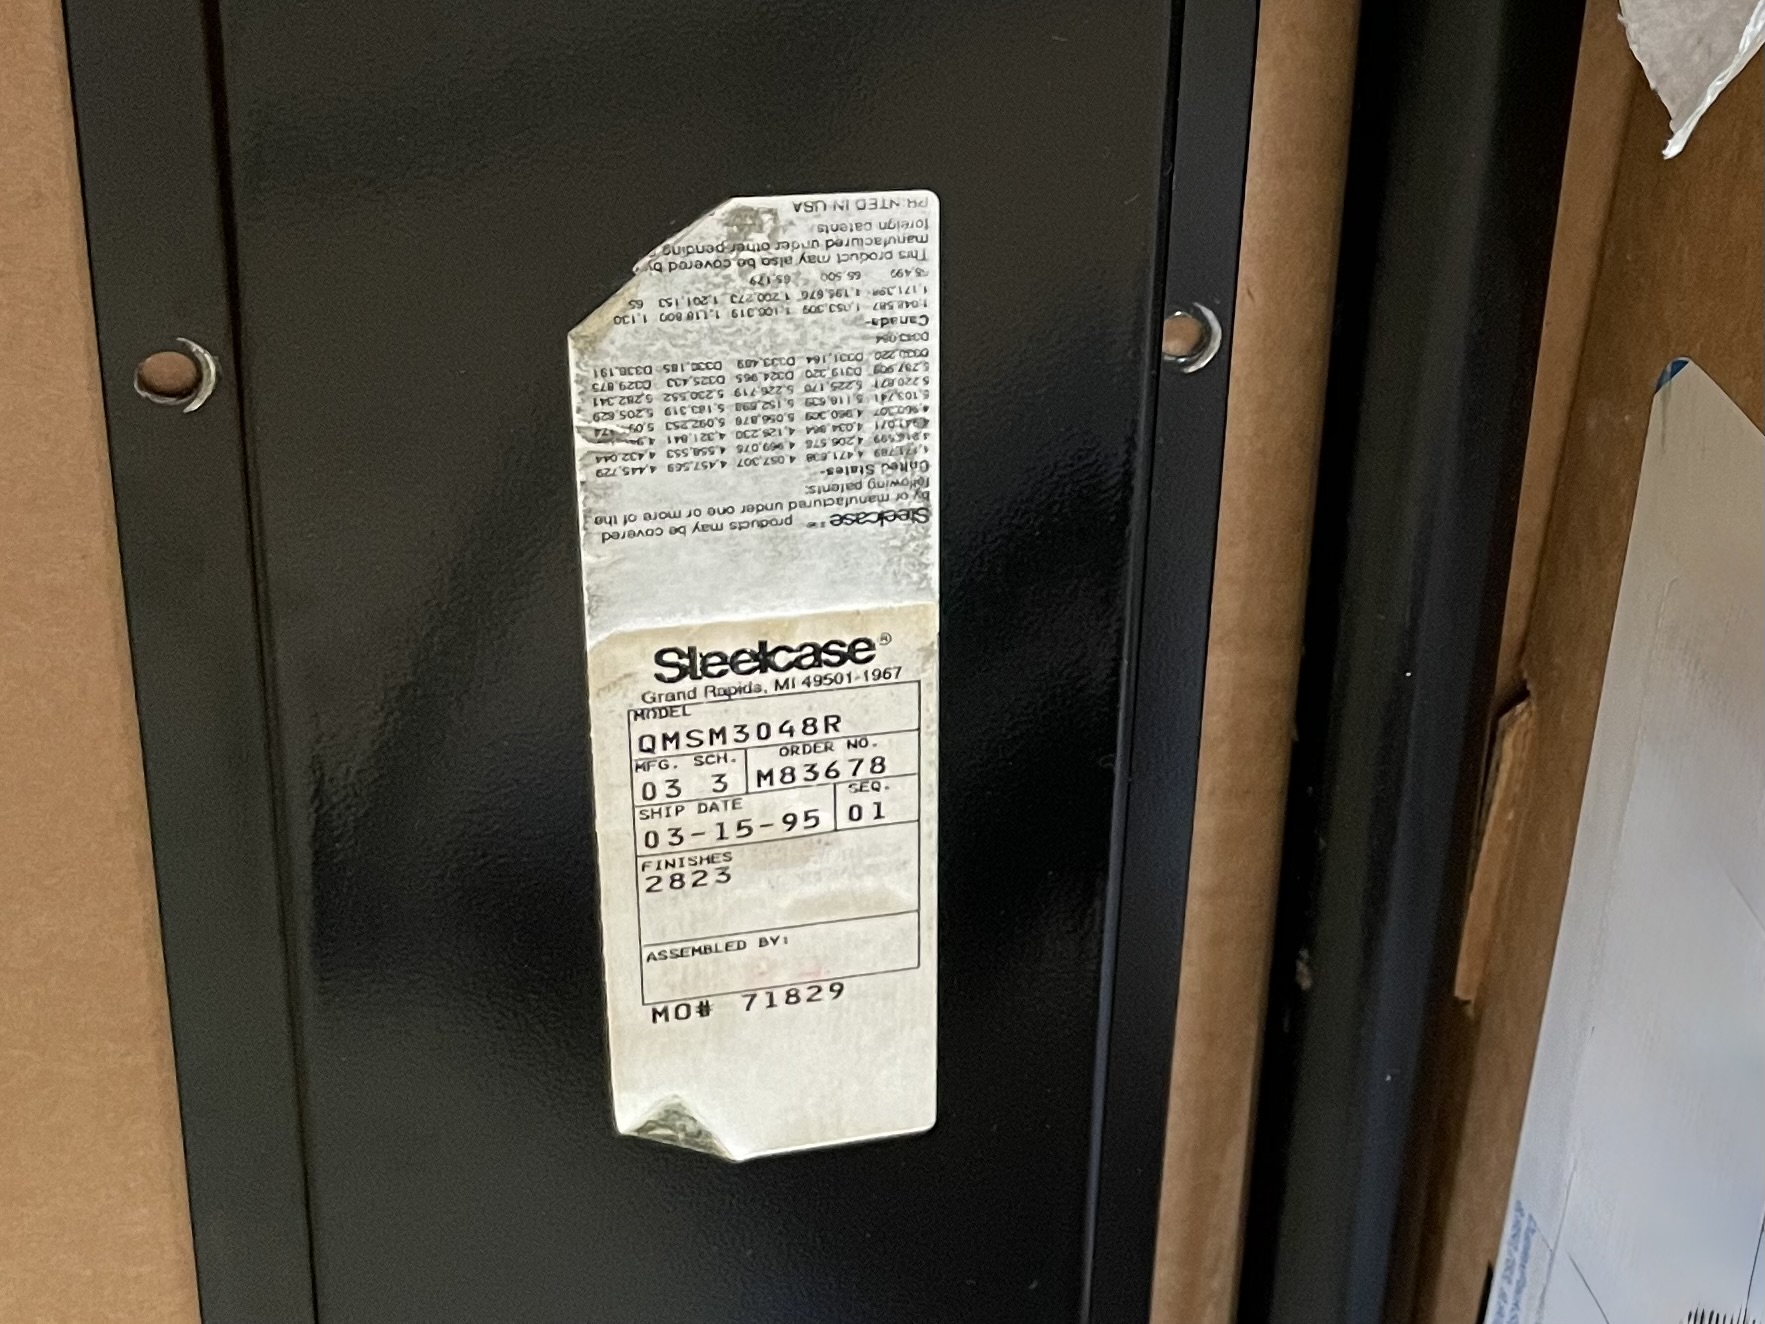
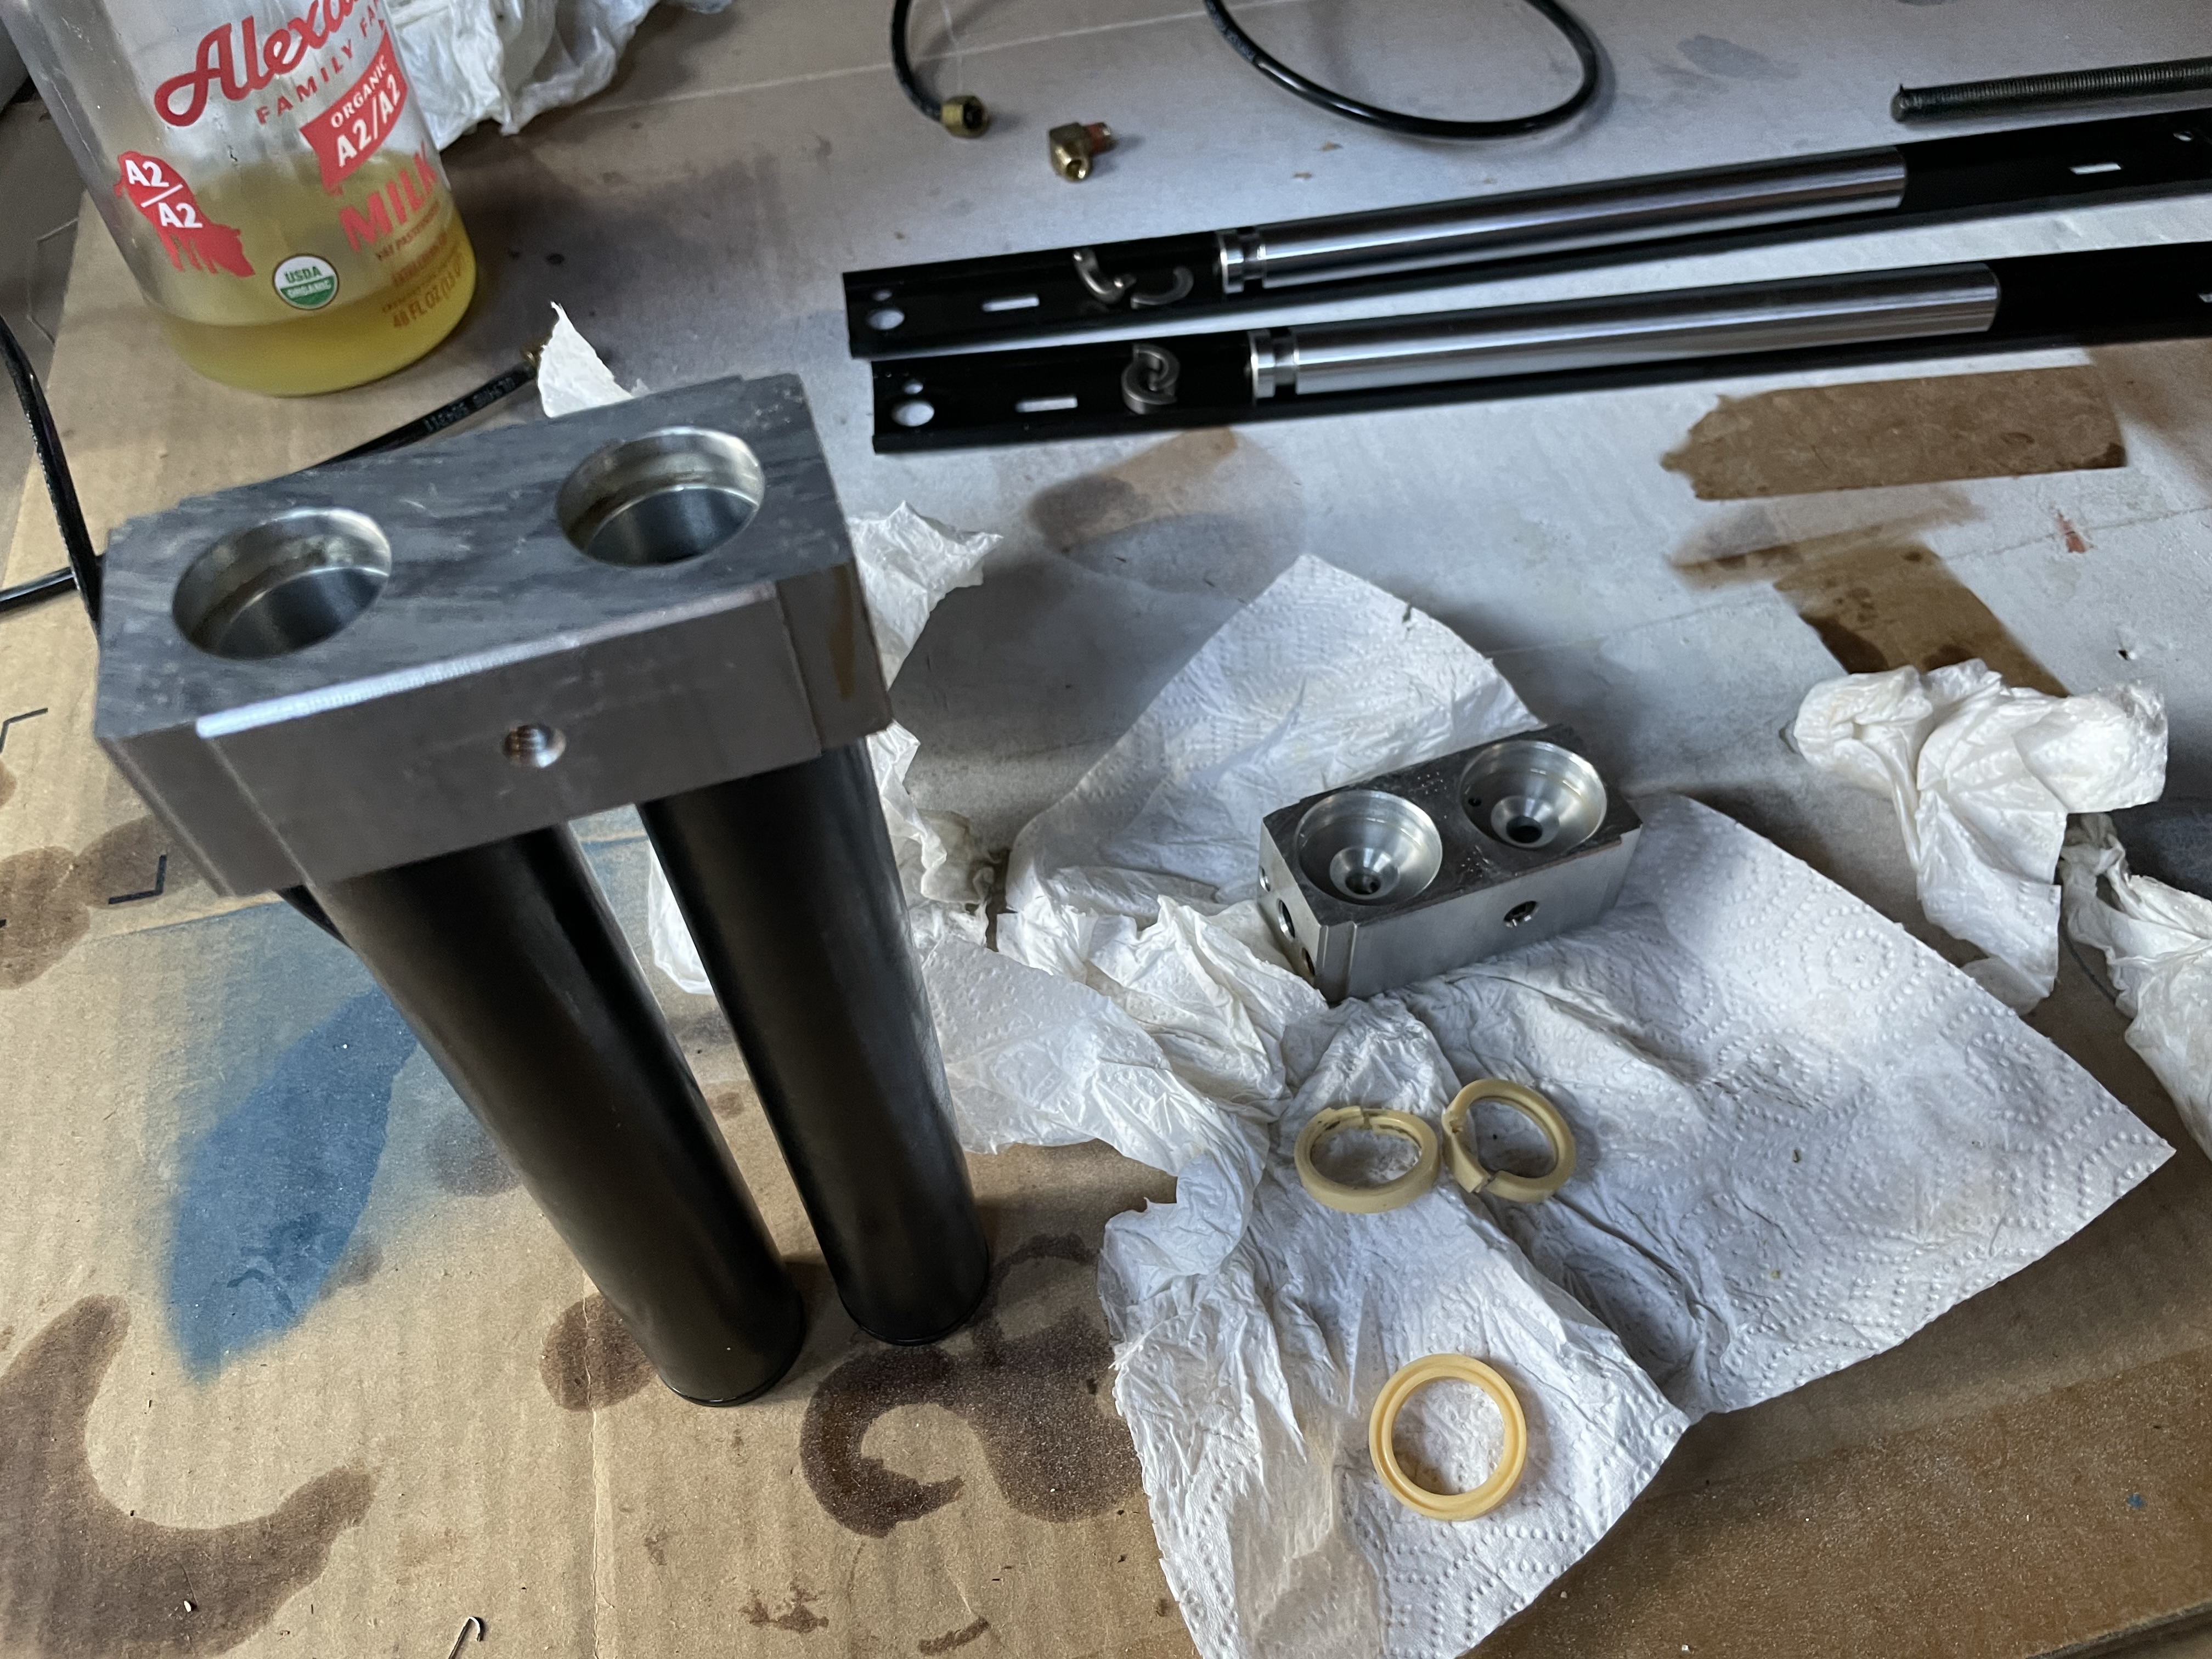
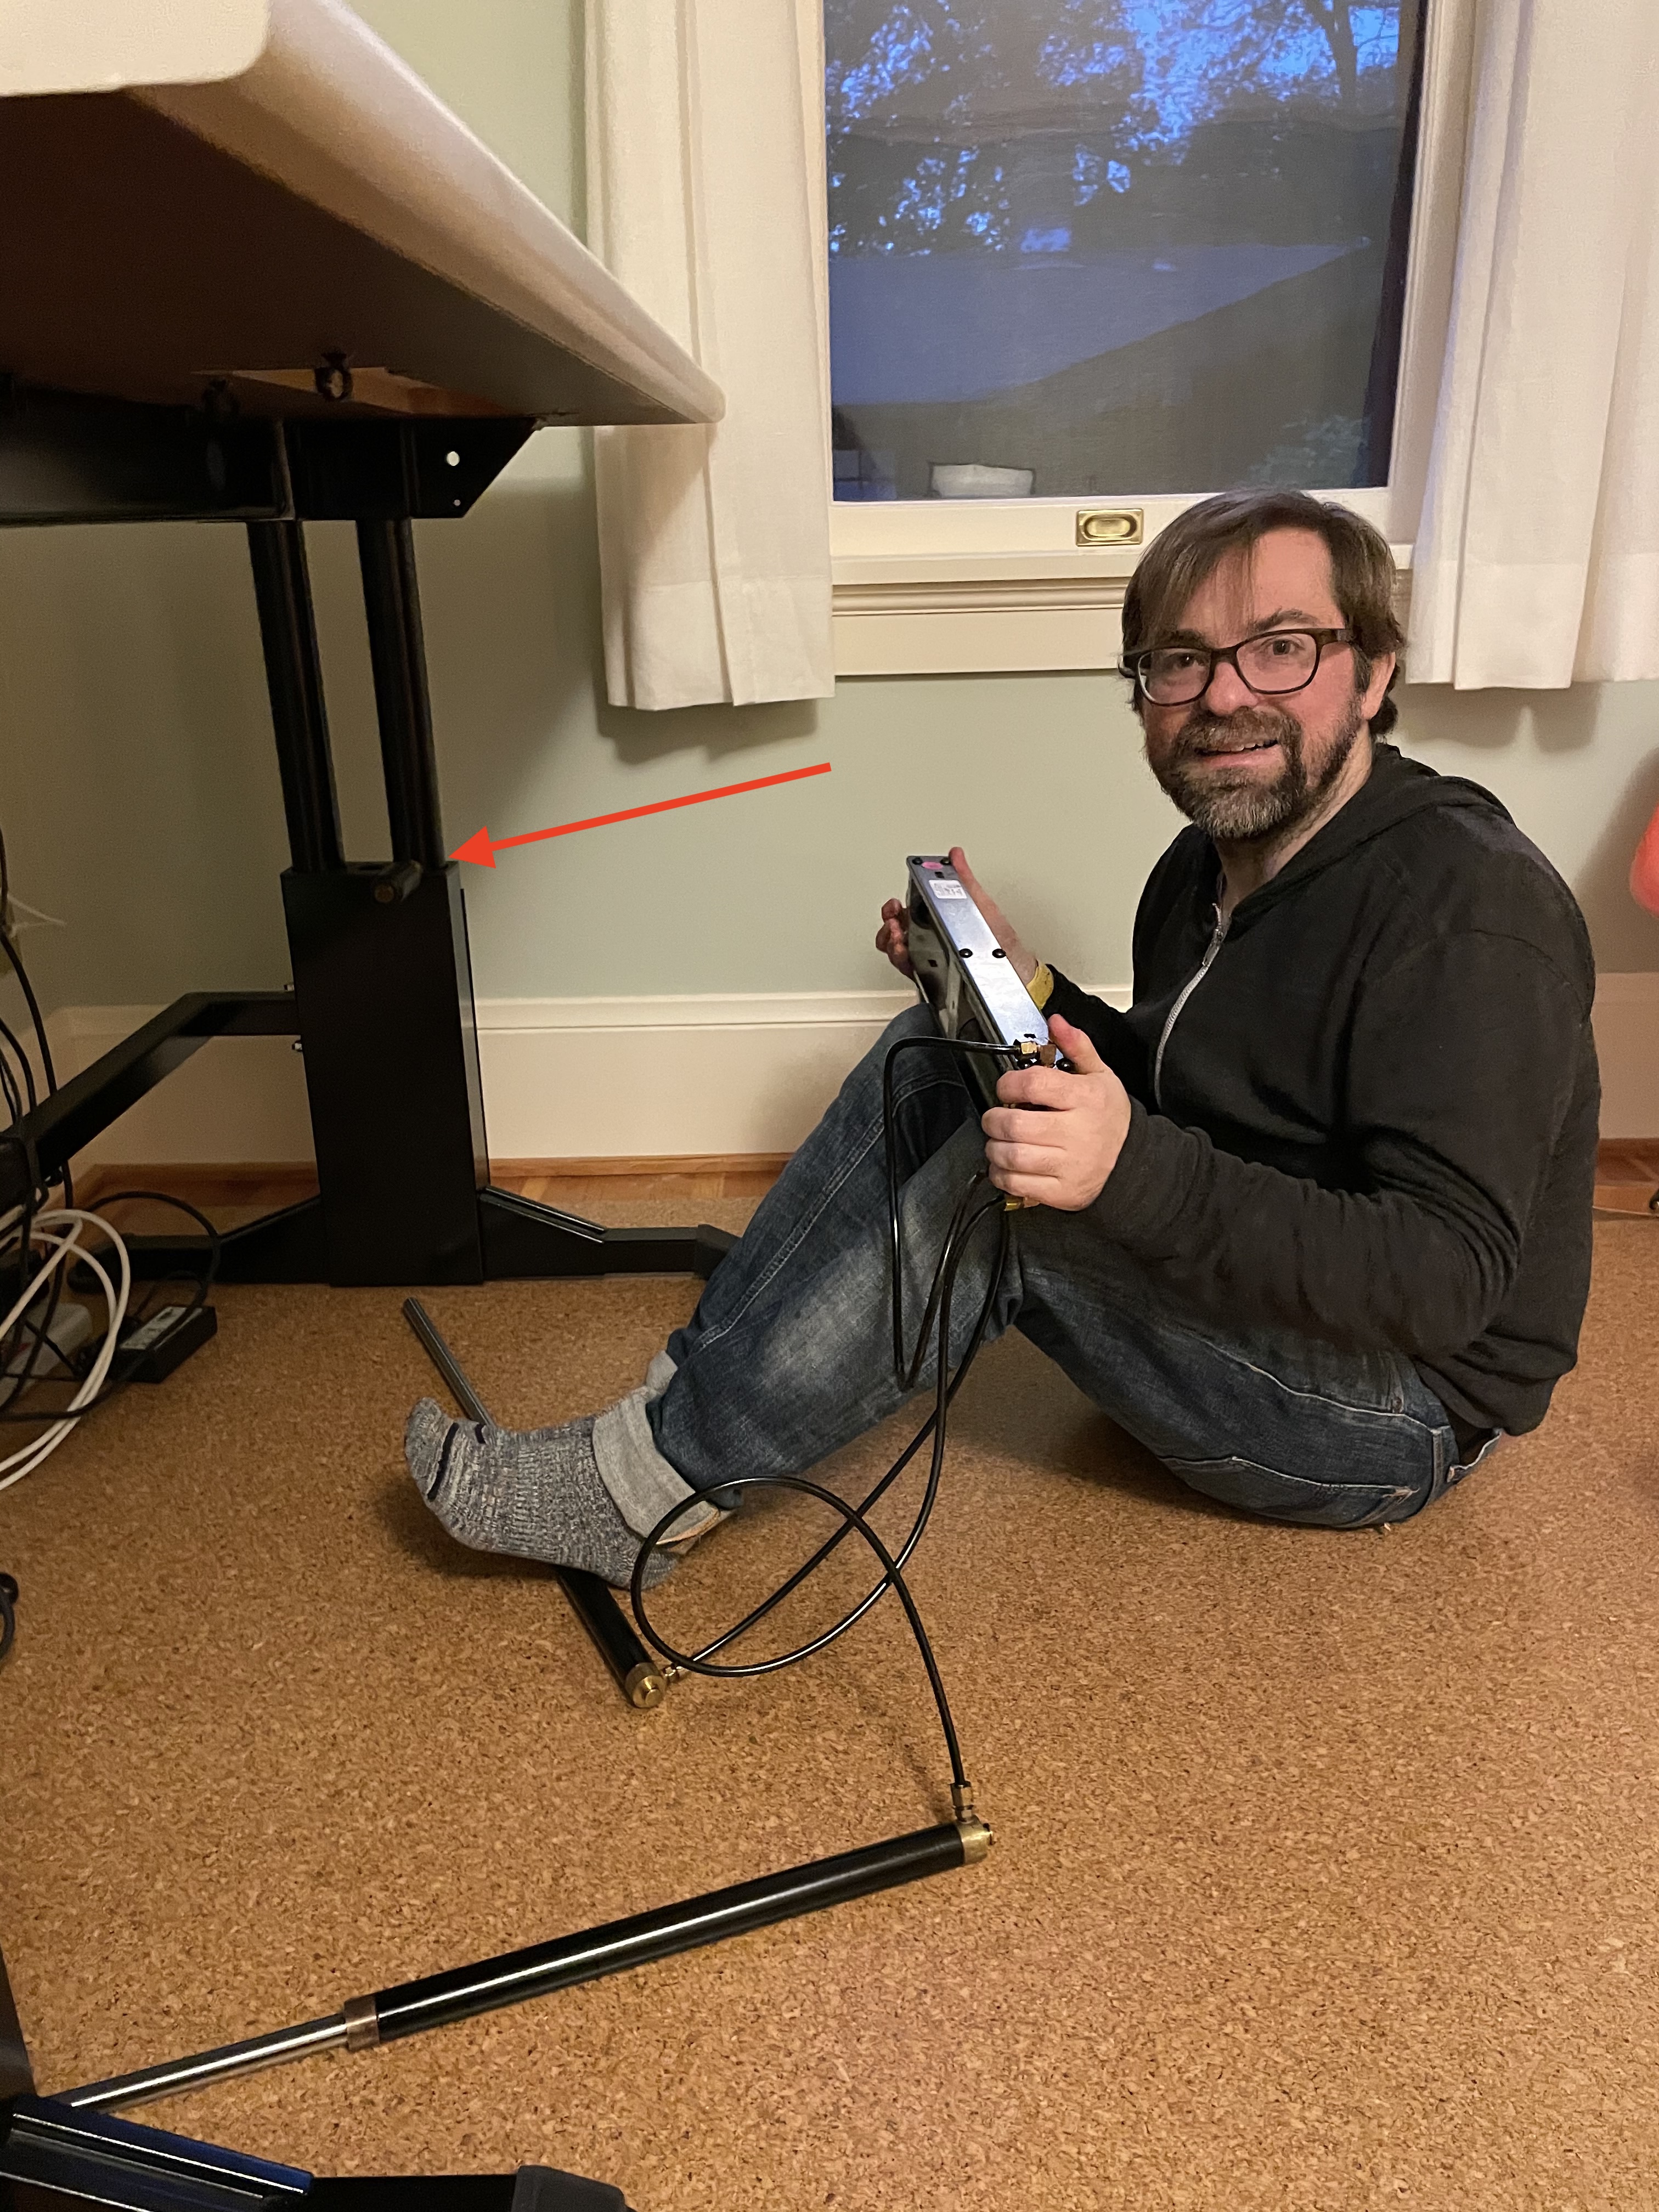
The desk uses a hydraulic lift system that consists of a hand-cranked pump unit that contains two pistons directly coupled to hydraulic rams in the leg assemblies, which is what needed repair. At first I didn't have much to go on other than a model number sticker on the bottom of the desk. I emailed Steelcase with reference to QMSM3048R but didn't get any answer back. After some exploratory disassembly (later I discovered that I took it apart in the wrong order), I discovered a Monach Hydraulics "Dyna-Lift" sticker on the side of the pump unit. Some internet searching led me to discover that Monarch Hydraulics is now part of Bucher Hydraulics, which still produces the Dyna-Lift product line! One more email. The team was extremely kind and helpful—even locating the folks that worked on this contract-manufacturing run decades ago—but they simply didn't have the technical or repair information anymore which I needed to source the correct parts and instructions for repair.

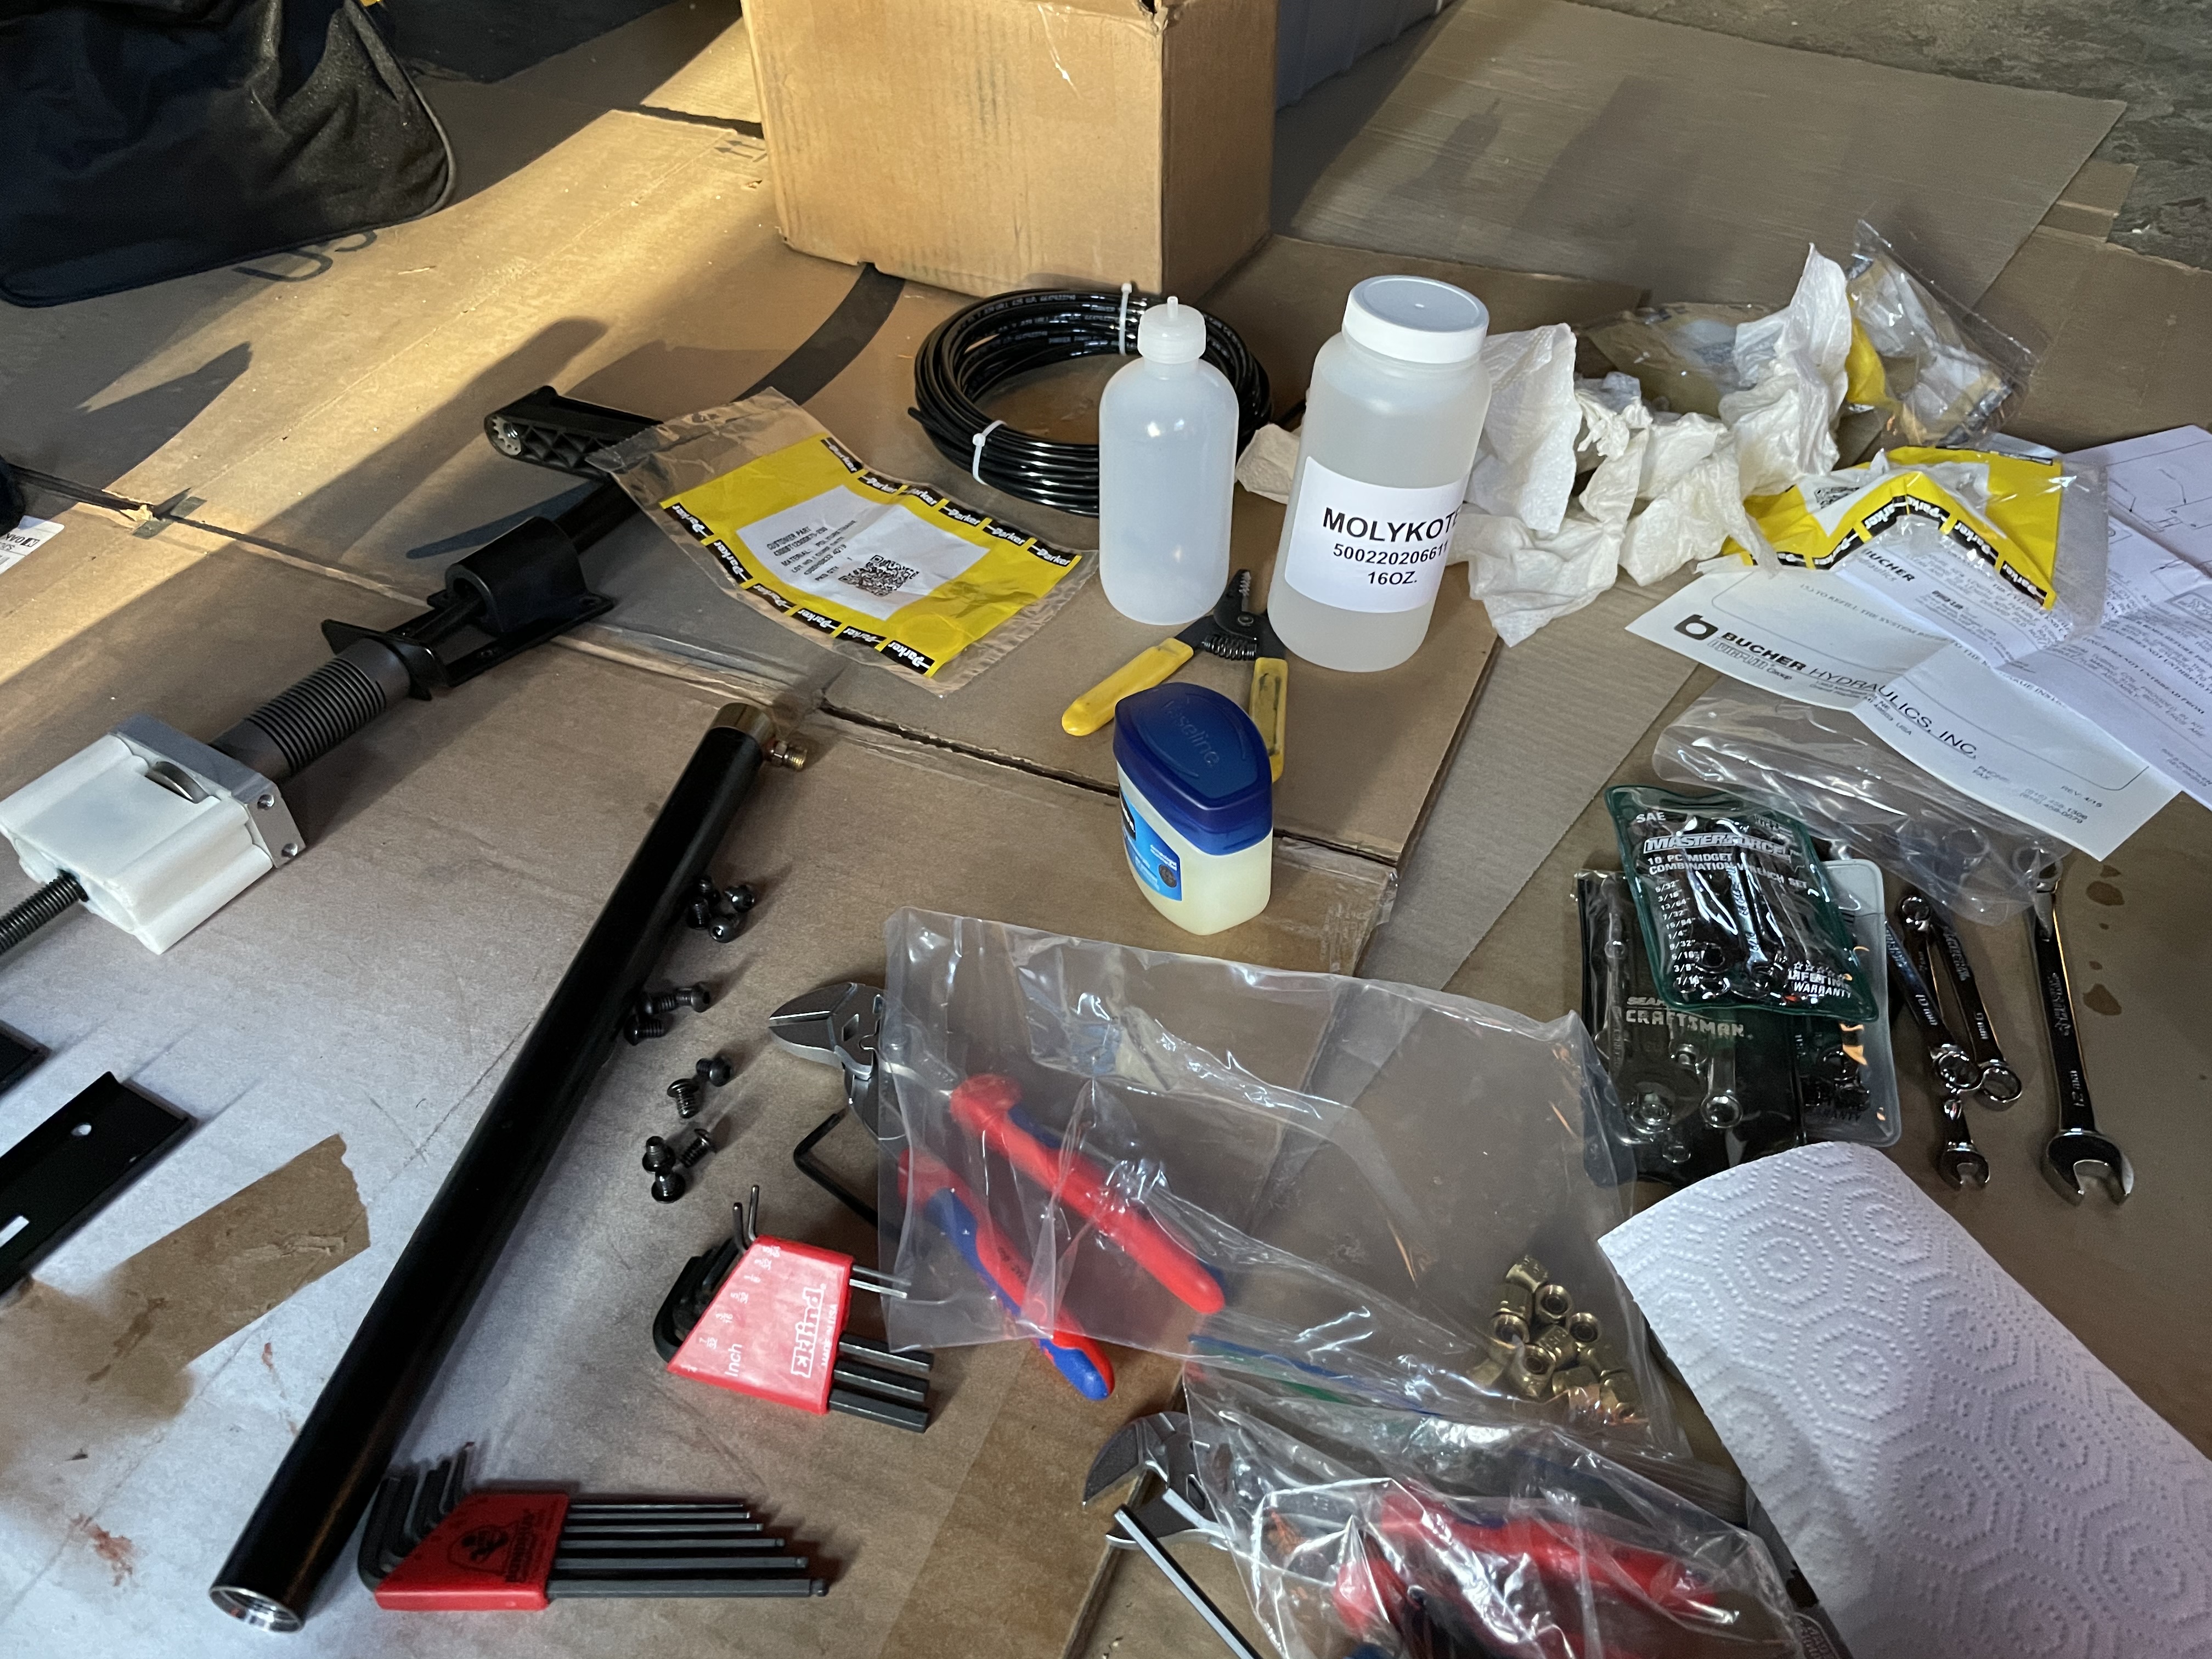
Without much to confirm either way, I had to simply hope that the design of the system hadn't changed much and that the "custom" designed parts Steelcase were more-or-less the same as the commercially available Dyna-Lift systems still being sold today. I ordered a DH-16000 Recharge Kit and a DH-16101 Repacking Kit from Mason Dynamics, and was ready to make a mess with they hydraulic system rebuild.
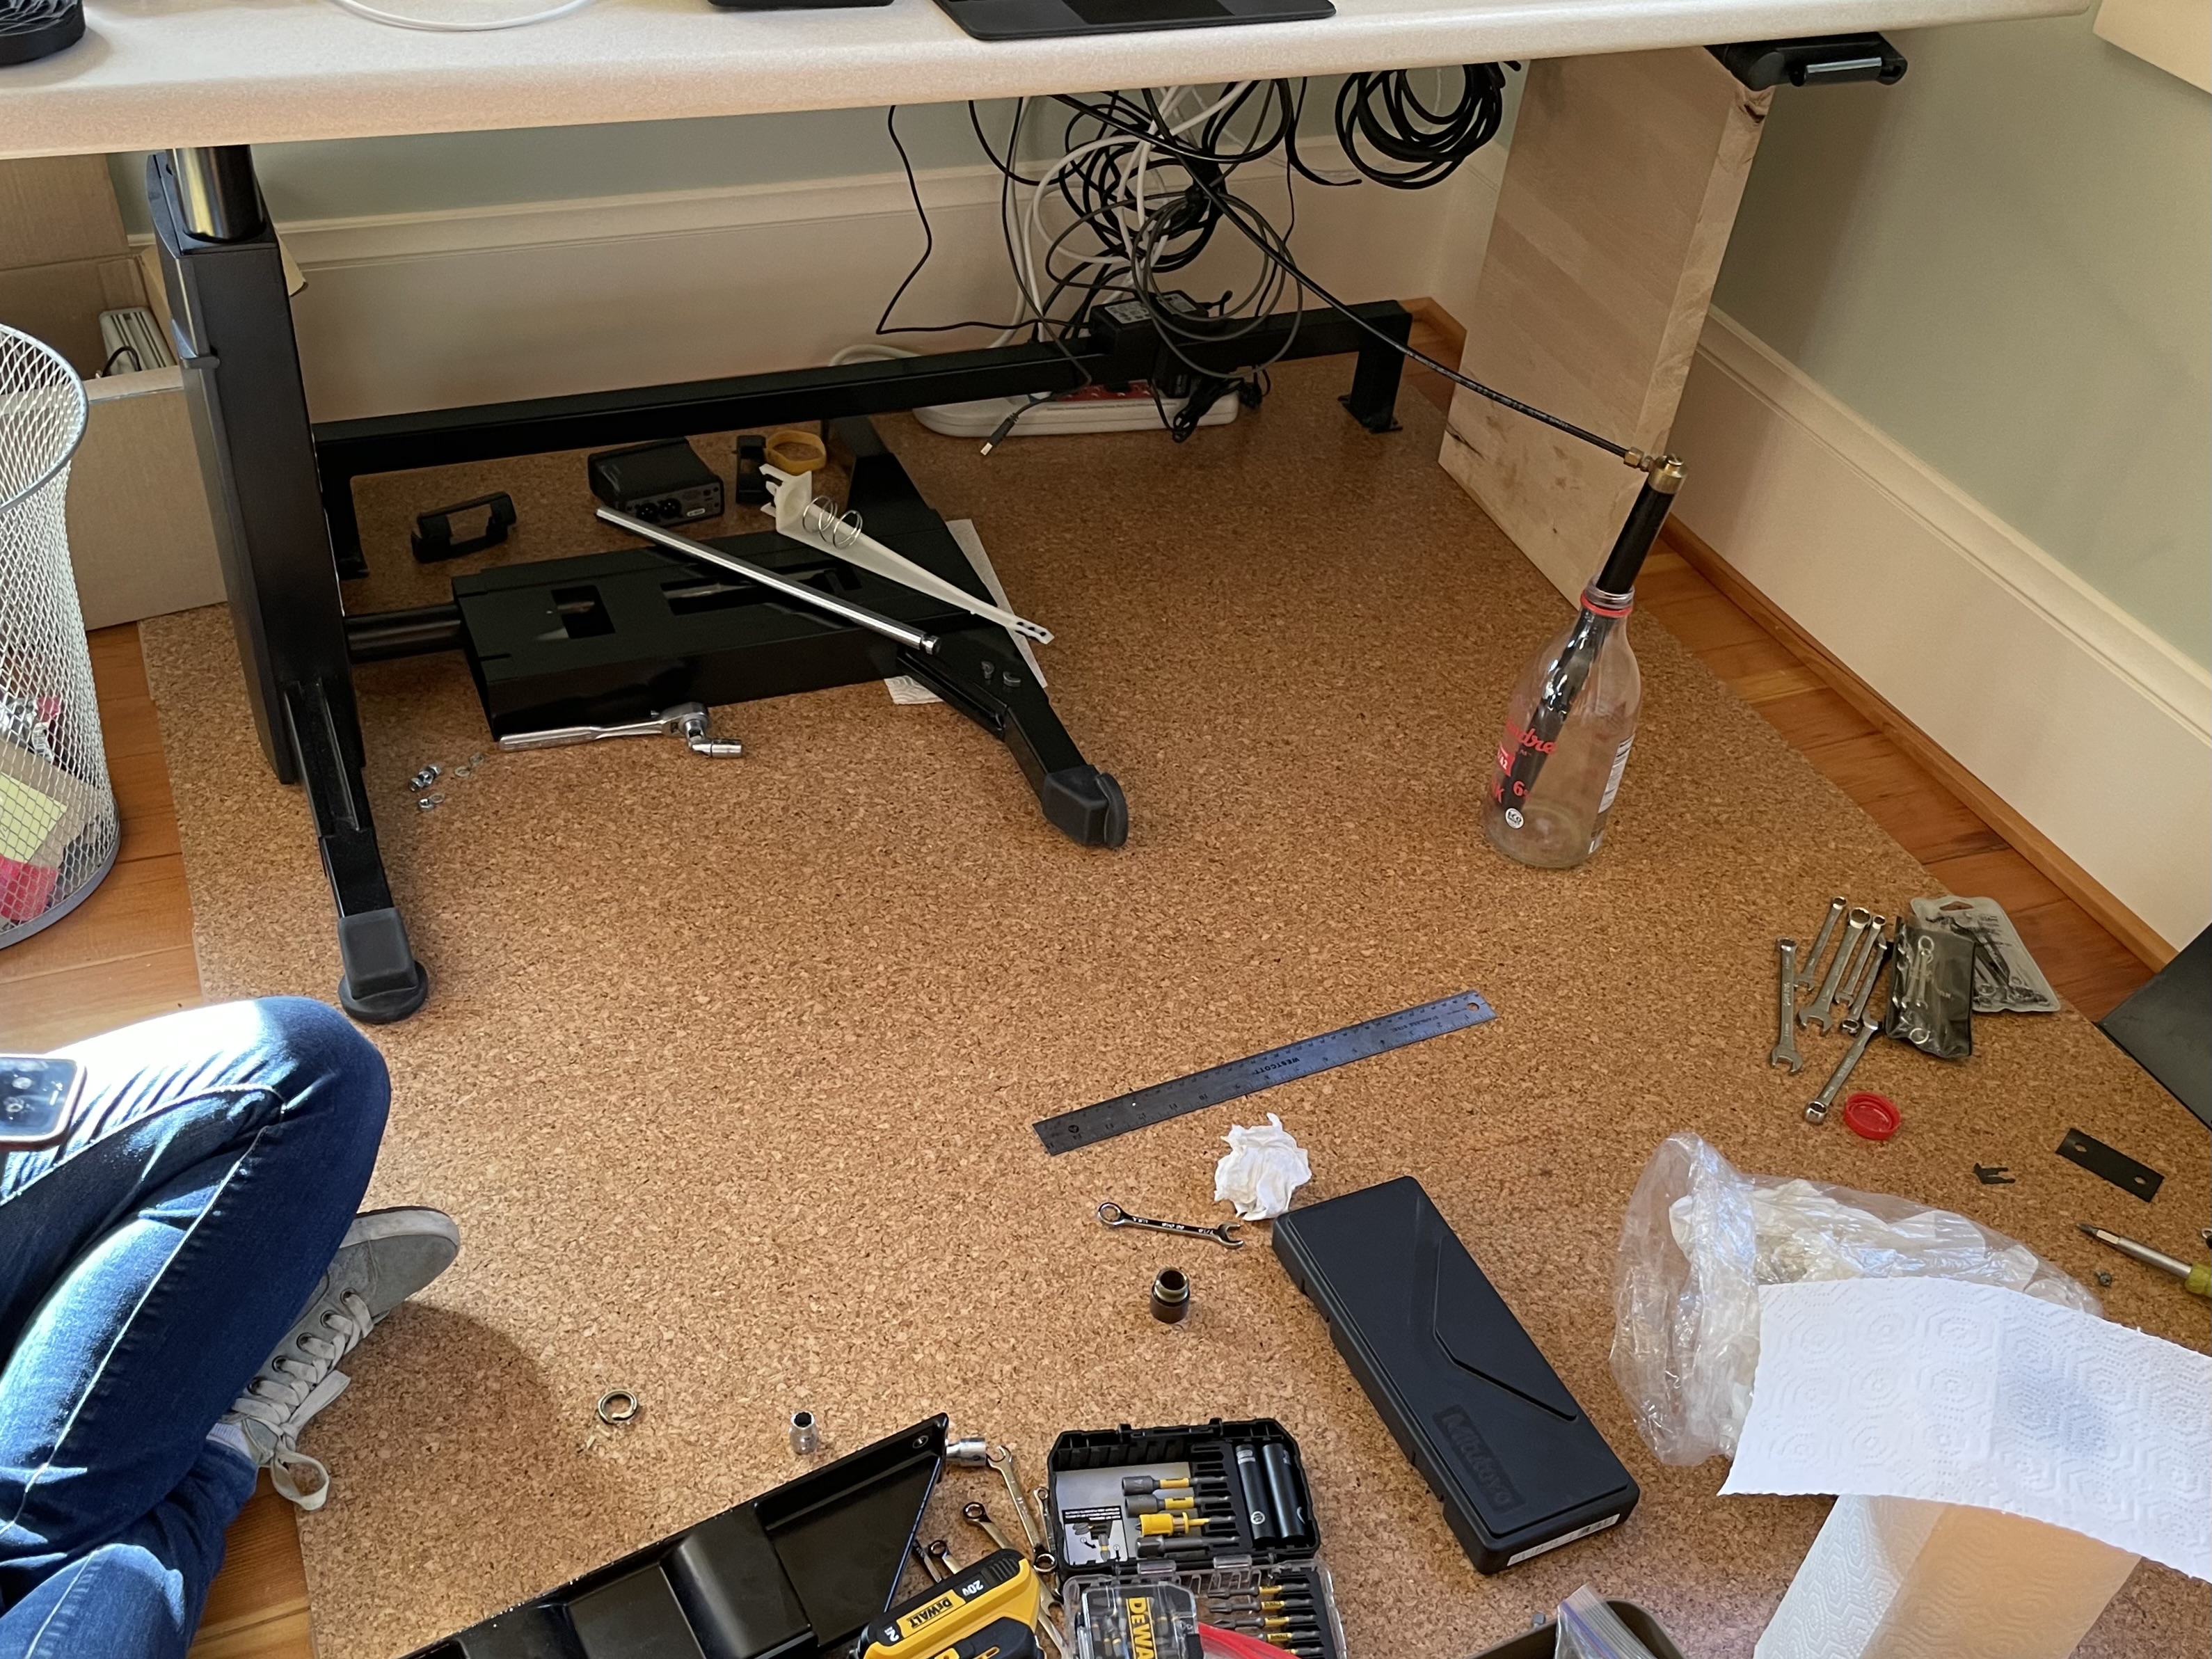
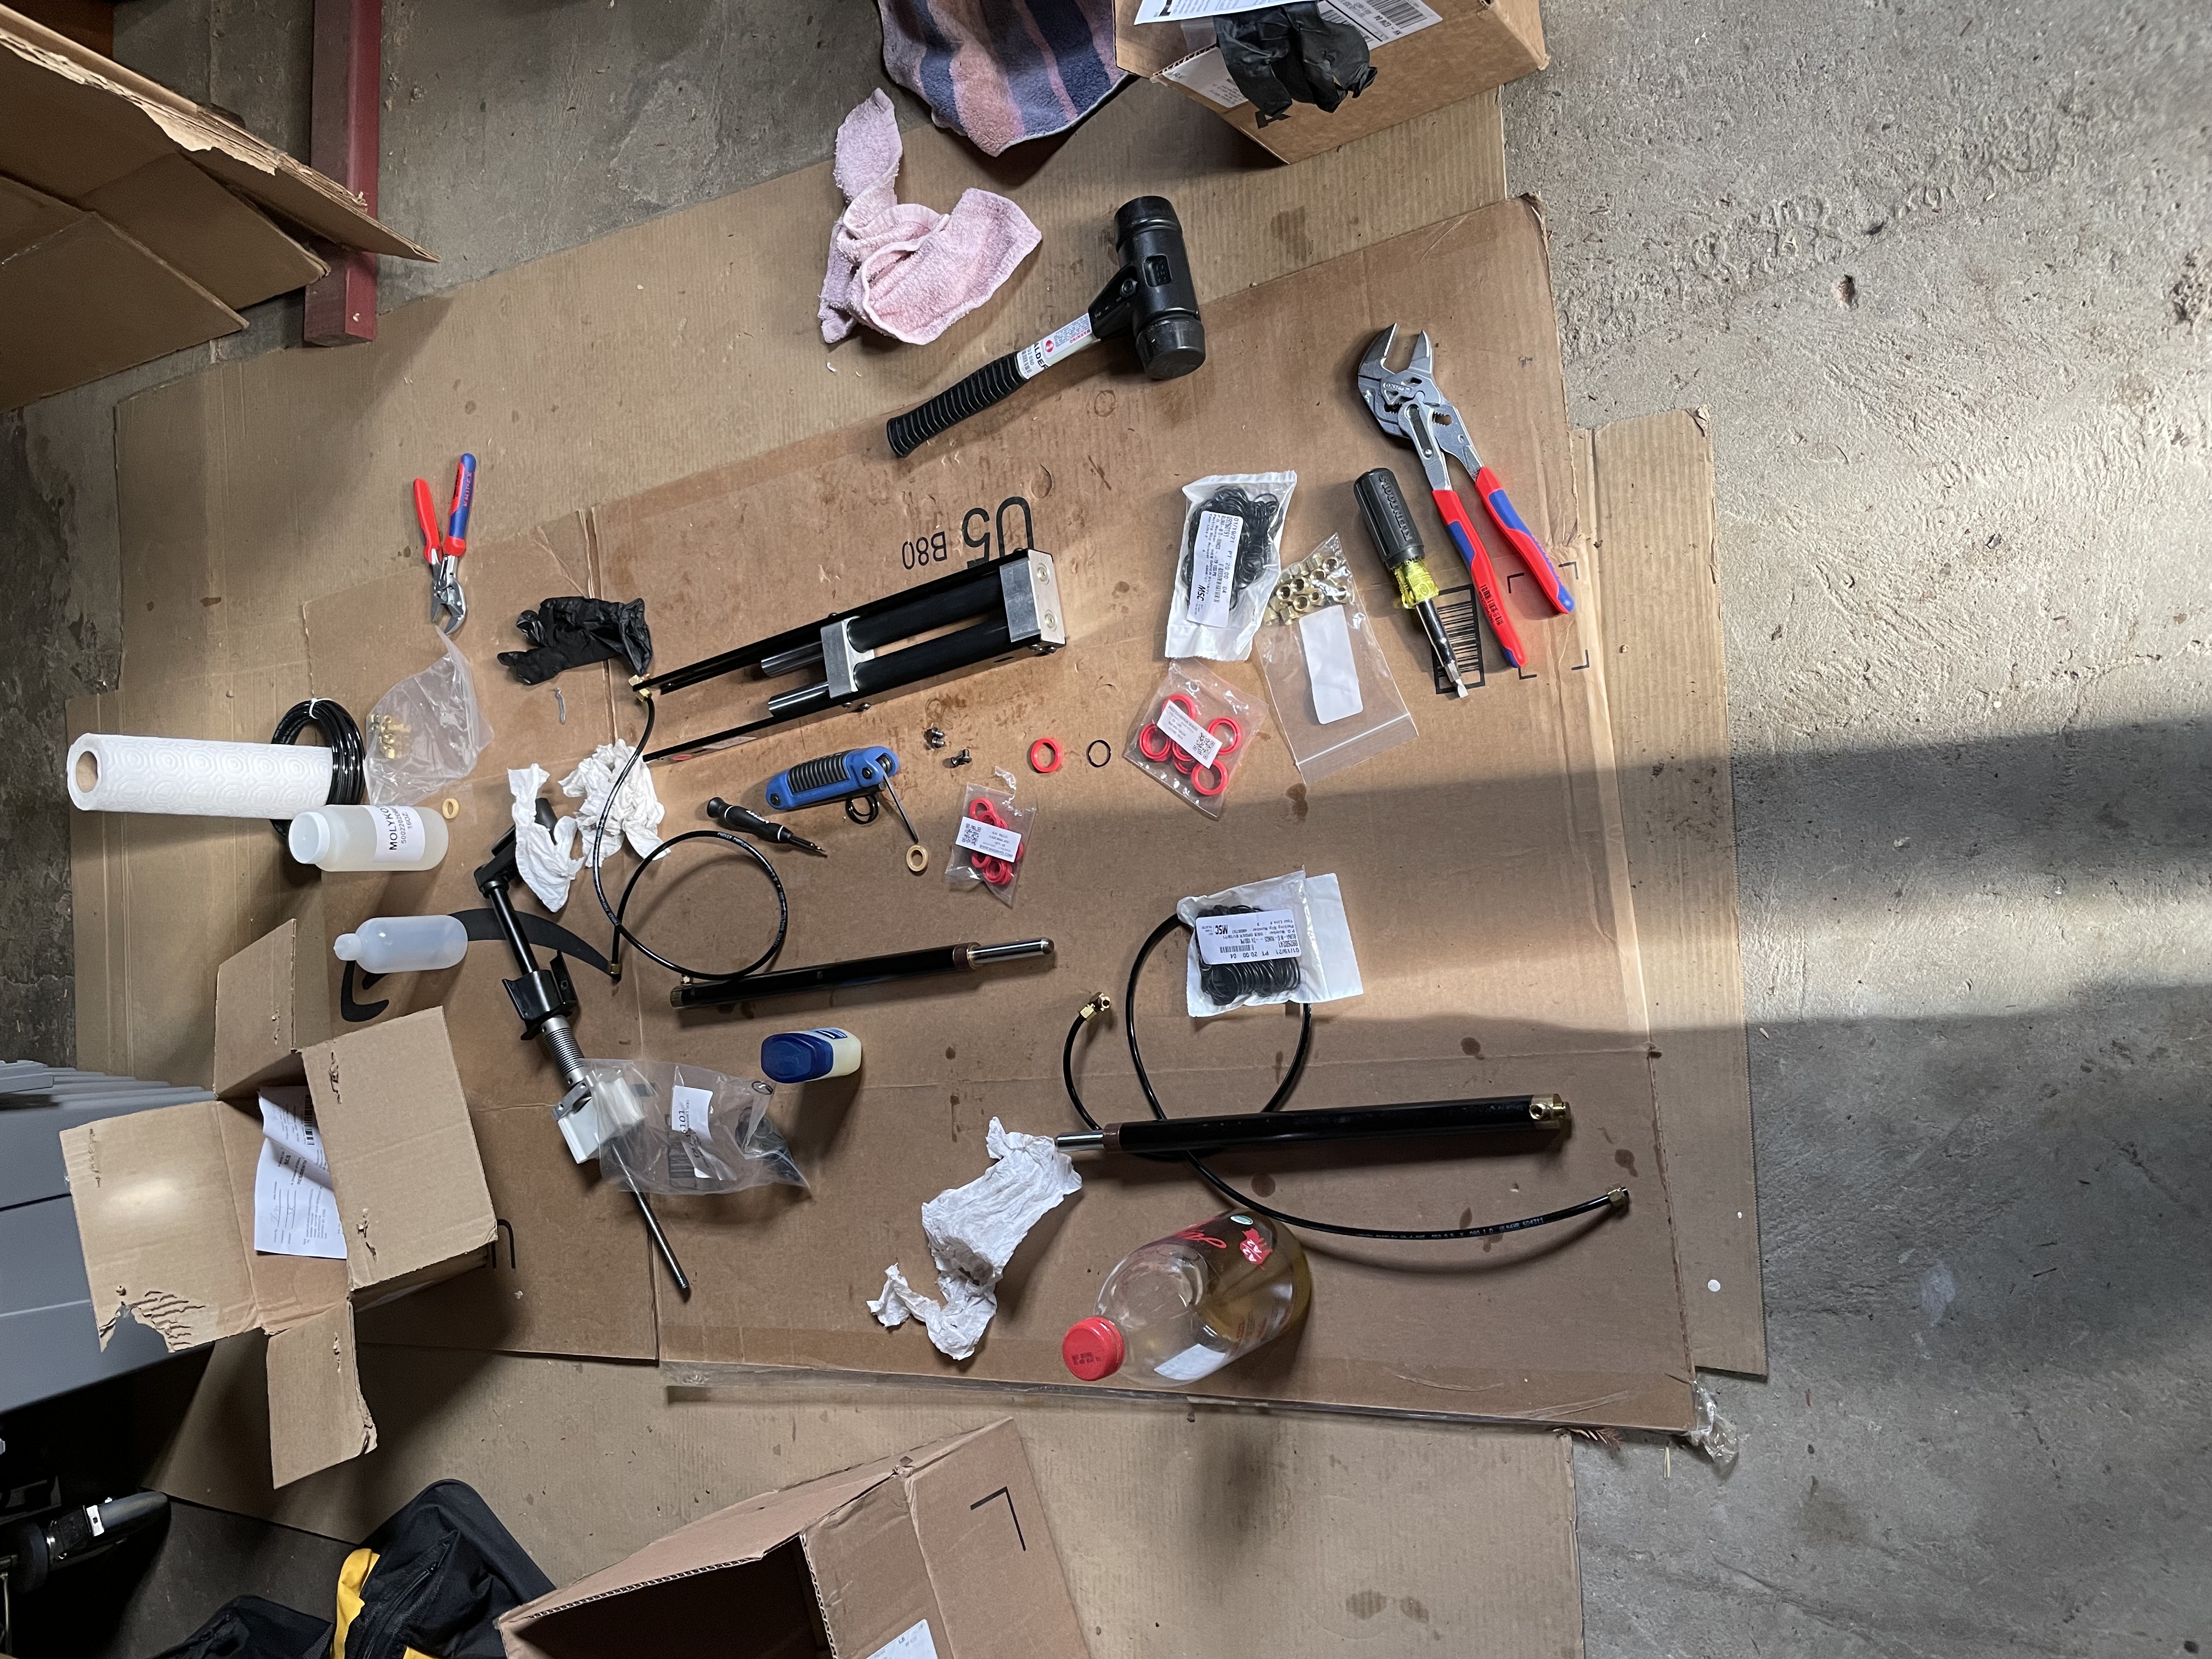
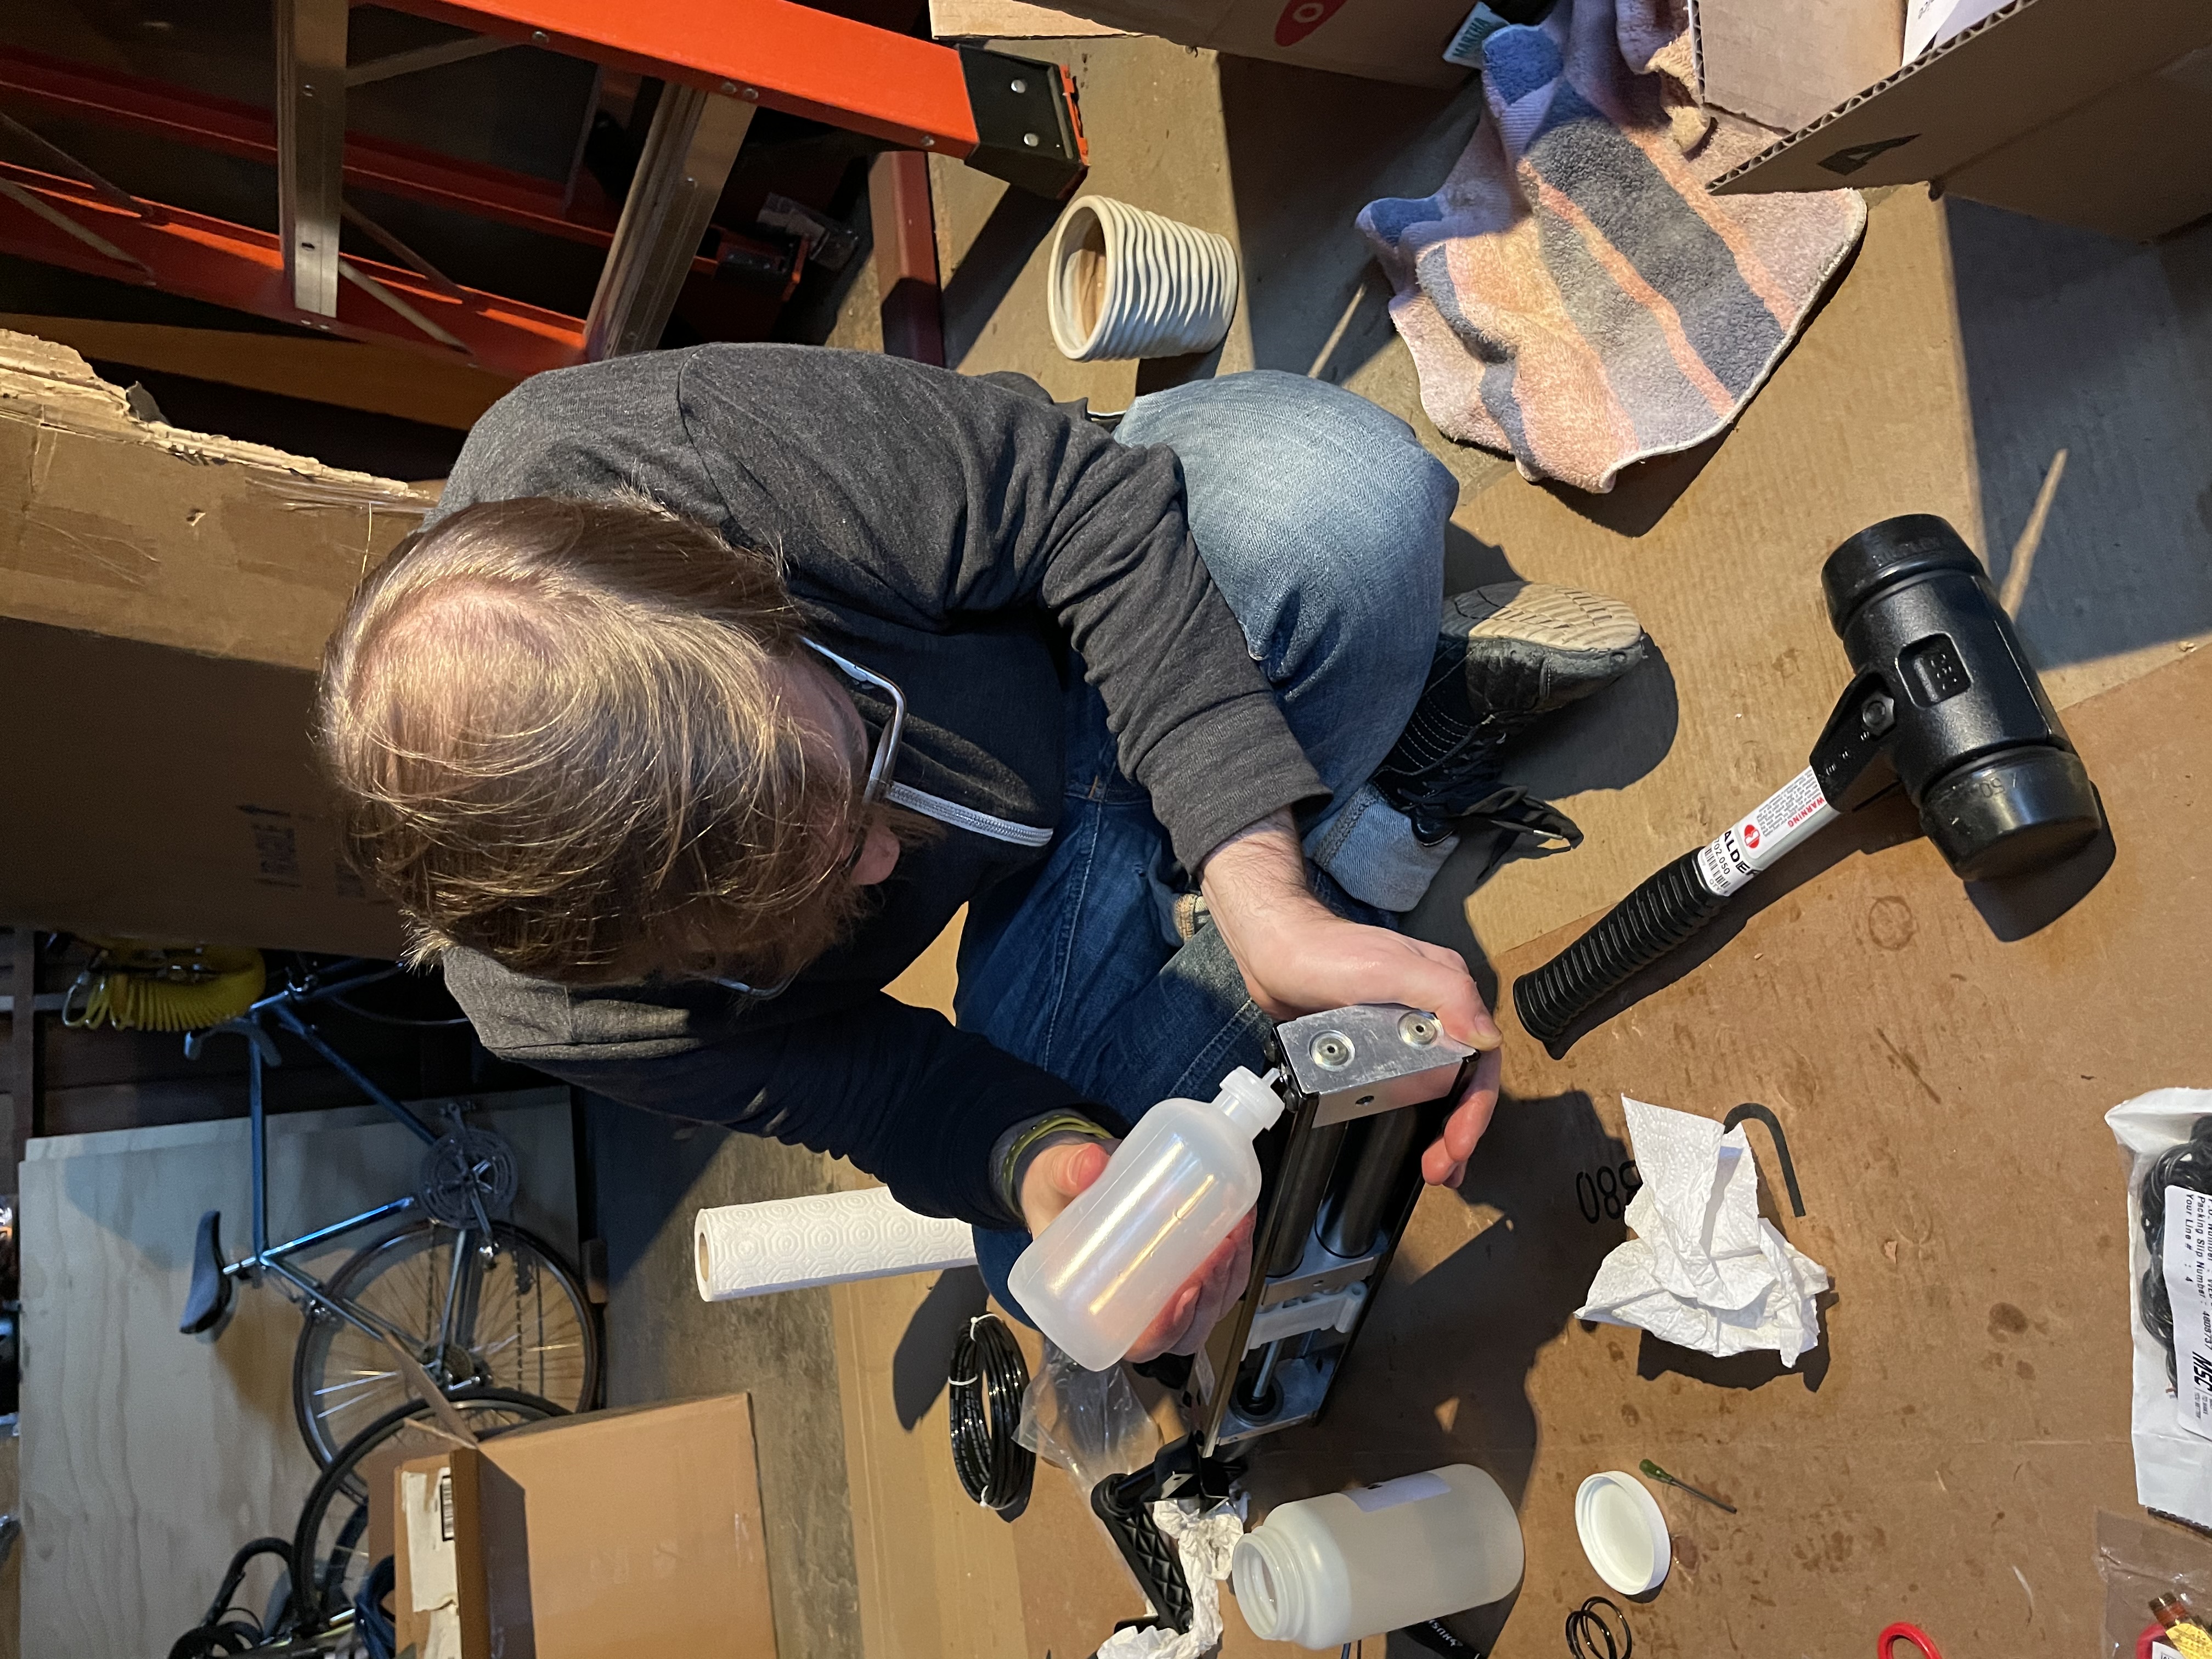
I was able to remove the complete hydraulic system from the desk, take everything out to the garage, and carefully start disassembly. The kit came with very helpful instructions for repacking and recharge (and I found some more related documents online), and thought I had a pretty good idea of what needed to be done. I found this part fascinating, having never worked on a hydraulic system before. Unfortunately, the parts that came in the kit just weren't the right size for the system I had in pieces in front of me.
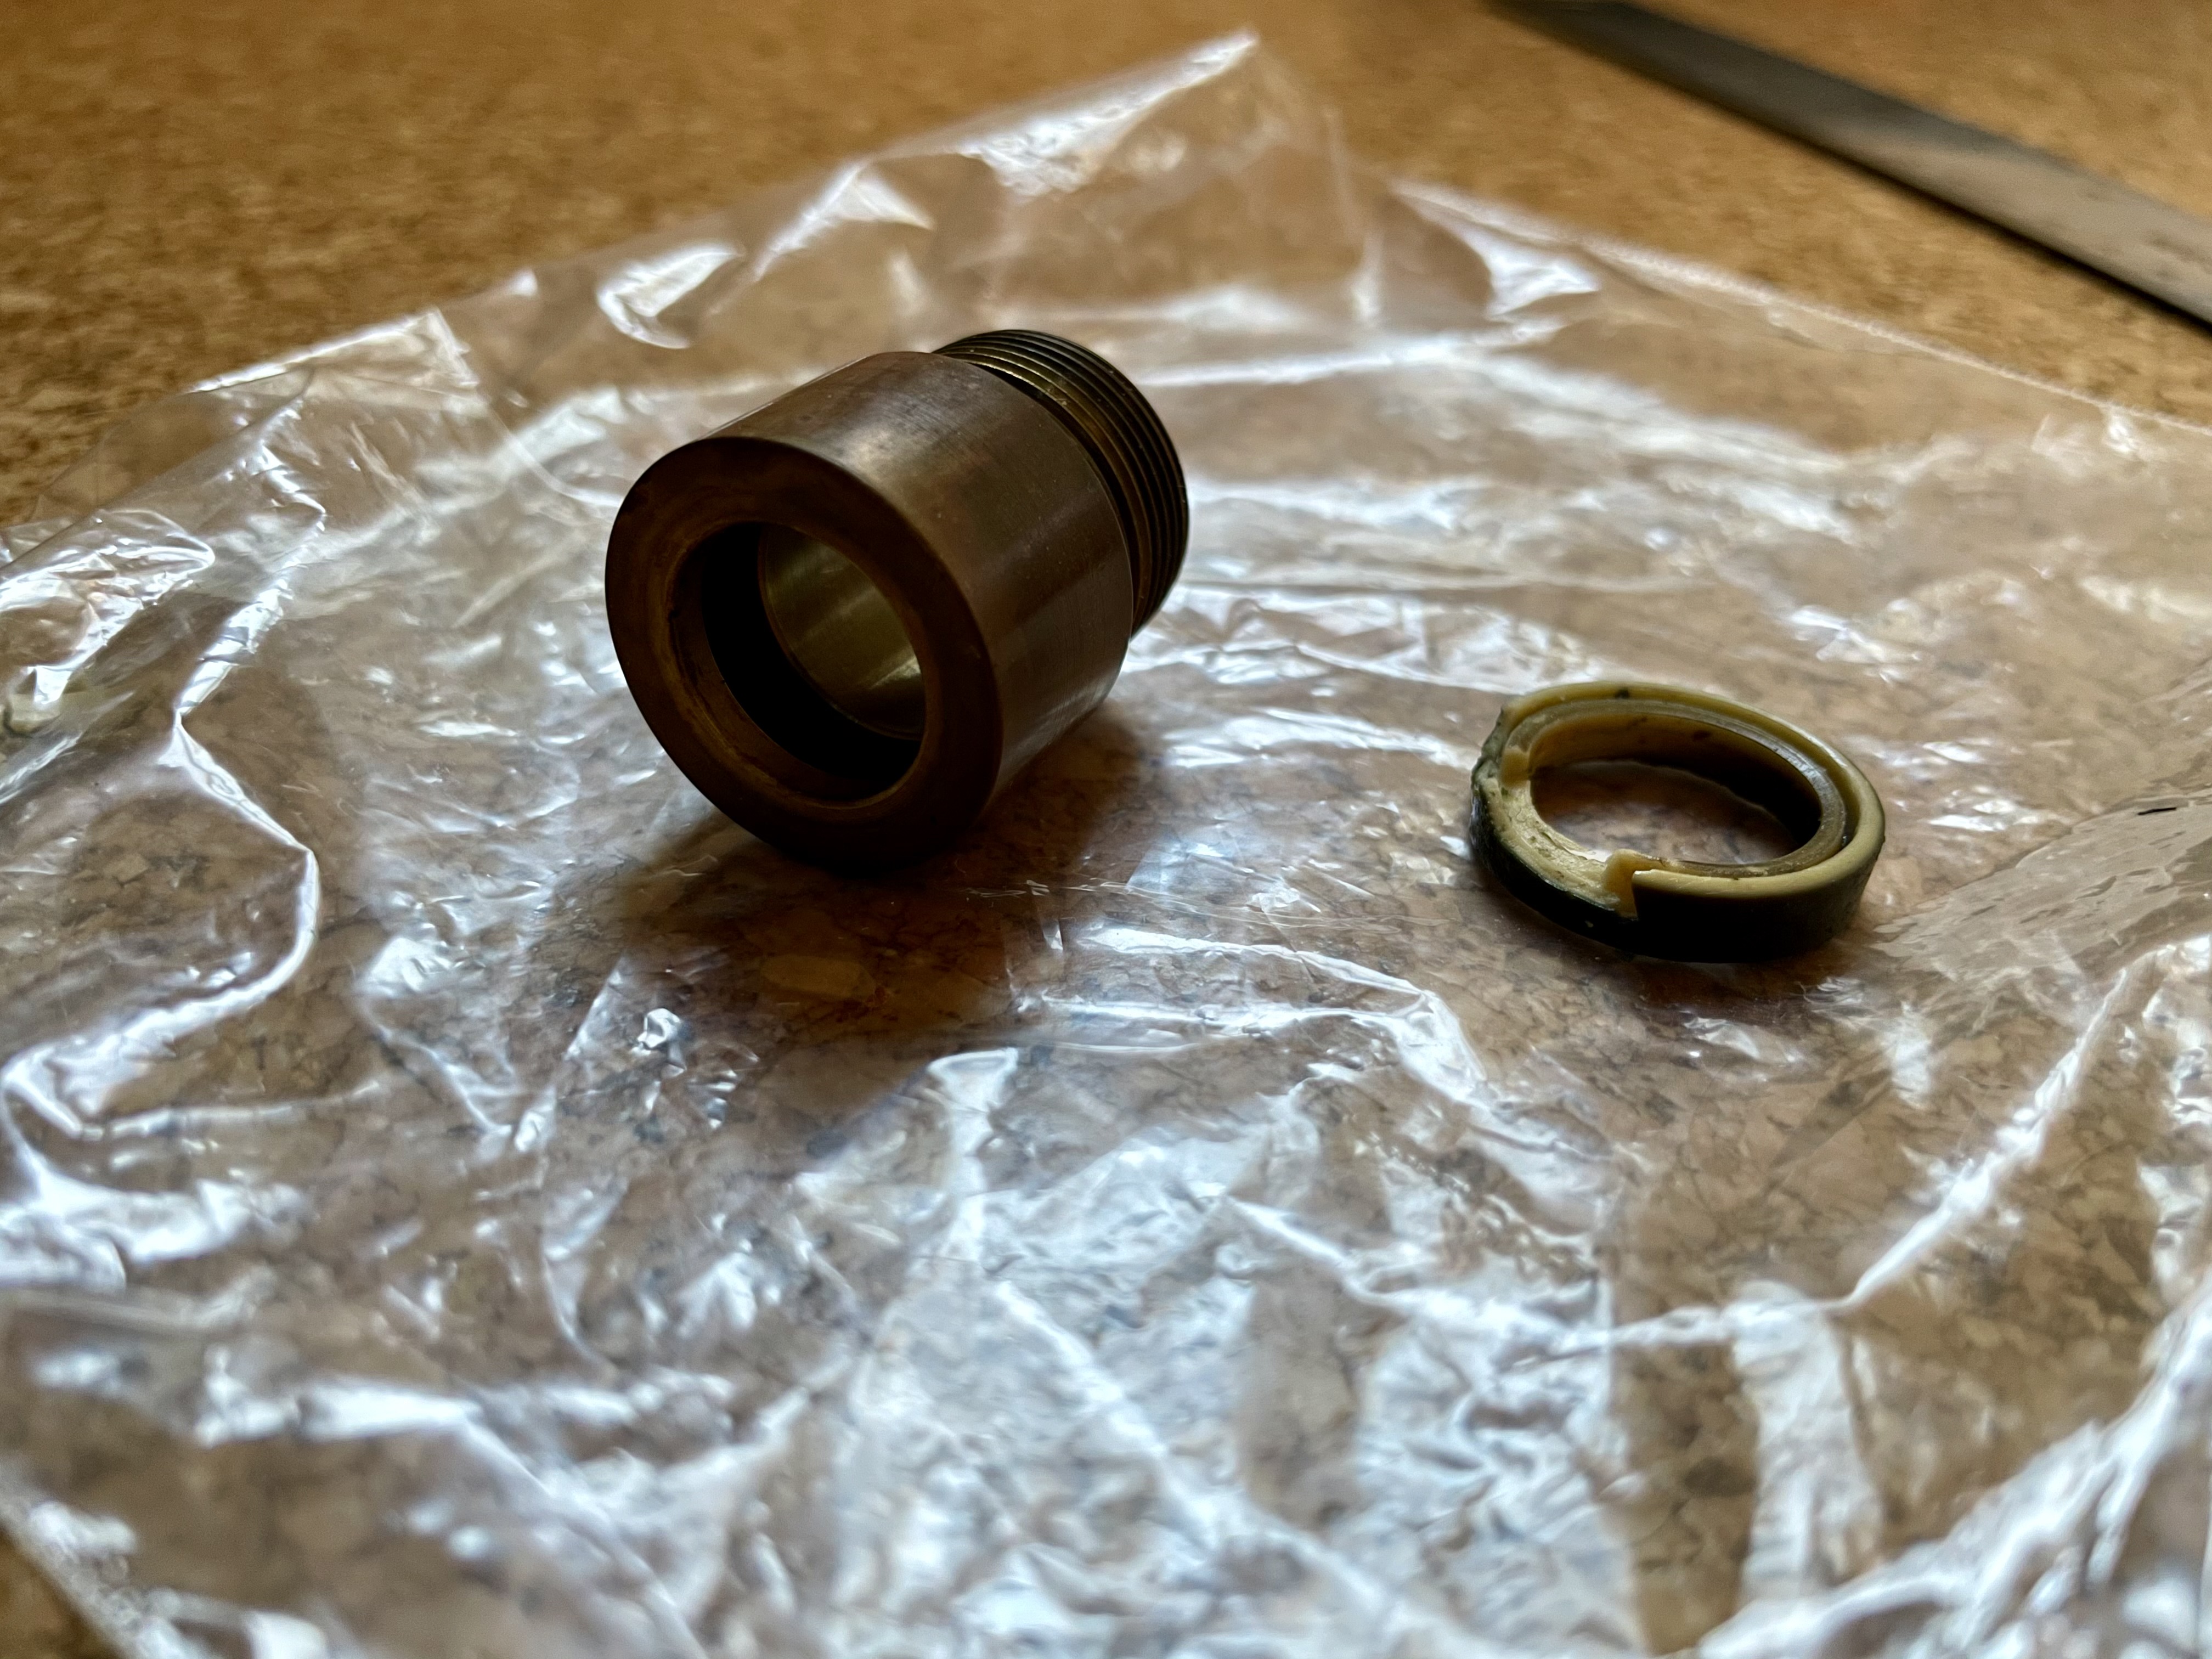
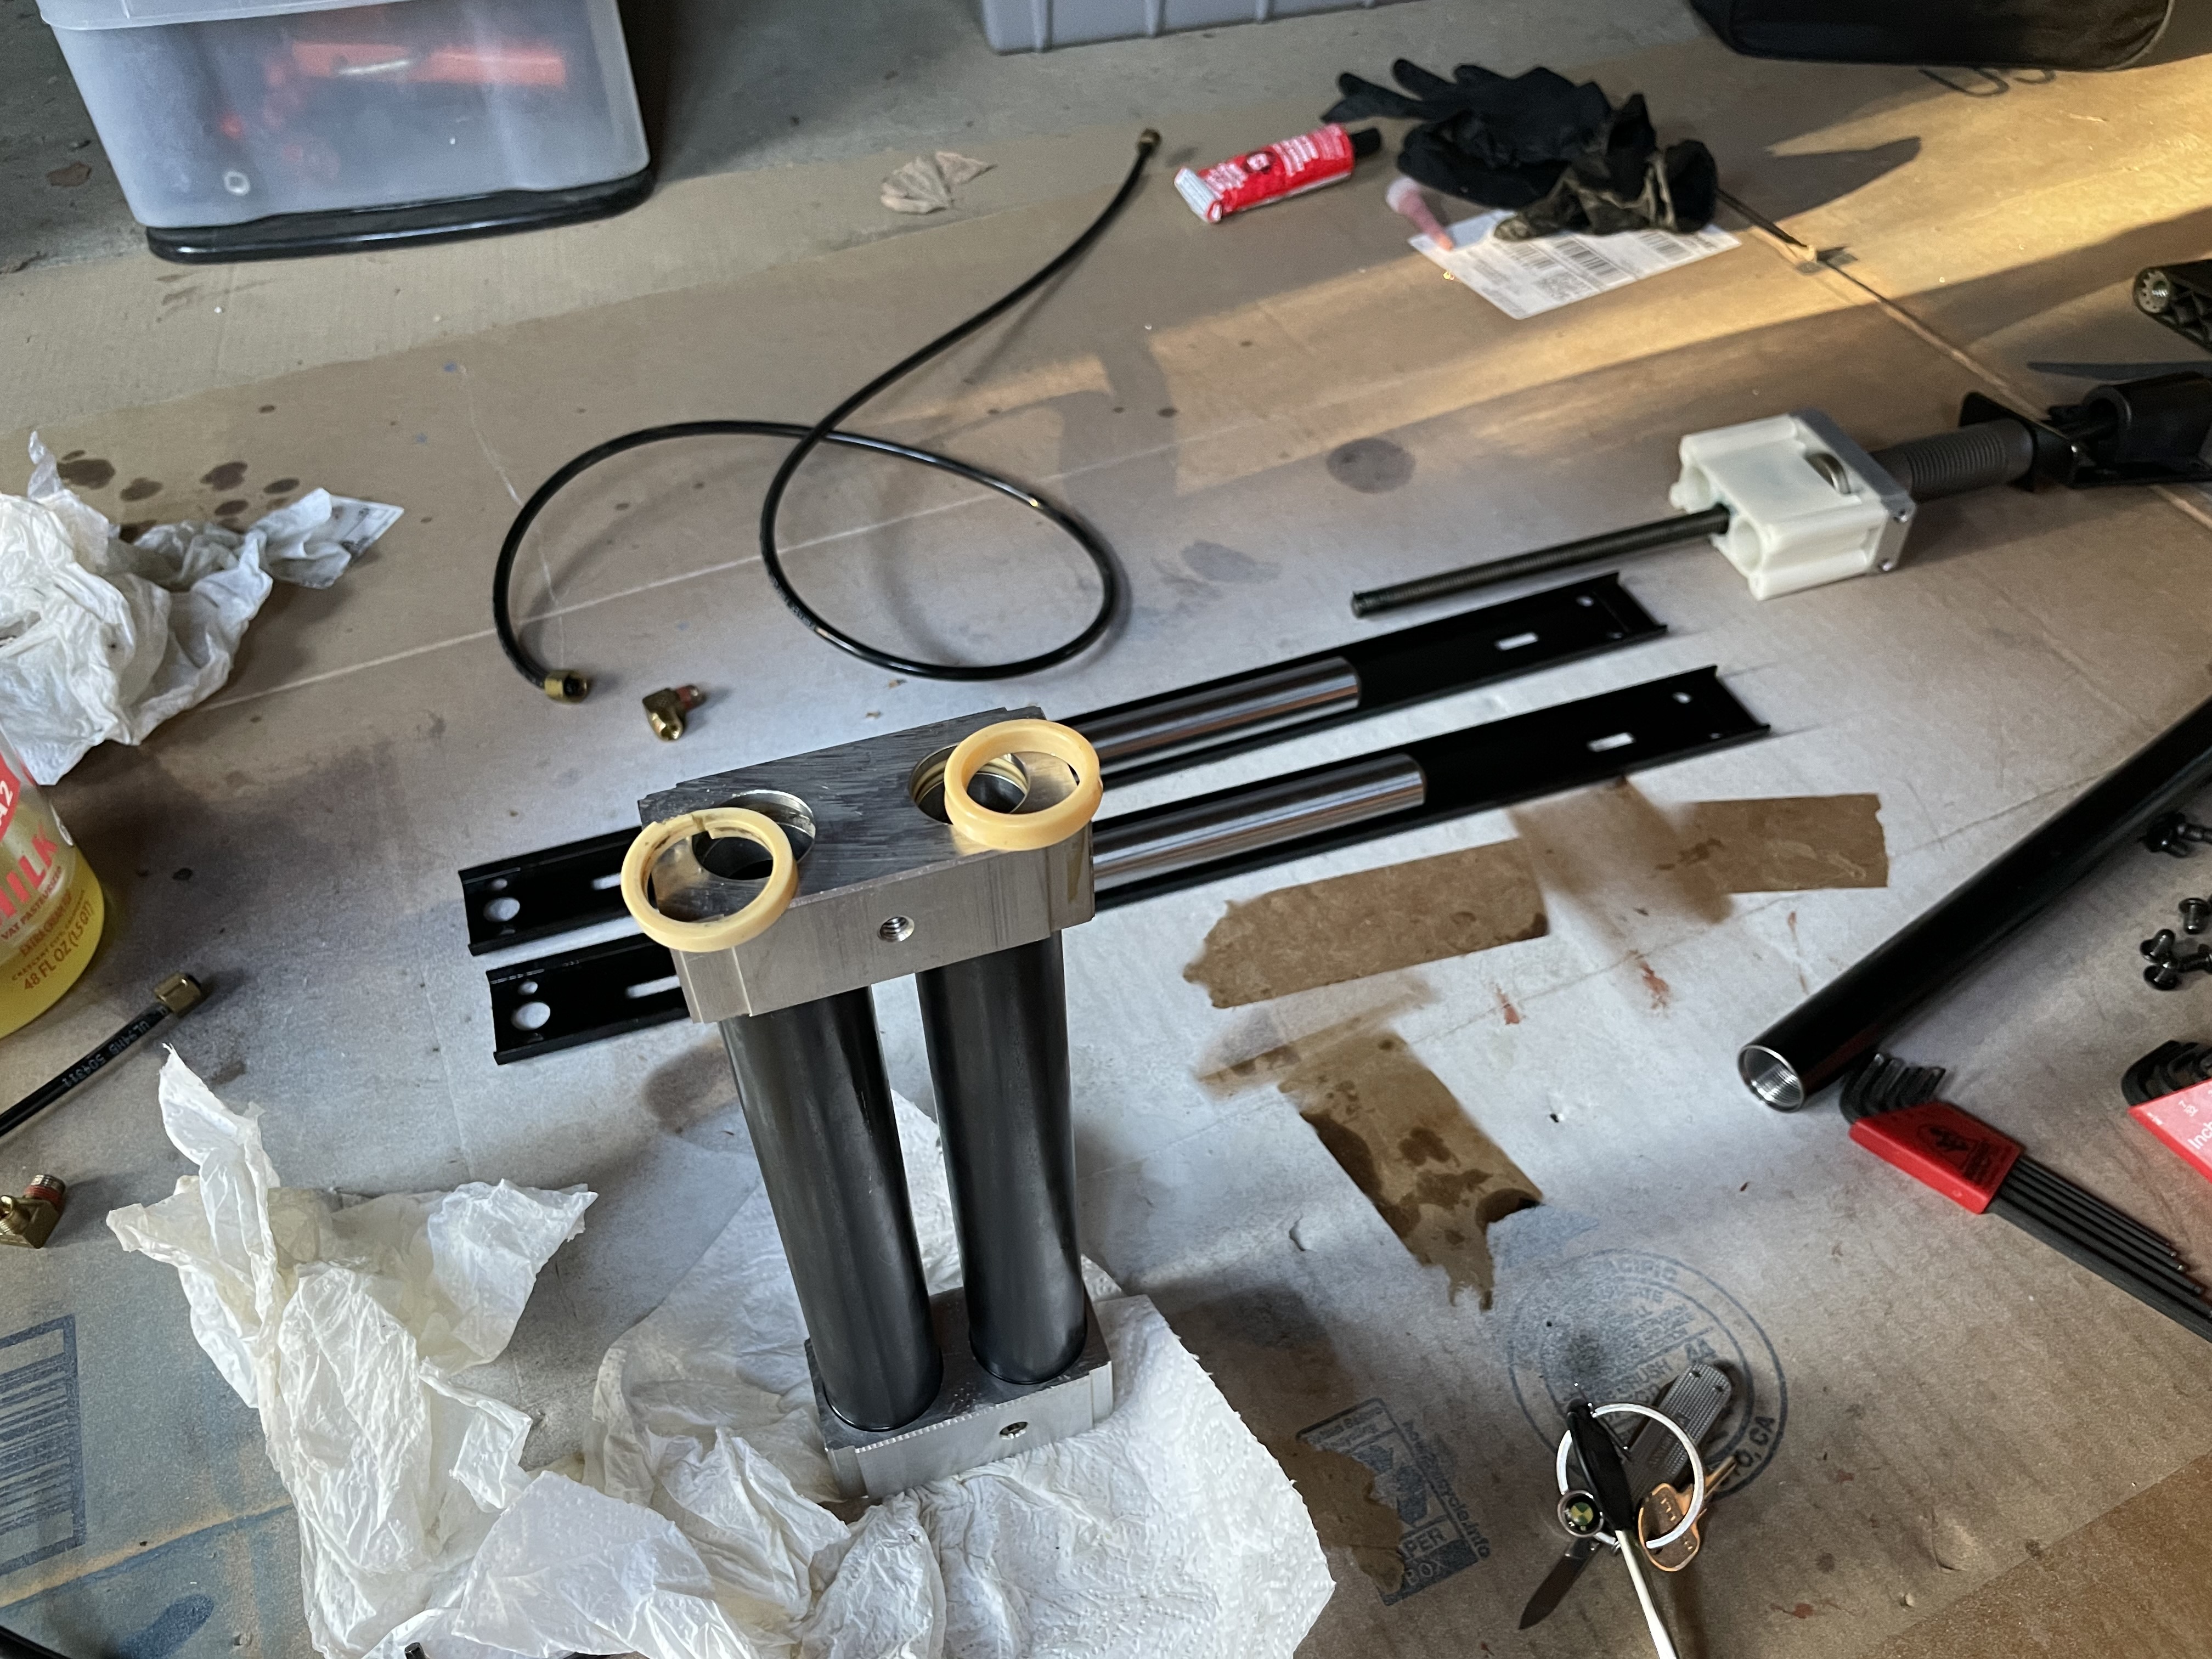

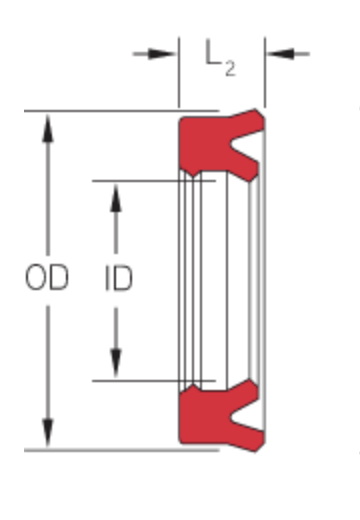
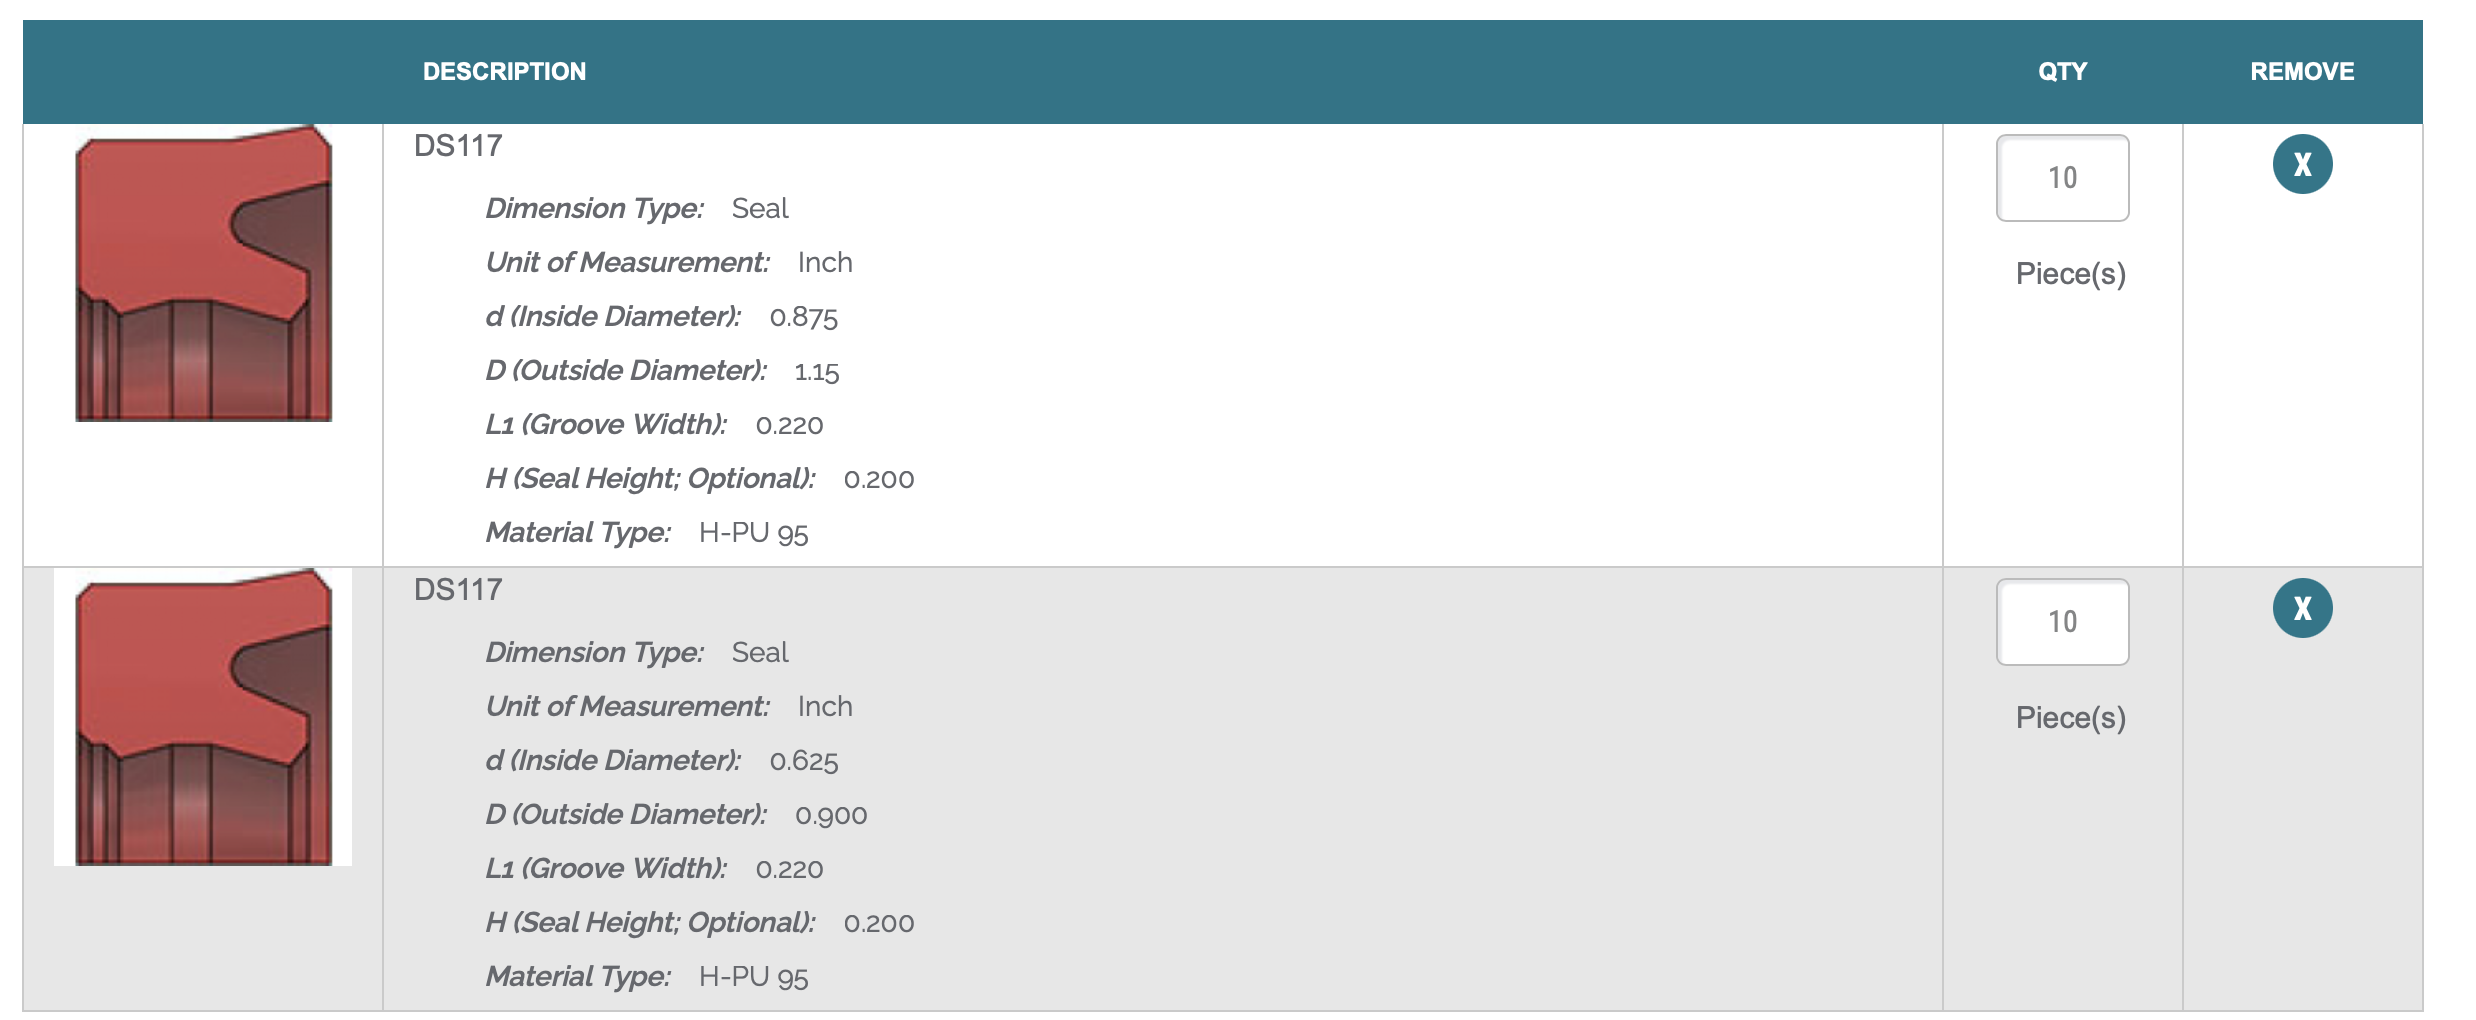
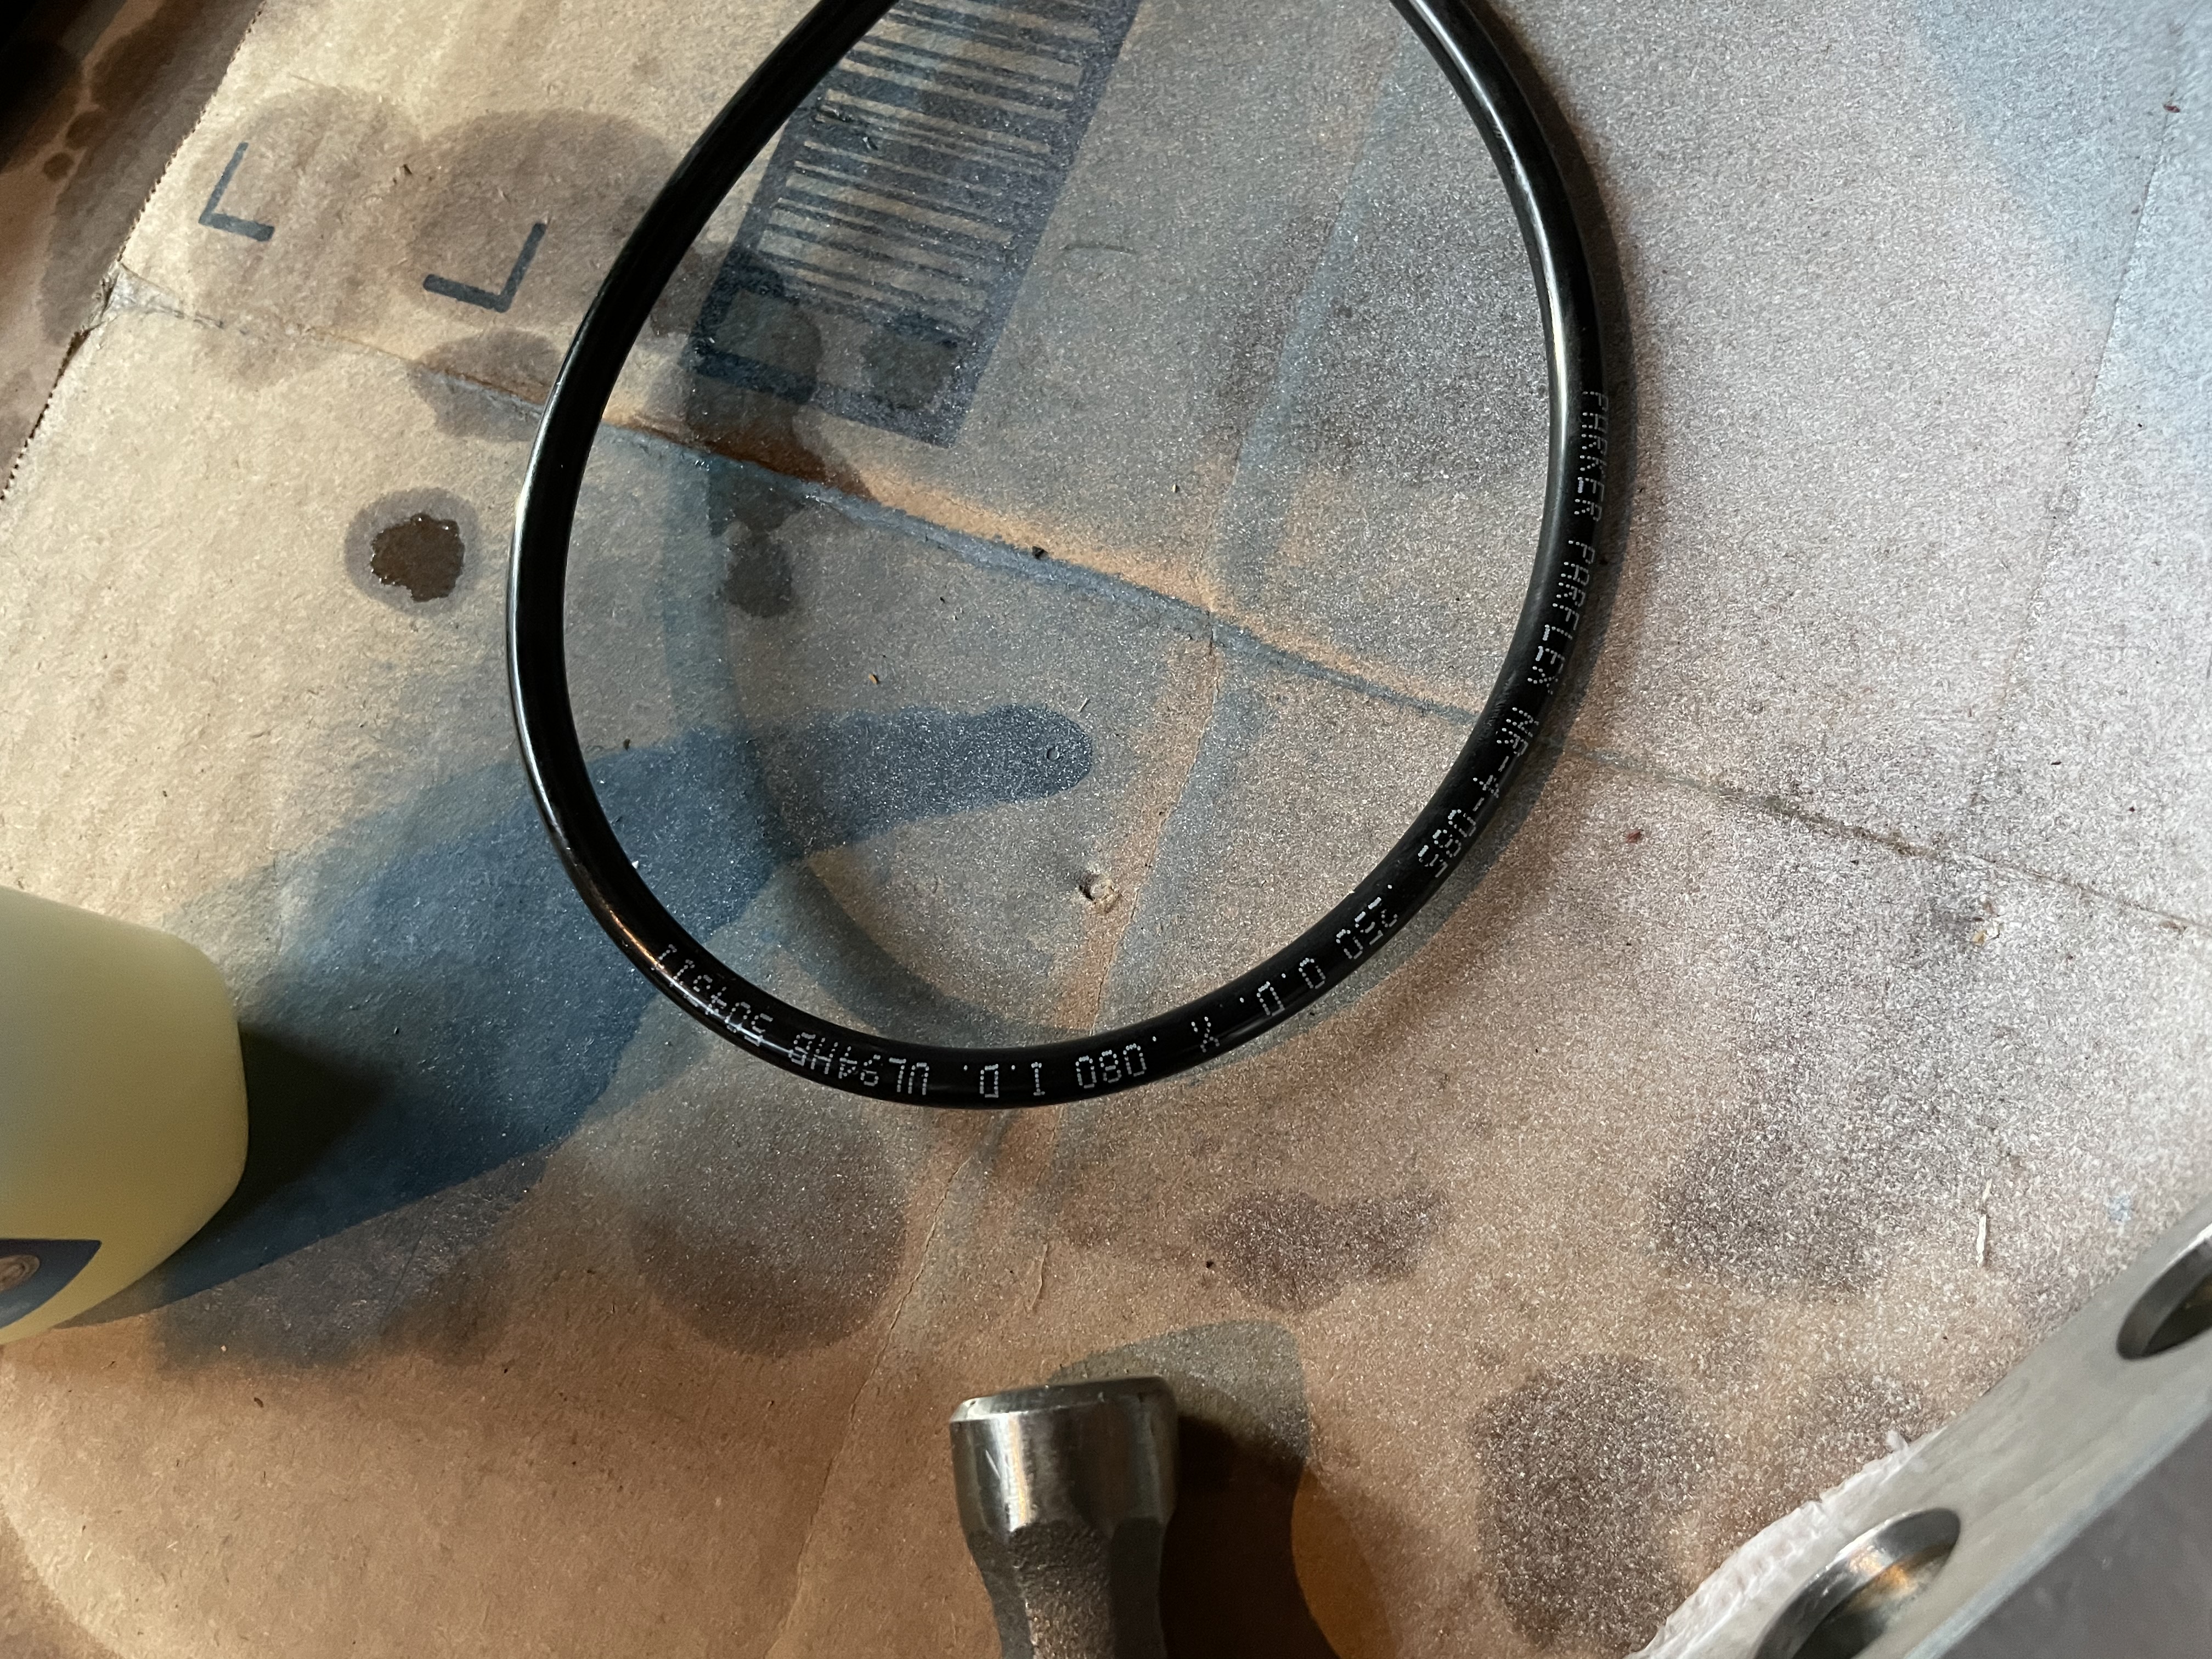
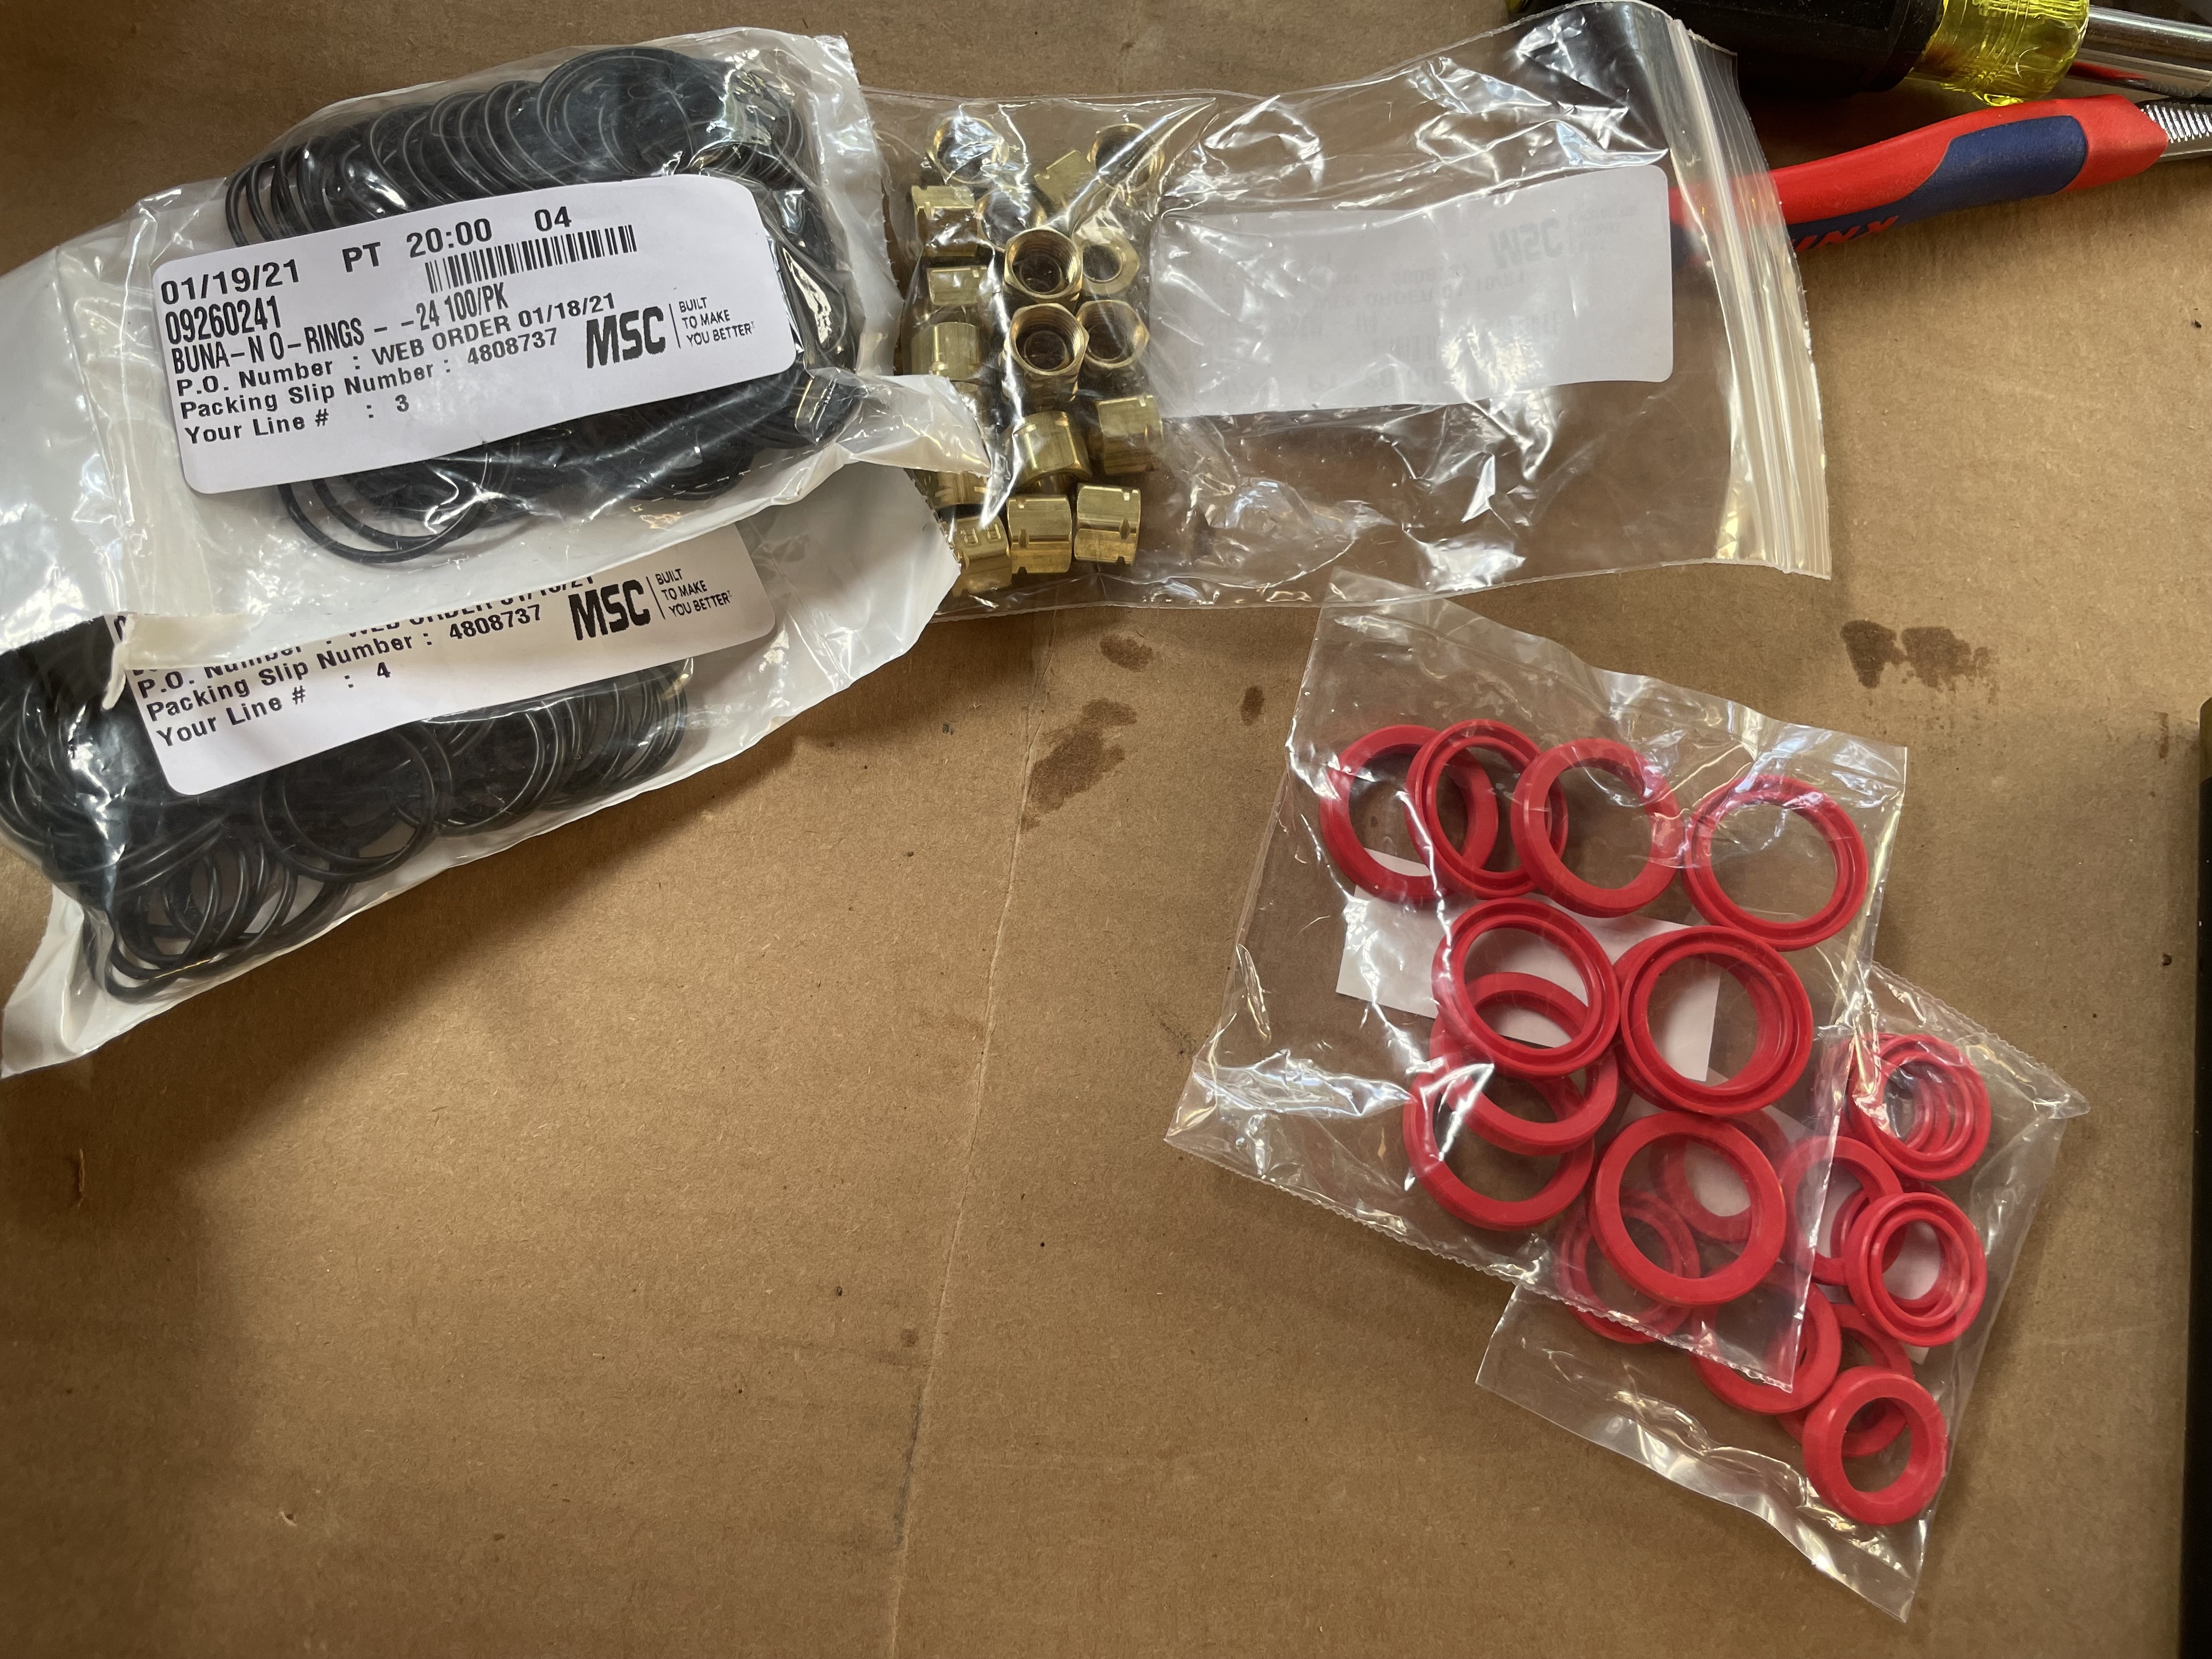
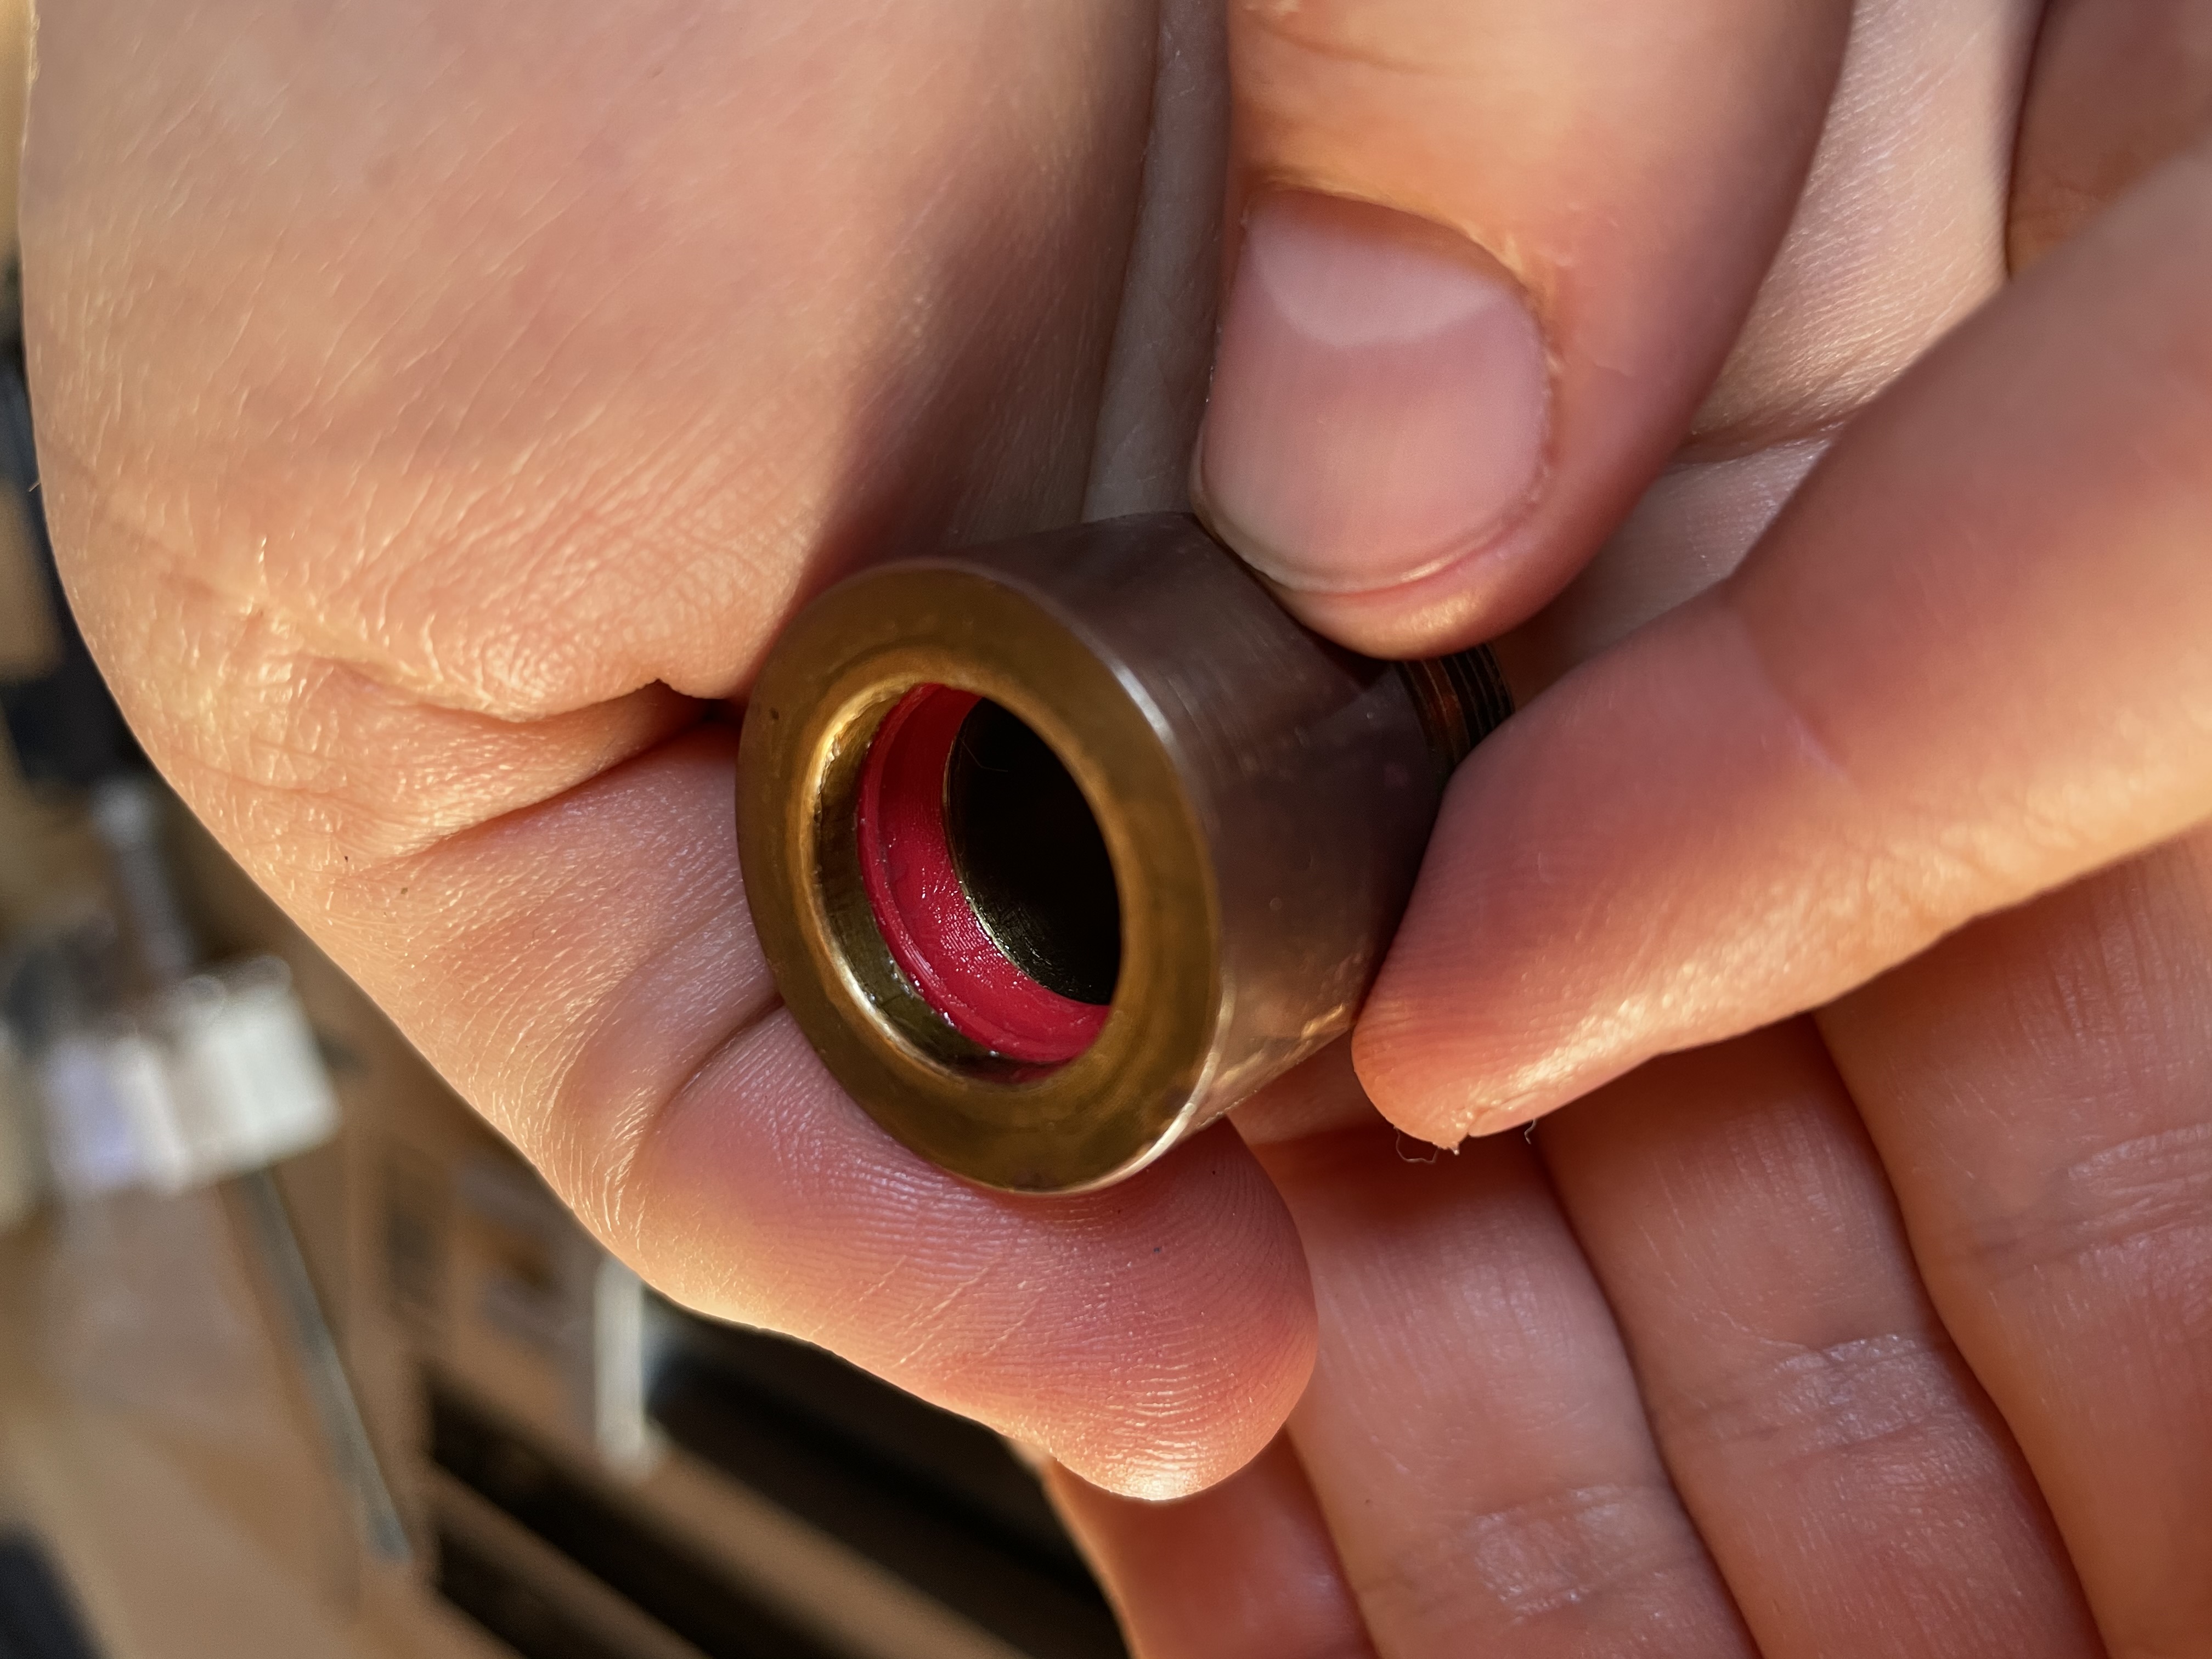
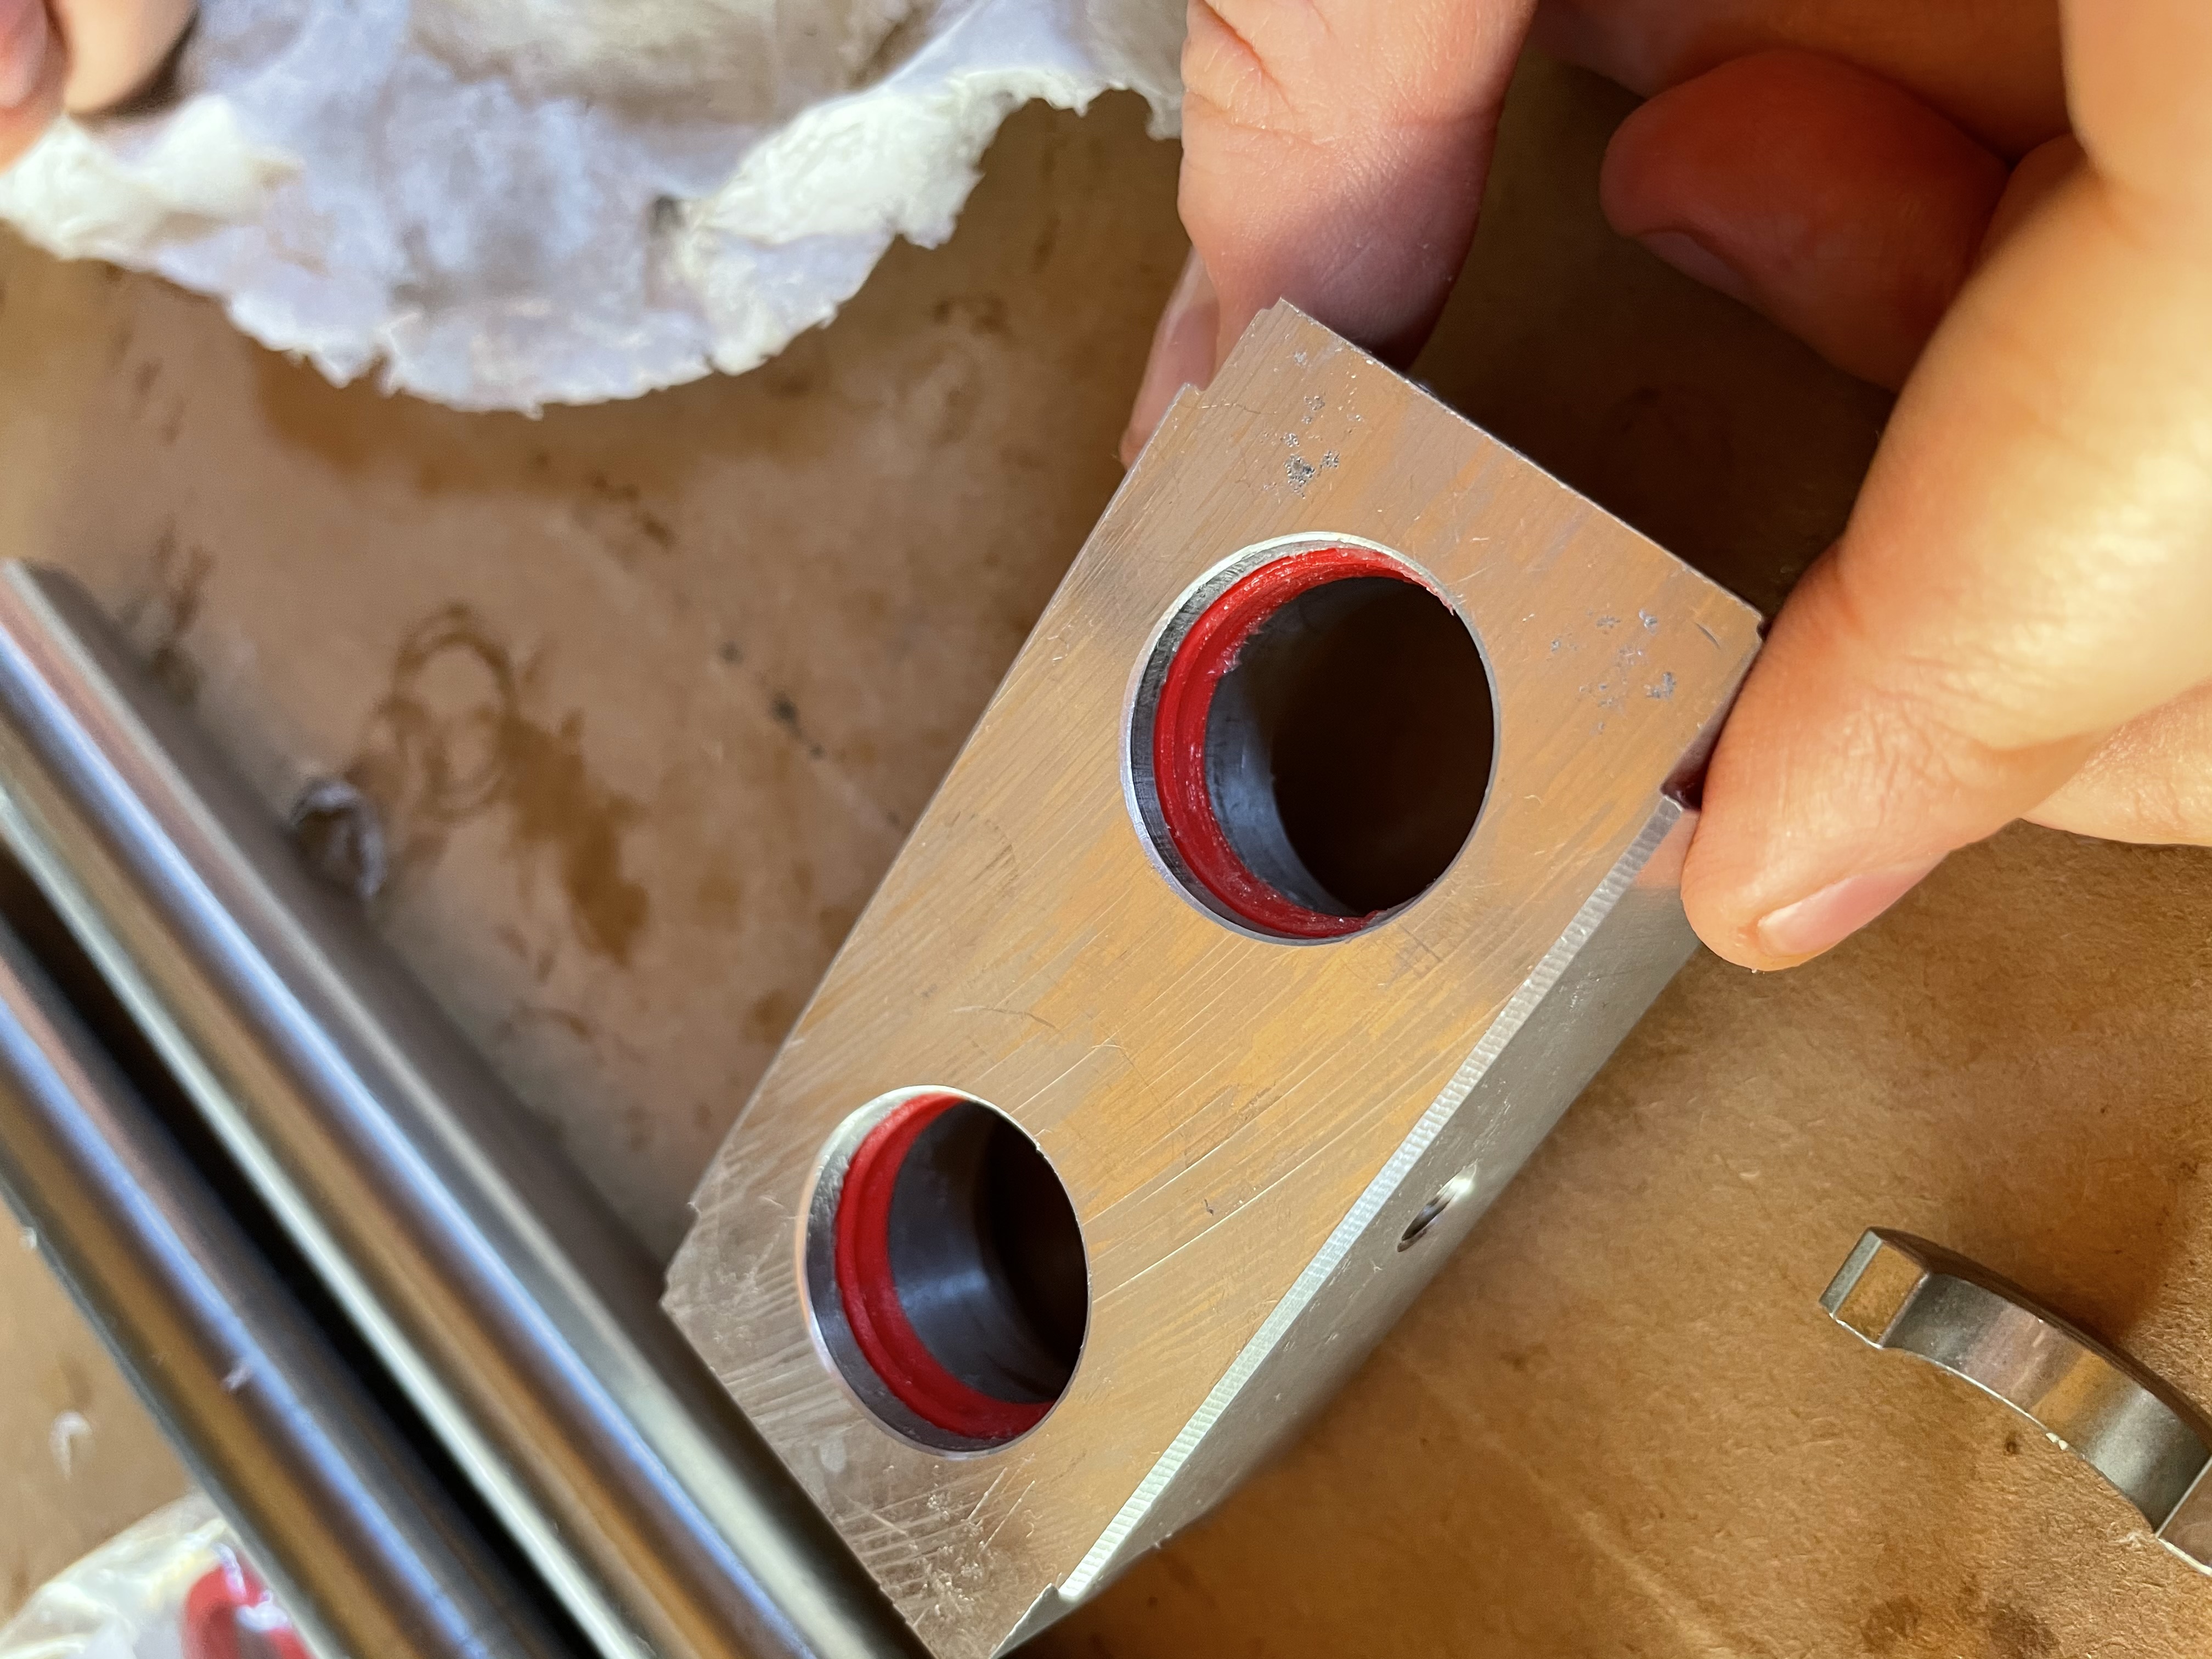
I had managed to pry out the seals and O-rings in the pump and cylinders. As they fell apart in my hands it was quite clear what the problem was—but sourcing these replacement hydraulic seals was a big challenge. I was able to order some suitable O-rings from MSC, but was still completely unable to find the seals I needed. I spent a week second guessing my caliper-measurements before finally identifying Maxx Hydraulics as a supplier that could custom-make the seals I needed. I emailed asking for a quote, confirmed the purchase the next day, and had them in hand by the end of the week.
The Repair
Once I had all the supplies needed, the hydraulic service was reasonably straightforward to carry out and documented perfectly well in the repacking and recharge instructions. That said, there were a few lessons learned along the way:
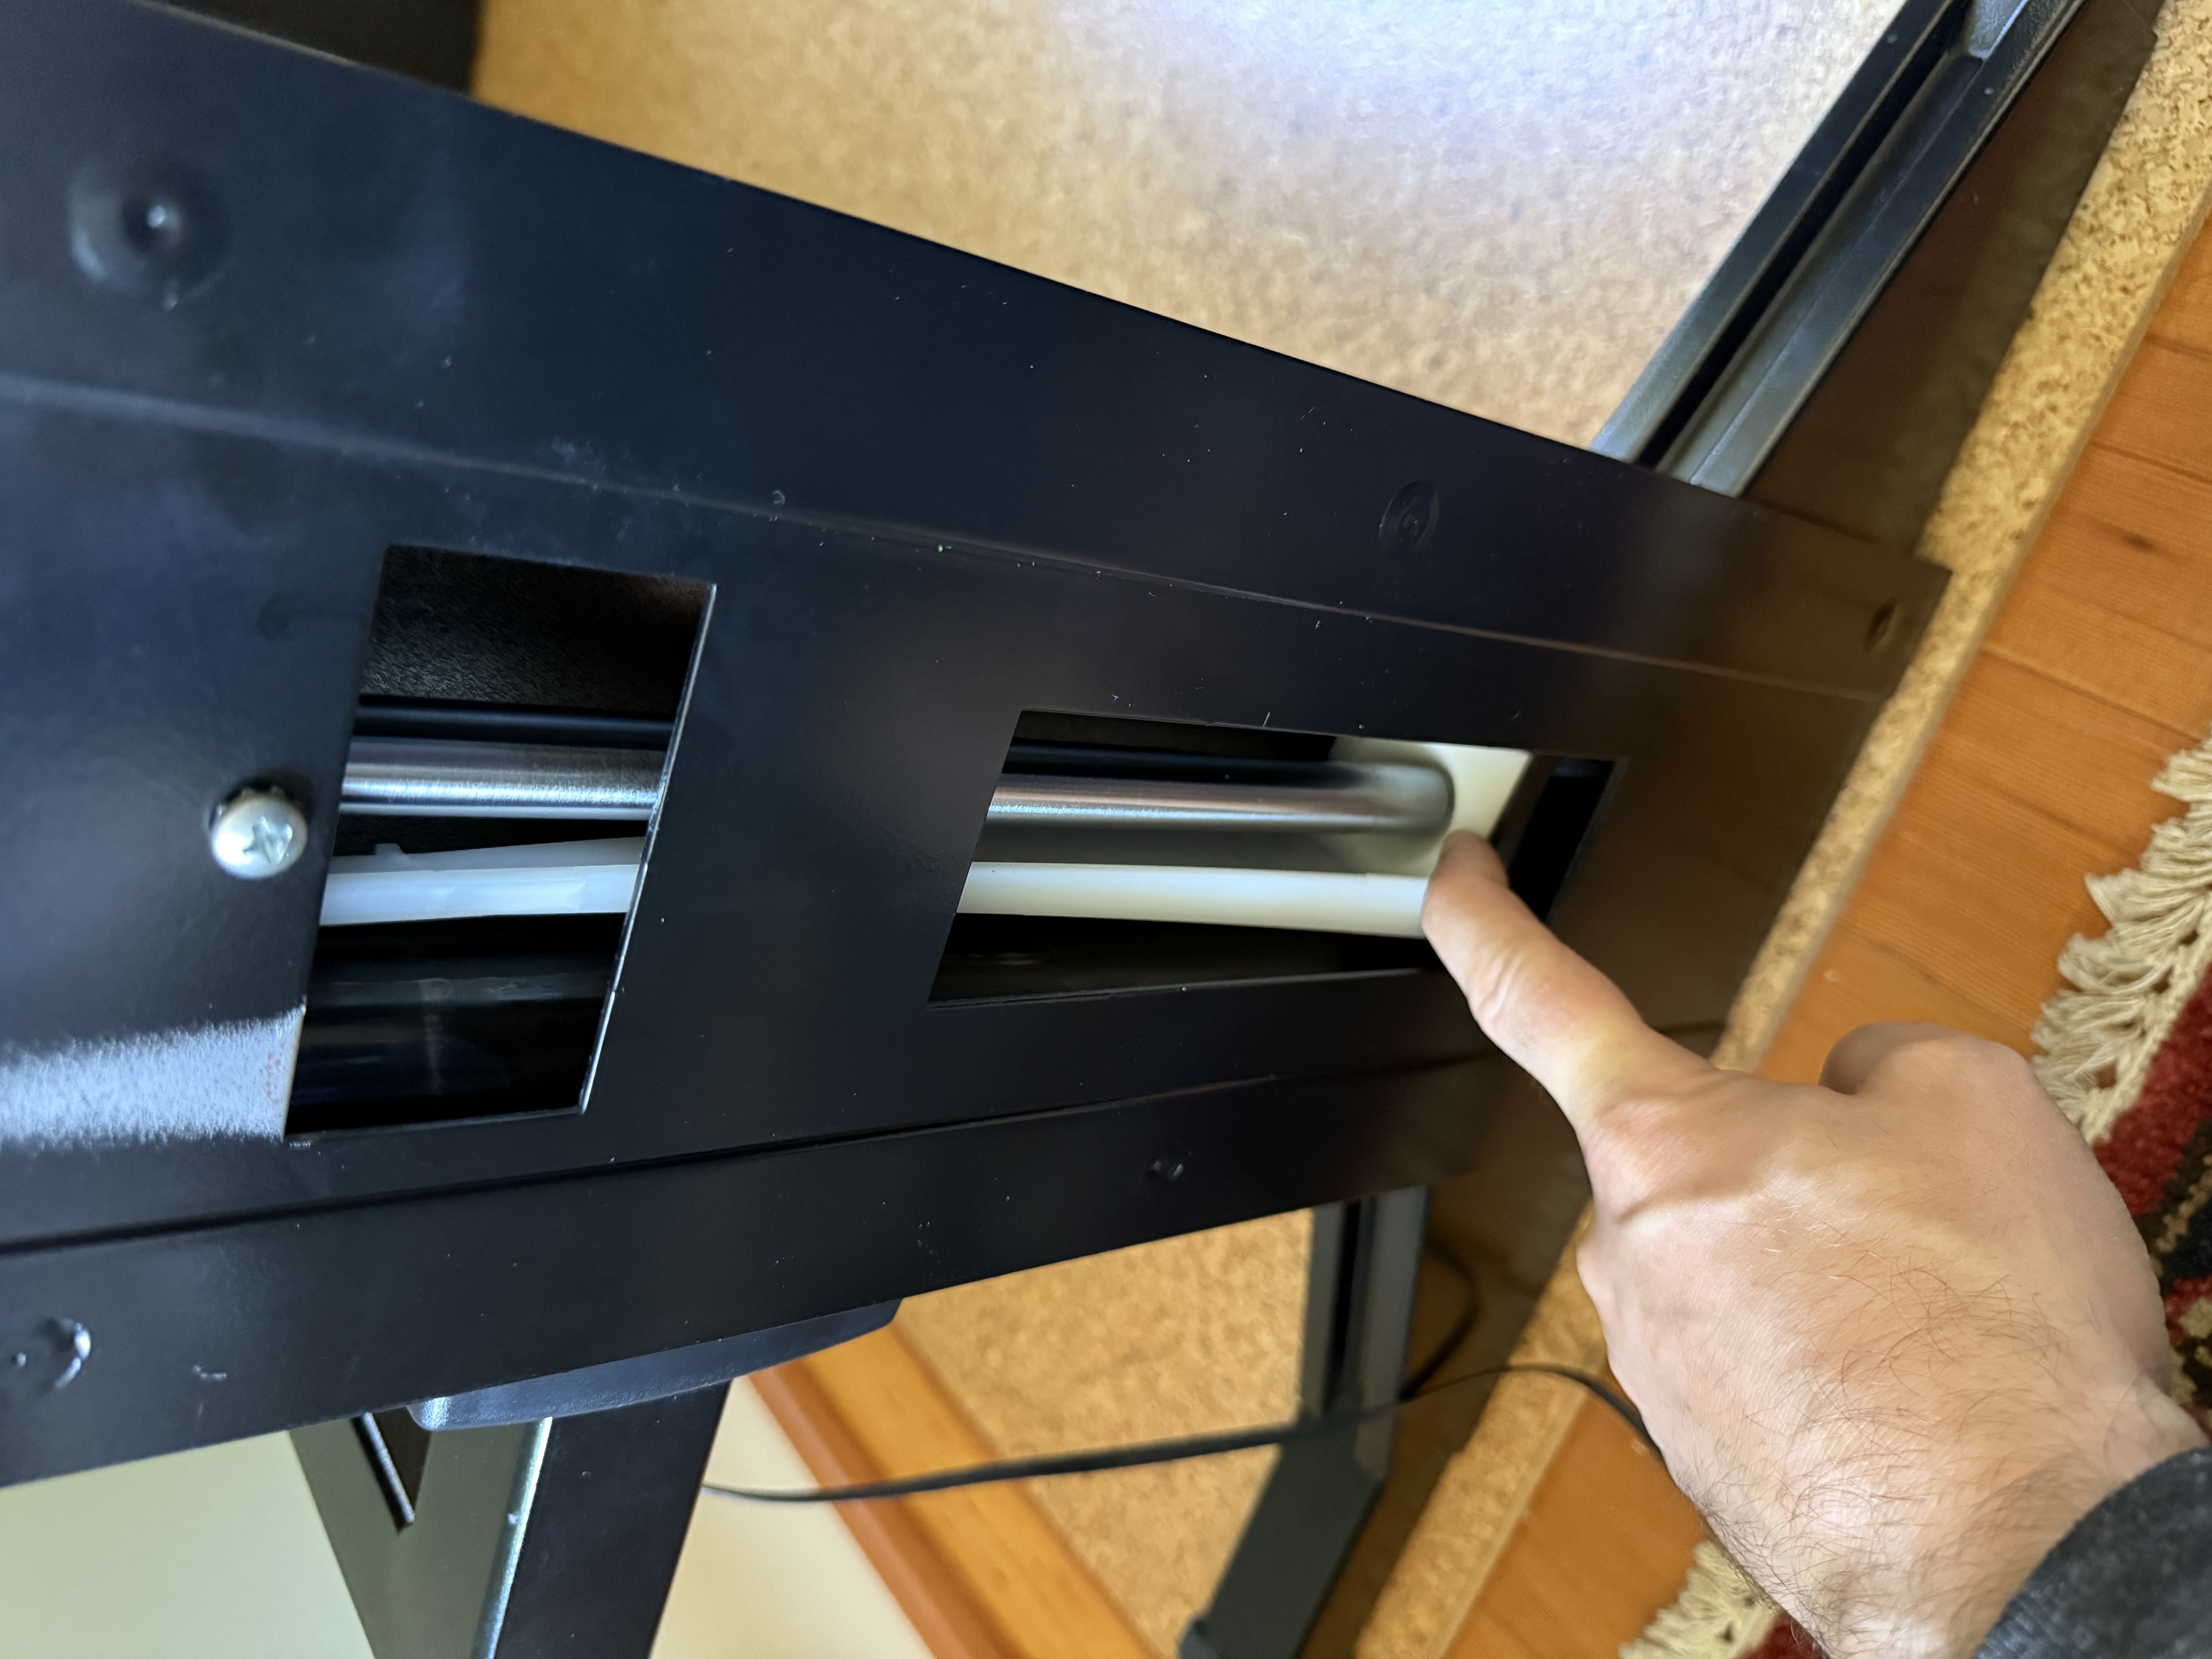
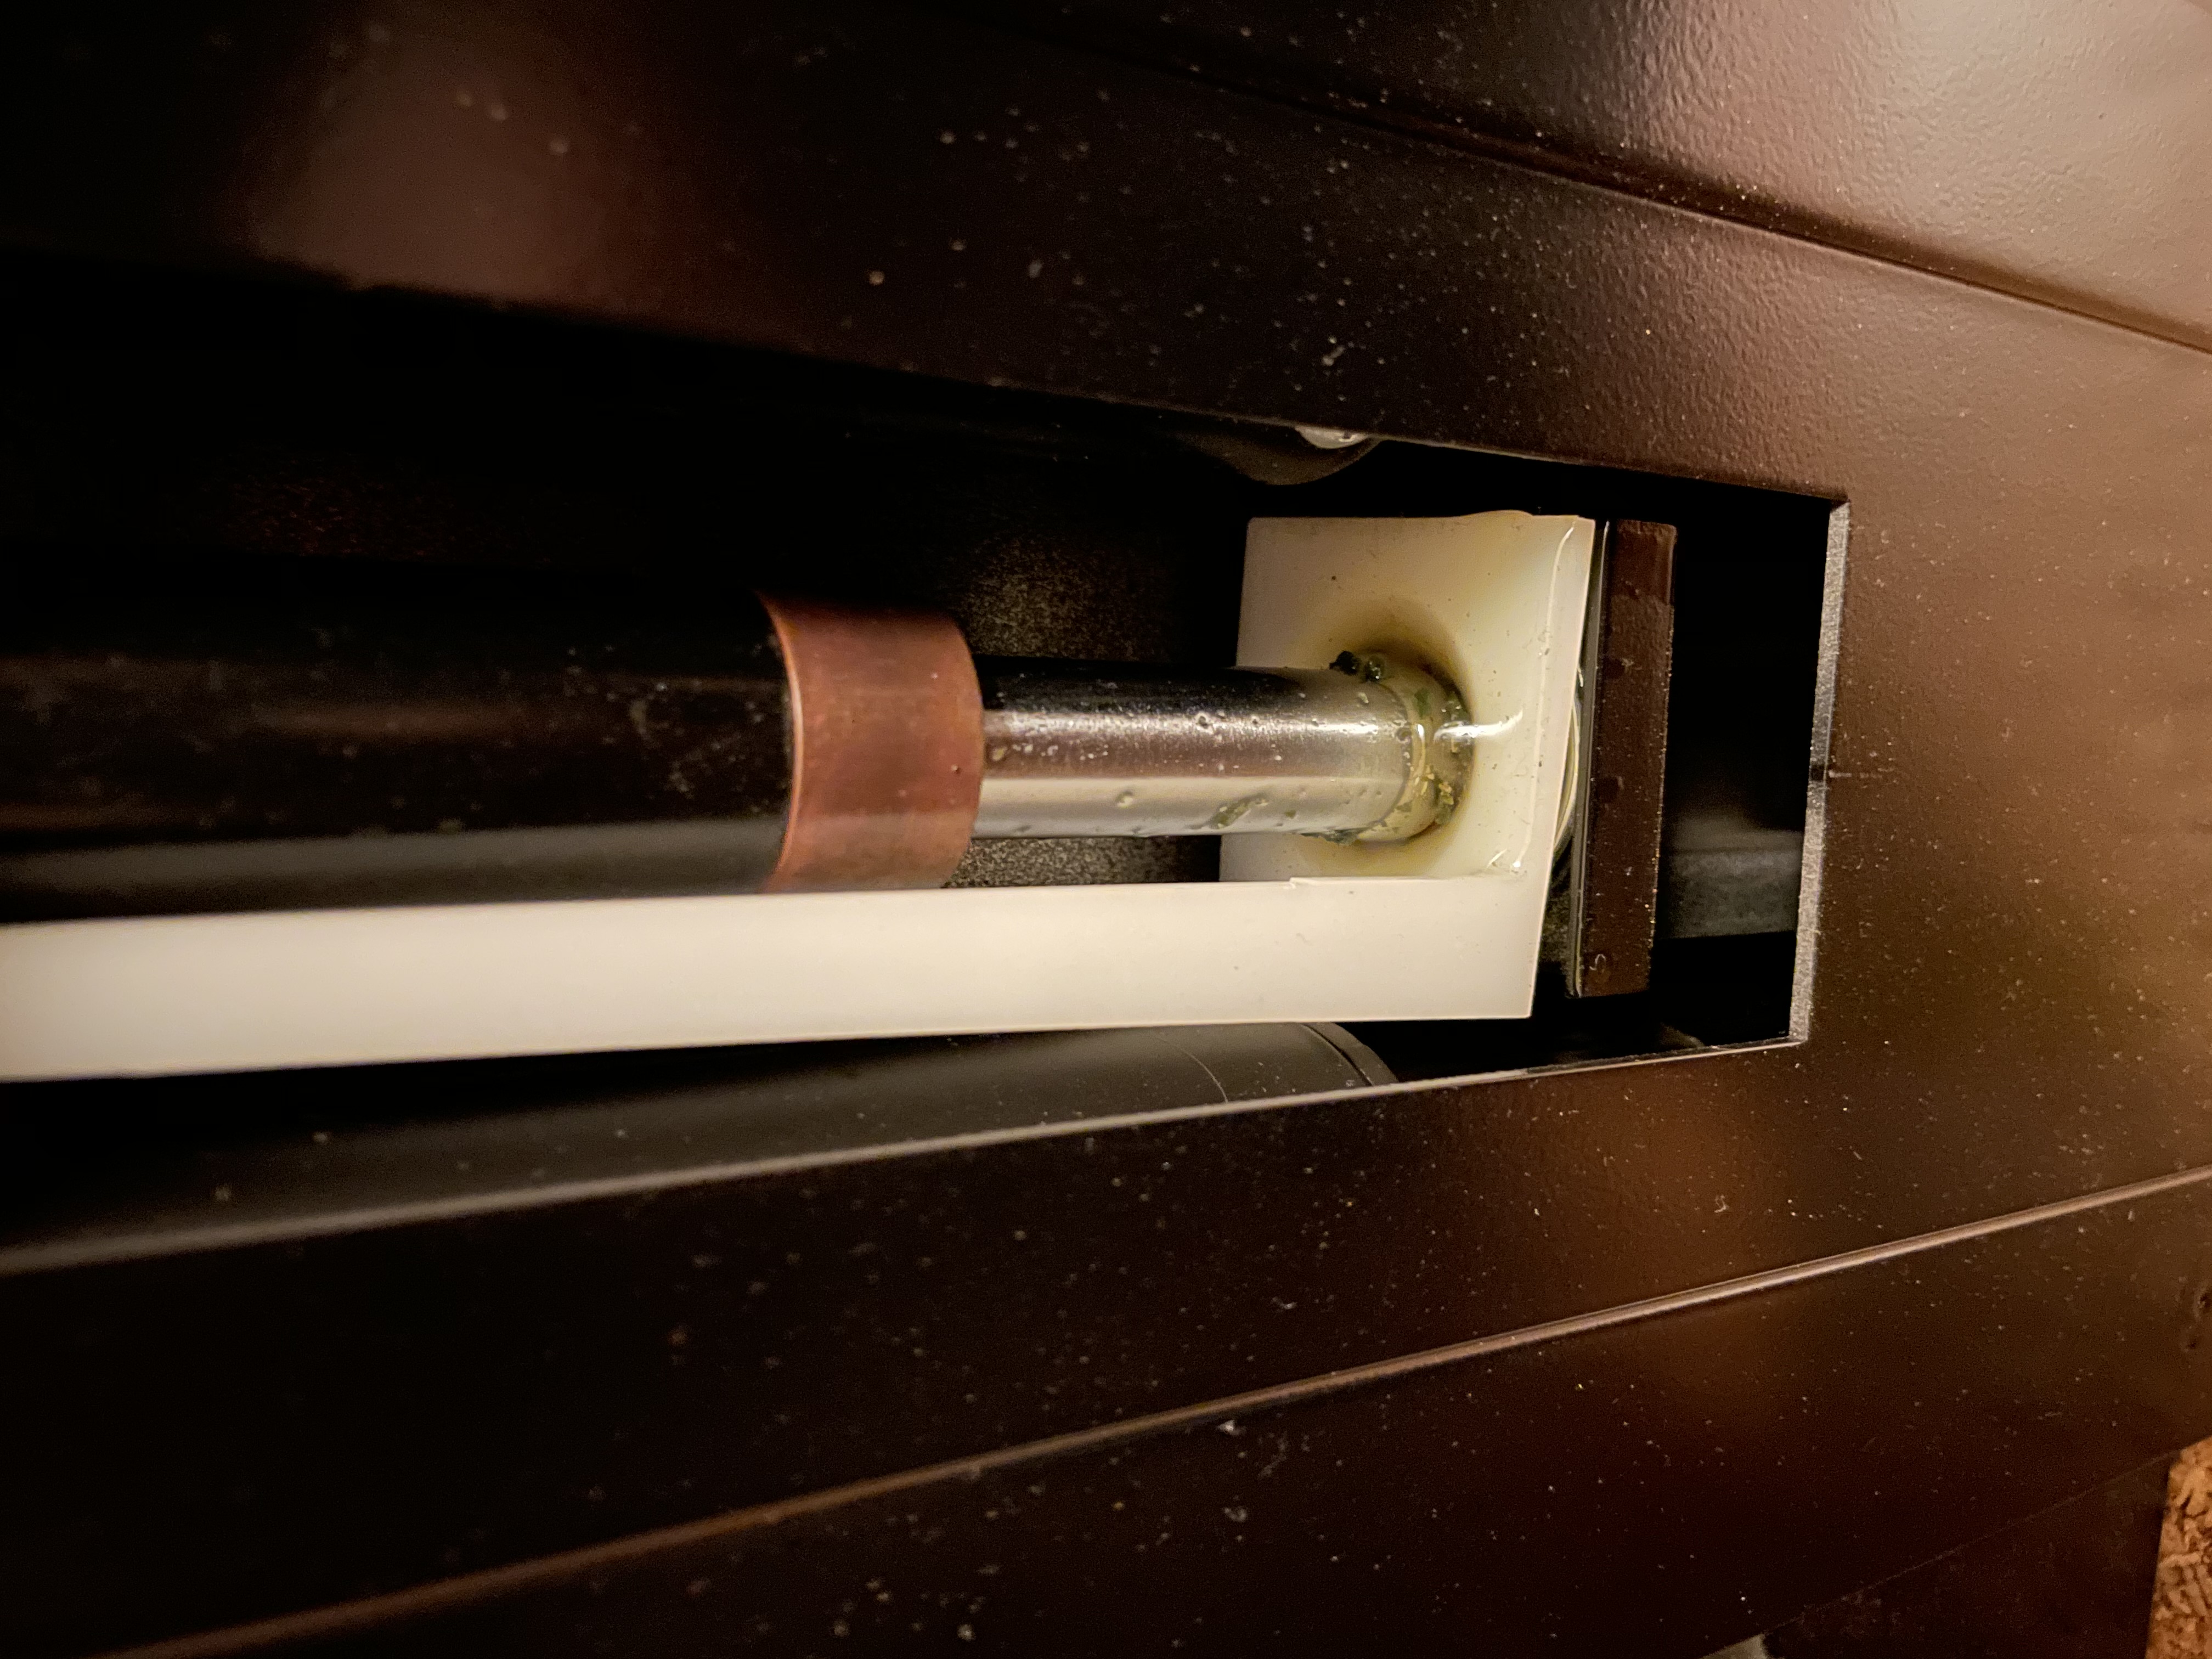
It wasn't completely necessary to disassemble the leg units from the desk in order to remove the hydraulic cylinders. I guess it was useful to really clean out all of the oil residue that had drained into the leg, but aside from that, the hydraulics could be removed from the desk by retracting the cylinders, lifting the desk to the maximum height, and pulling the clips out to release the cylinders. There is a little bit of a trick to it though—in order to make it possible to carry the desk around, there is a brake mechanism that prevents the leg assemblies from falling to the ground when the desk is lifted by the work-surface. It is necessary to push down on the white plastic bracket inside the leg while lifting the top in order to release the brake and fully lift the desk.
I probably should have used new fittings, or at least applied fresh thread sealant to the hydraulic connections. Subsequent to the repair I experienced a little bit of oil seepage in the following week, so I just tightened up the brass fittings a bit more, but suspect there's an appropriate sealant to use here. The only parts I could use from the recharge kit ended up being the Molykote mineral oil itself, and the handy squirt bottle to fill the pump. The included plastic tubing was the wrong diameter, and I couldn't figure out how to remove the ferrules from the tubes—perhaps it is necessary to cut them off? So, I didn't install new ferrules and unthreaded the right-angle fittings going out of the pump, which I suspect was the source of the seepage.
While the instructions were invaluable, the recharge and repacking kits weren't what I needed for this old desk. The Molykote L-0532FG Multi-Purpose Light Oil MSDS indicates it is 99% White mineral oil (CAS 8042-47-5), and given that the seals degraded so much and I rarely adjust the height of the desk—I'm not sure I'd make the same choice in the future.
I never did find the exact replacements for the plastic clips to secure the hoses to the bottom of the desk surface, but the ones I found on DigiKey were awfully close.

Conclusion
Overall, I'm happy to have one more vintage repair in the books. While nearly there, it didn't quite come out perfectly. Aside from the initial seepage (which was easily fixed), there remains some slip-stick juddering on one side when I operate the crank to raise and lower the desk. I assume this comes from me getting the dimensions or material wrong on the seals—or perhaps some residual air in the system. It took few months to get everything together and actually carry out the fix, but it's great to have the desk back and I hope it lasts another couple of decades. :)
Adventures with Parasitic Battery Drain
My BMW E46 M3 is turning 20 next year. Given how few miles I put on it each year, and how sentimentally attached I am to it, I'm not yet ready to trade it for something new. I take pride in maintenance but it comes as no surprise that a few issues come up from time to time with a car of this age. I have a great shop that handles the core of the maintenance and repairs, do as many of the smaller fixes and preventative replacements as I can find time for myself, and have a pretty good track record of keeping this contemporary classic in good working condition.

Dead Batteries
The first time I found the battery dead a couple of years ago I assumed it was some kind of fluke, maybe I left the car unlocked or the trunk wasn’t latched. This was an incorrect assumption—there’s always a reason. It happened a couple more times before it became clear to me there was a real malfunction. Searching online, there are reams and reams of forum posts that describe various different causes of battery drain, including the famed faulty Final Stage Resistor (FSR), or a malfunctioning Navigation Computer or Telematics Control Unit (TCU). It's also common to just replace the battery. In general there were lots of folks that either confidently suggested a cause, or suggested a procedure for using a multimeter and pulling fuses to watch for a change in idle draw current that would immediately lead to a fix. Many of those threads ended up with the original poster buying a battery tender to keep the charge up—or even selling the car.
It was tricky to ask my mechanic to investigate this one since it was so sporadic. The issue might not happen when they had the car, and I didn't want to be without it for a long period of time. In the last 6 months or so, I noticed an increased incidence of the car either having a dead battery (maybe 2 times this spring) or a clearly depleted battery in the morning, where the starter motor sounded under strain and lights dimmed. This made me determined to find a root cause myself, and it seemed just like the kind of thing I could handle.
I started by following the lore of the forums; swap out the FSR (probably a good preventative measure), try ejecting the navigation DVD, unplug my phone charger… but eventually I realized a more systematic engineering approach was not only possible, but the only way to be confident in identifying the root cause. It would end up requiring a more advanced technique than the “watch the meter and pull fuses” approach I’ve seen described so many places.
Continuous Current Monitoring
The first step was identifying exactly how the battery was ending up discharged. The symptoms were inconsistent, a couple of times the battery was dead after sitting for a few days, but other days it was completely fine after the same duration. I also observed a sluggish starter motor at times—and the engine surging a bit after starting up. The last symptom I didn’t initially connect to a battery issue, but eventually I learned that when the car starts and the battery is significantly discharged, the alternator charges it at a relatively high current just after starting the engine and that extra load can impact engine idle.
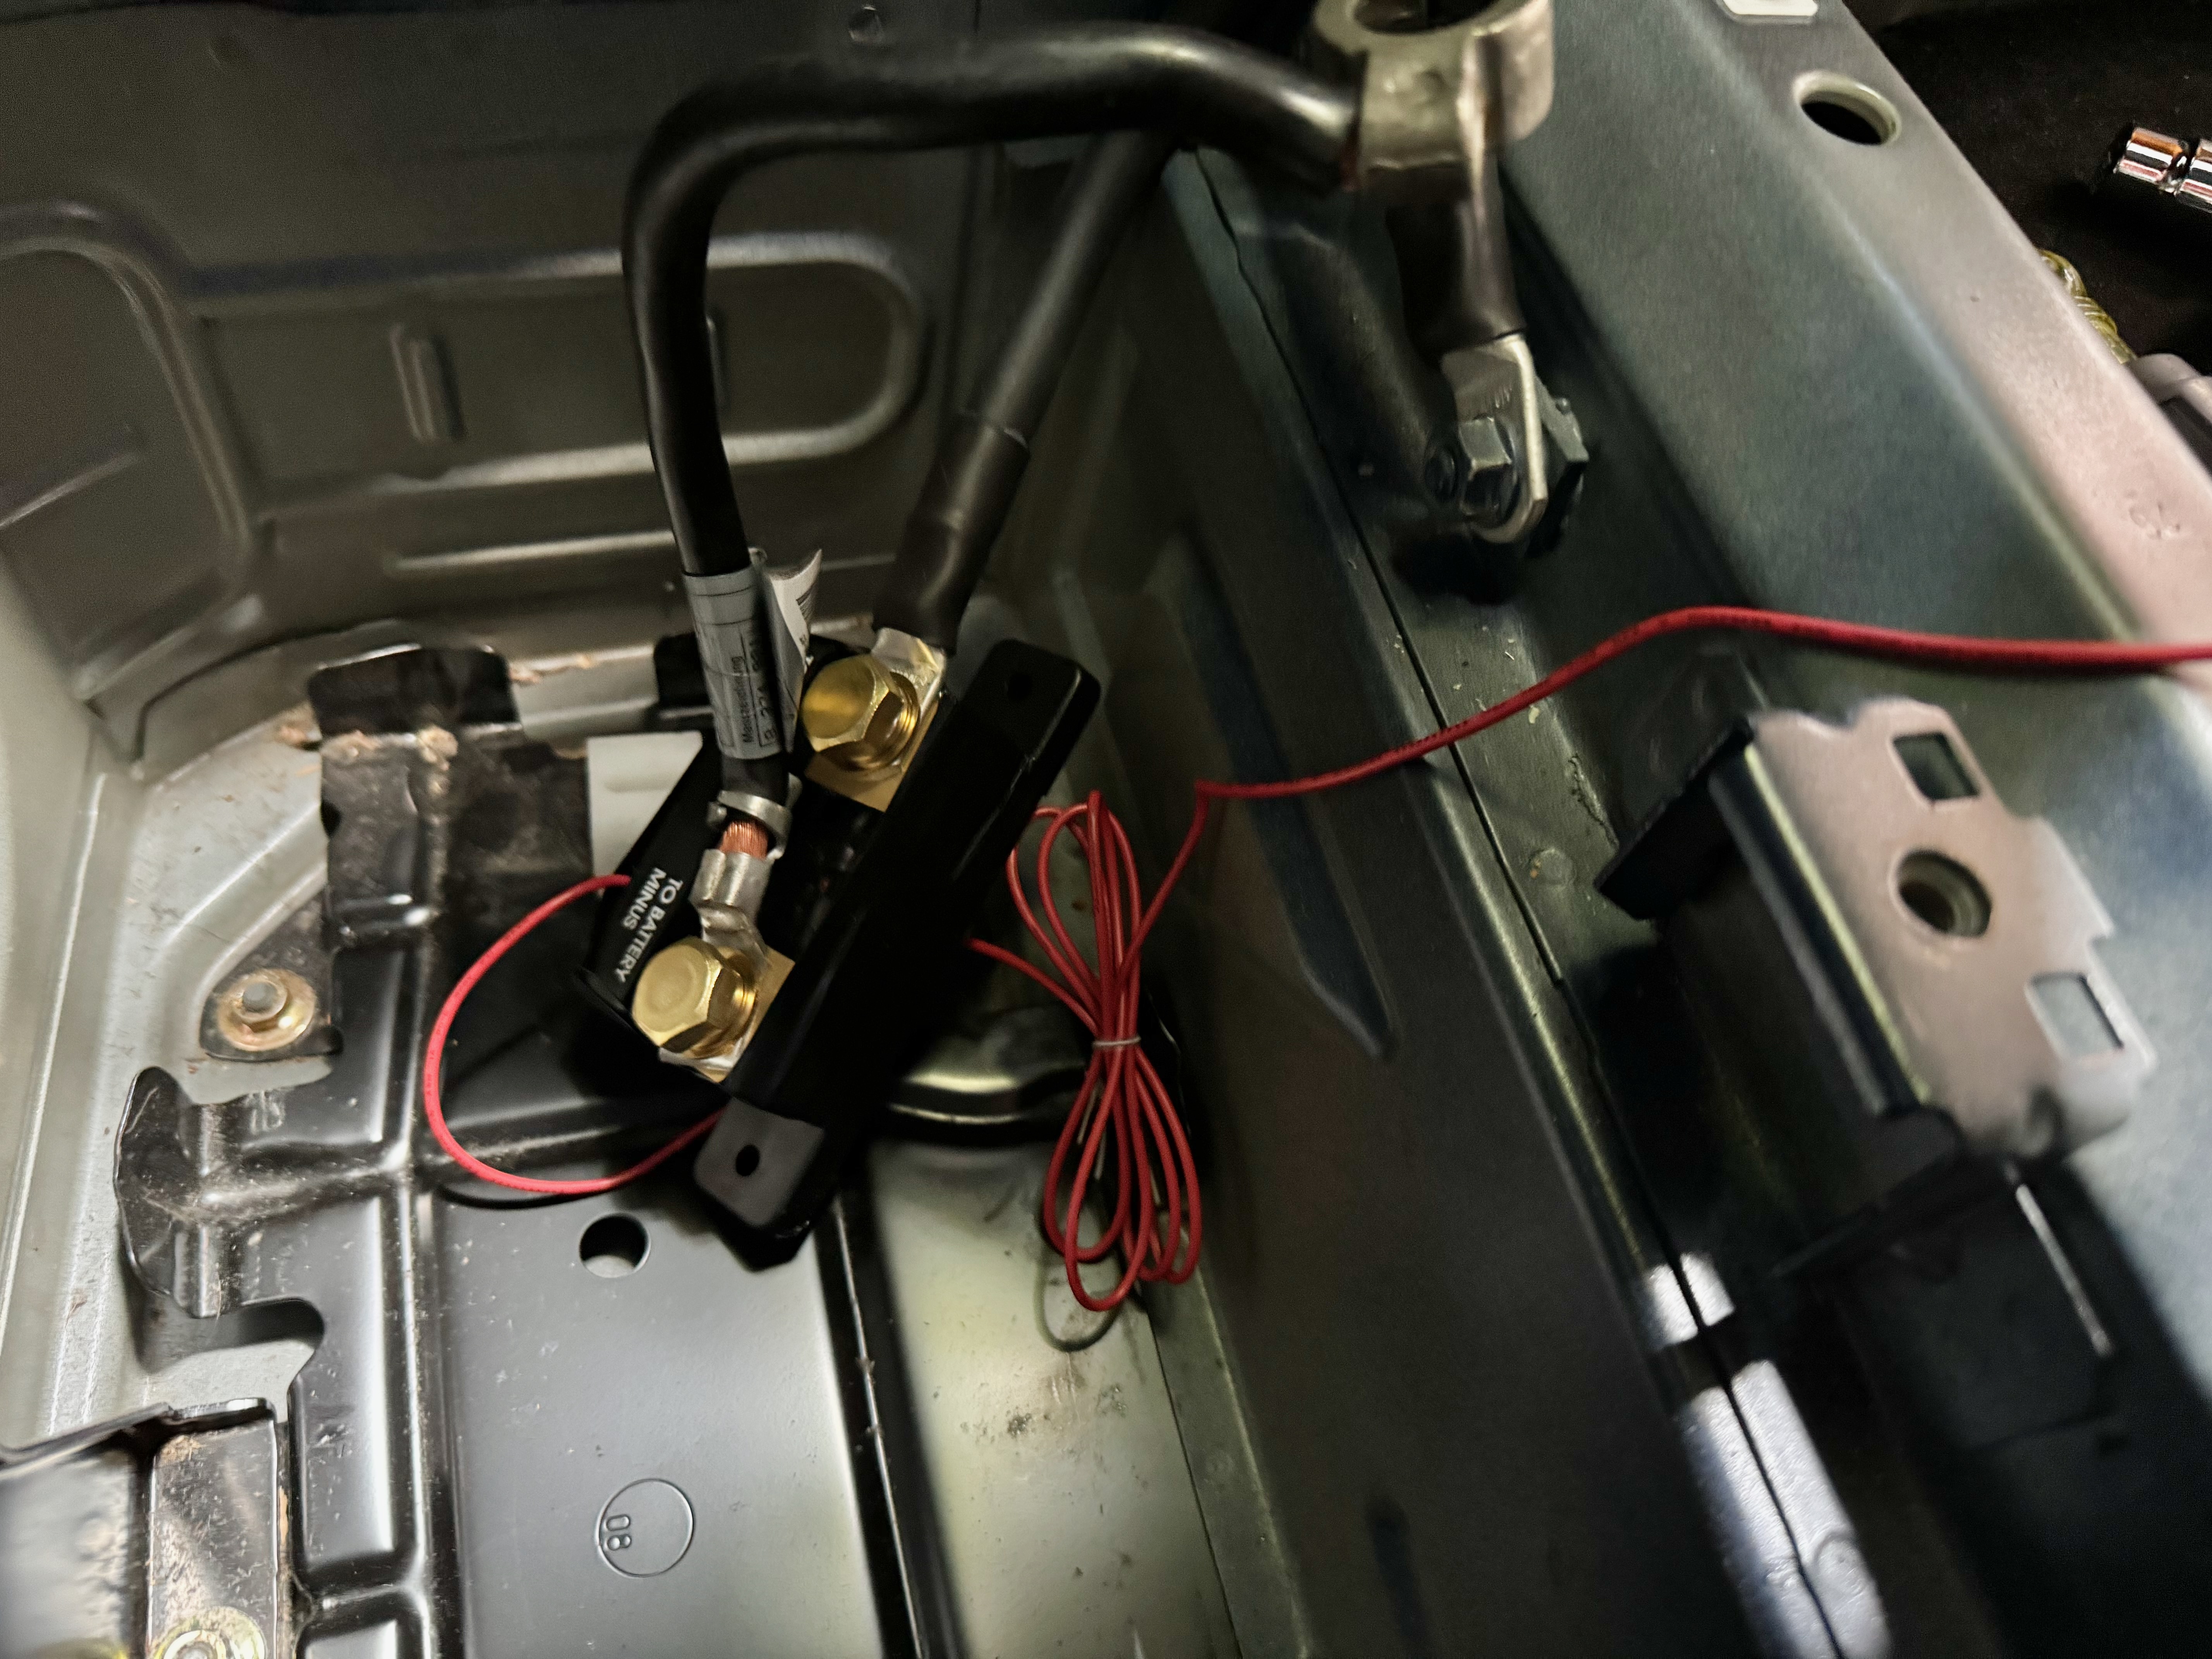
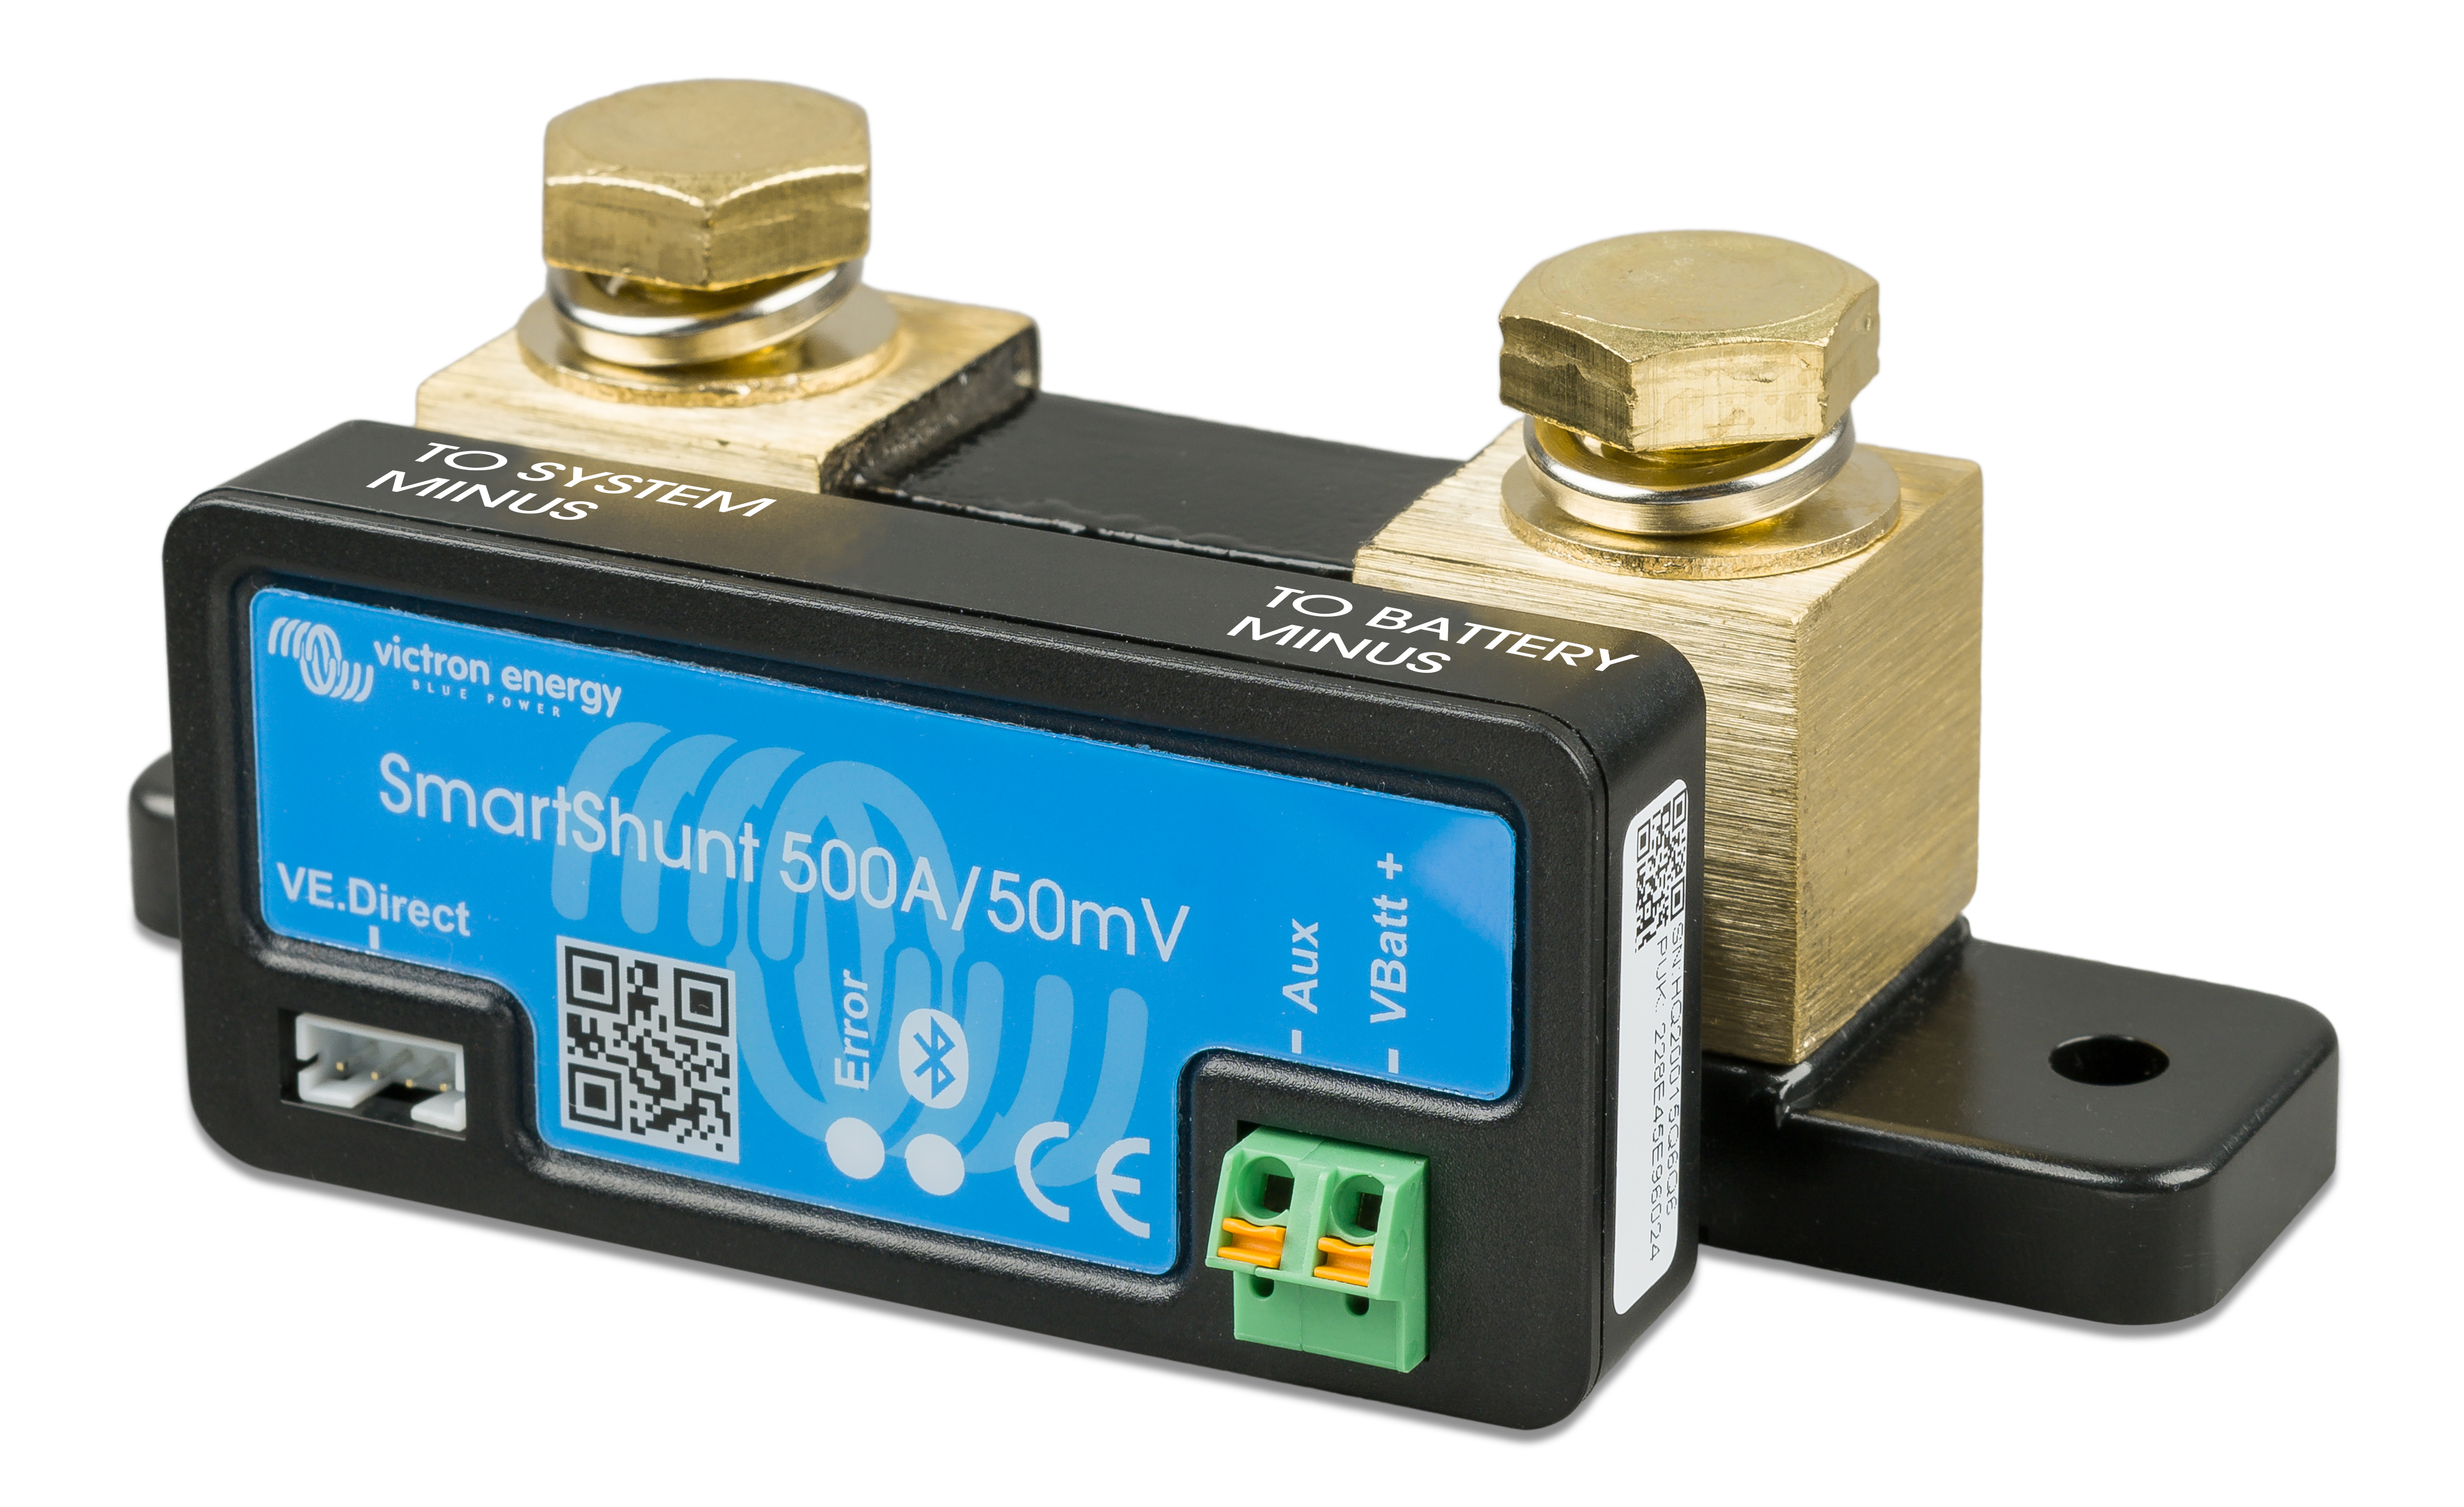
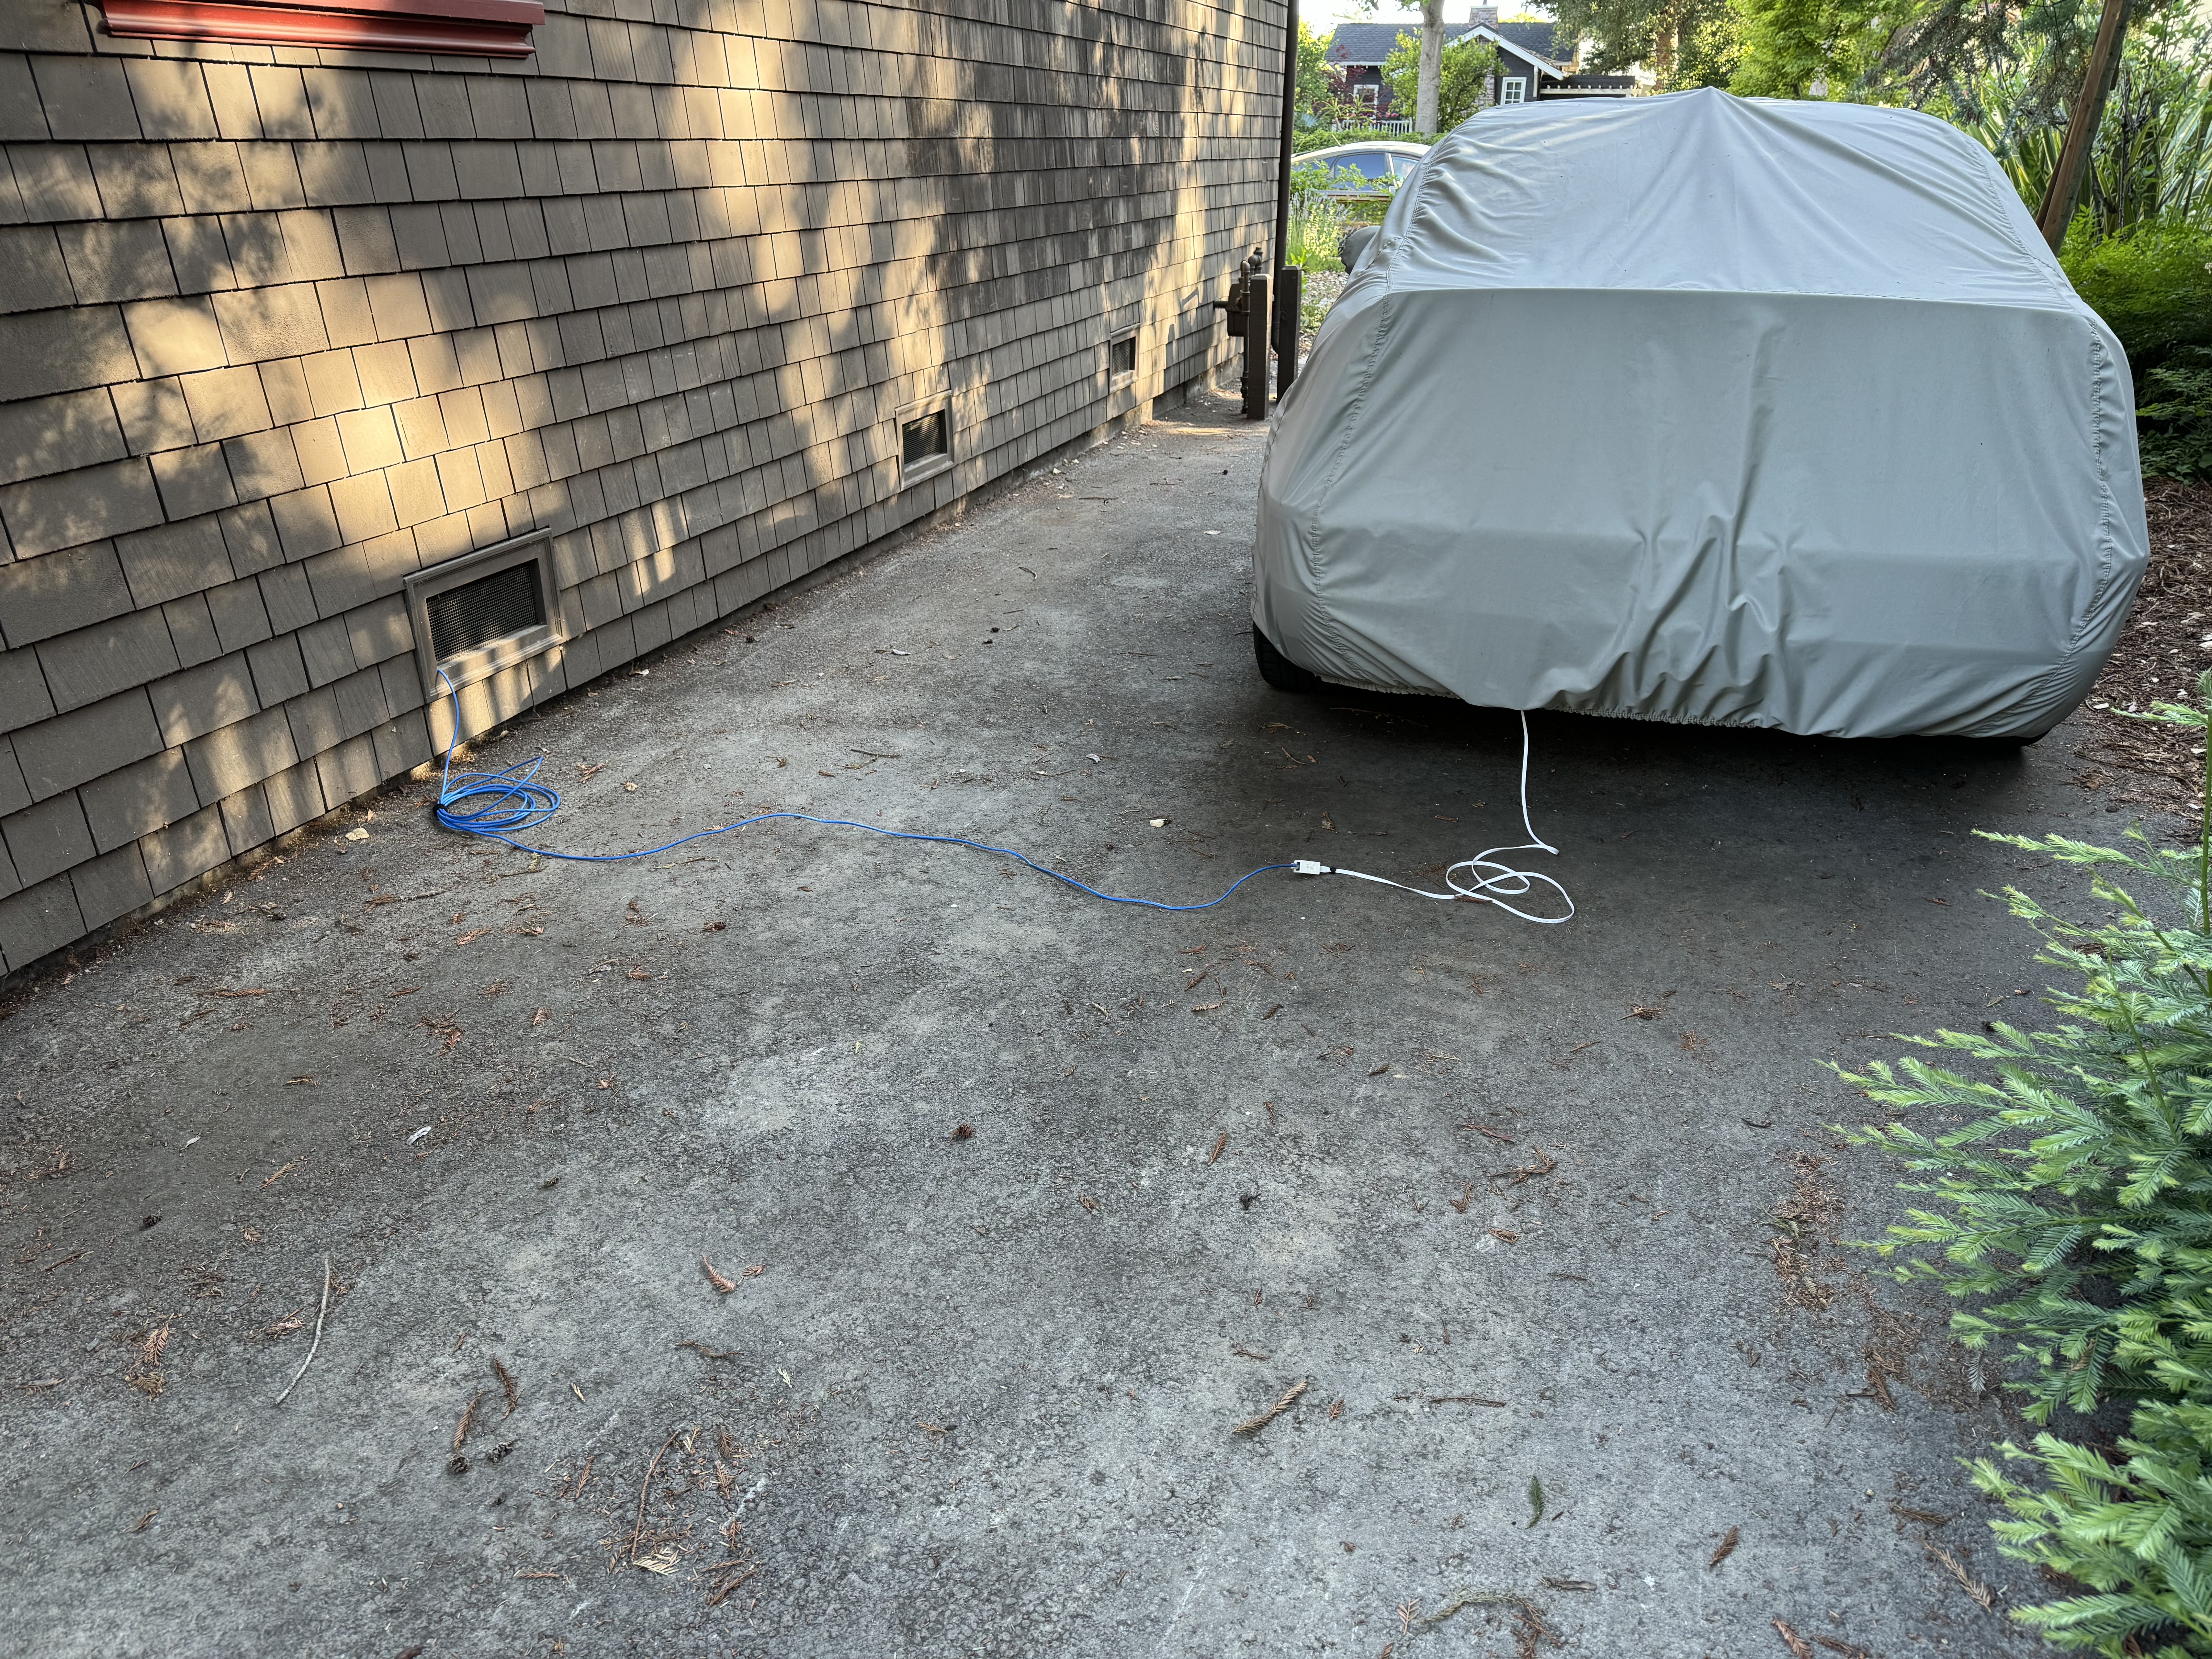
In order to get a comprehensive picture, I invested in a Victron SmartShunt because it supports continuous data logging without too much effort, and seemed to have a great API to dig deeper. I bought a spare negative battery cable on eBay so I could modify the lug to attach to the shunt, and another short jumper to connect to the body ground. This ended up being a great hardware solution to leave connected--no fuss of trying to hookup of my oscilloscope and current probe when I get home each day.
The VictronConnect app leaves a little bit to be desired. I really like the “Trends” graphing feature, but it isn’t available unless actively connected via Bluetooth, and there’s currently no way to export the trends data to something like CSV.
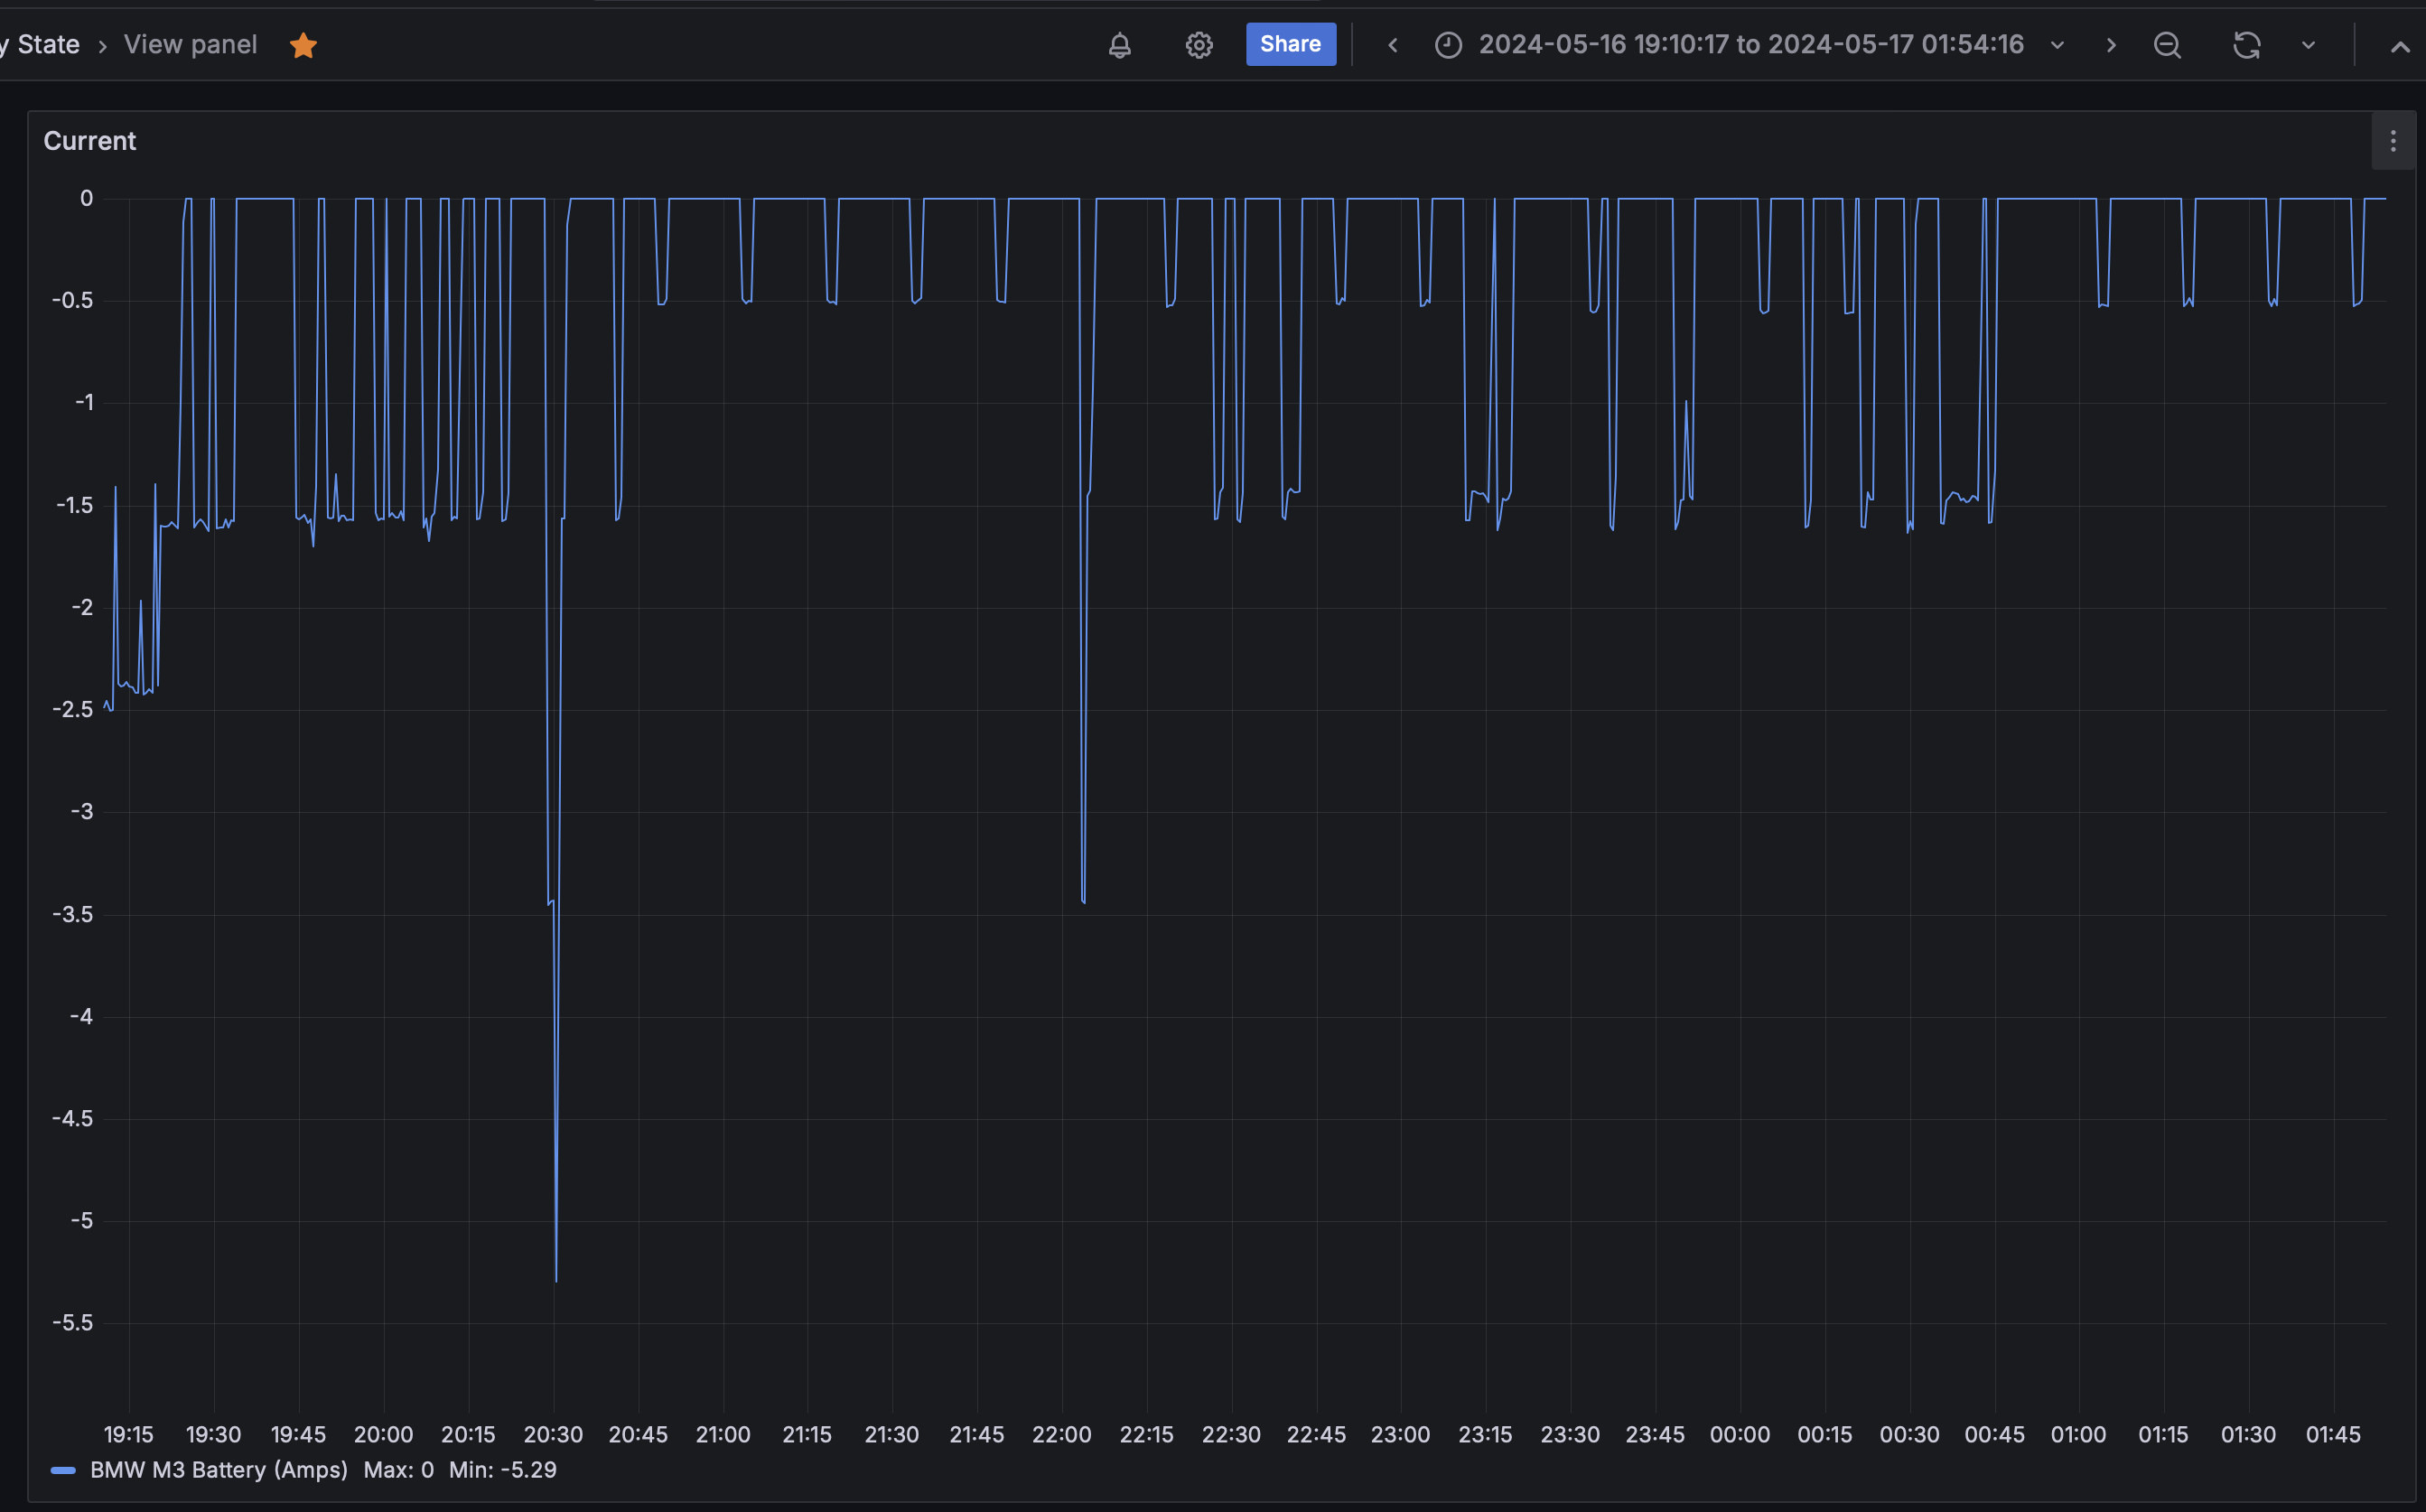
Despite these shortcomings, it clearly showed there was some current usage while I was away from the car. Several places online suggested that it should go to sleep after 16 minutes, and power draw should be no more than a few mA. I observed regular current draw at 15 minute intervals, but they'd eventualy stop. I was happy to find this Service Information Bulletin on NHTSA's website which, in addition to confirming the spec for idle current draw of 40 milliamps after 16 minutes for E46 cars, described the 15-minute periodic drain issue:
Note: On 2005 MY vehicles equipped with BMW ASSIST, there are additional current fluctuations as high as 500ma that last for approximately 2 minutes. The fluctuations occur every 15 minutes for up to 14 hours after key off. This is considered normal operation of the TCU, and should not be considered a fault. This also applies to 2005 TCUs that are installed into earlier production vehicles as replacement parts.
While a slightly disappointing discovery for "normal operation", it didn't seem to explain the drain issue I was encountering. Armed with this additional knowledge, I looked more carefully at the graphs in the VictronConnect app and found something more interesting; some of the current usage events exceeded the 500ma expected from the TCU and they occurred sporadically.
Zeroing in on the fault - Finding the Fuse

Identifying the circuit causing this excessive draw was the obvious next step. I had a clever idea to monitor the current draw and get notified on my phone with a push notification when the issue was reproducing so I could quickly head out there and pull a fuse. My plan was to leave the door latched but ajar, wait for a notification that current draw exceeded 1.2A, and run out there to see if I could either measure a small voltage across a particular fuse—or pull one and see the excess draw drop to zero.
The SmartShunt has a bunch of great APIs for extracting data. I love that they've published both a specification for accessing info via the Bluetooth GATT Protocol, a well as another describing how to extract the (encrypted) info from extended manufacturer data in Bluetooth Advertising Beacon Protocol, which allows collecting data without even being connected to the device.
Fortunately I was well prepared to start collecting this data since I monitor a bunch of data about my home using InfluxDB 2.x, Grafana, and an assortment of homegrown hardware and Python scripts to read sensor data. That made it easy to write a simple script I could leave running on a spare Raspberry Pi to collect the advertisement data from the SmartShunt and both explore it using Grafana, as well as setup some notifications (via Pushover) to encourage me to head out there while the car was reproducing the issue. The script is nothing special, I just grabbed some BLE scanner code from this Stack Overflow post, used the victron_ble library to parse it, then used the influxdb-client library to ingest the data to InfluxDB. I also found some that used MQTT but found it easier to just write to InfluxDB directly in my own custom script.
While a key motivation for the data logging was push notifications, the visualization afforded by Grafana was dramatically better than that provided by the VictronConnect app. Unfortunately, this idea to run out to the car when the drain was happening didn't work. I saw the notification several of times, but didn't manage to quite get to a place where I had enough time to start pulling fuses or measuring voltage drop.
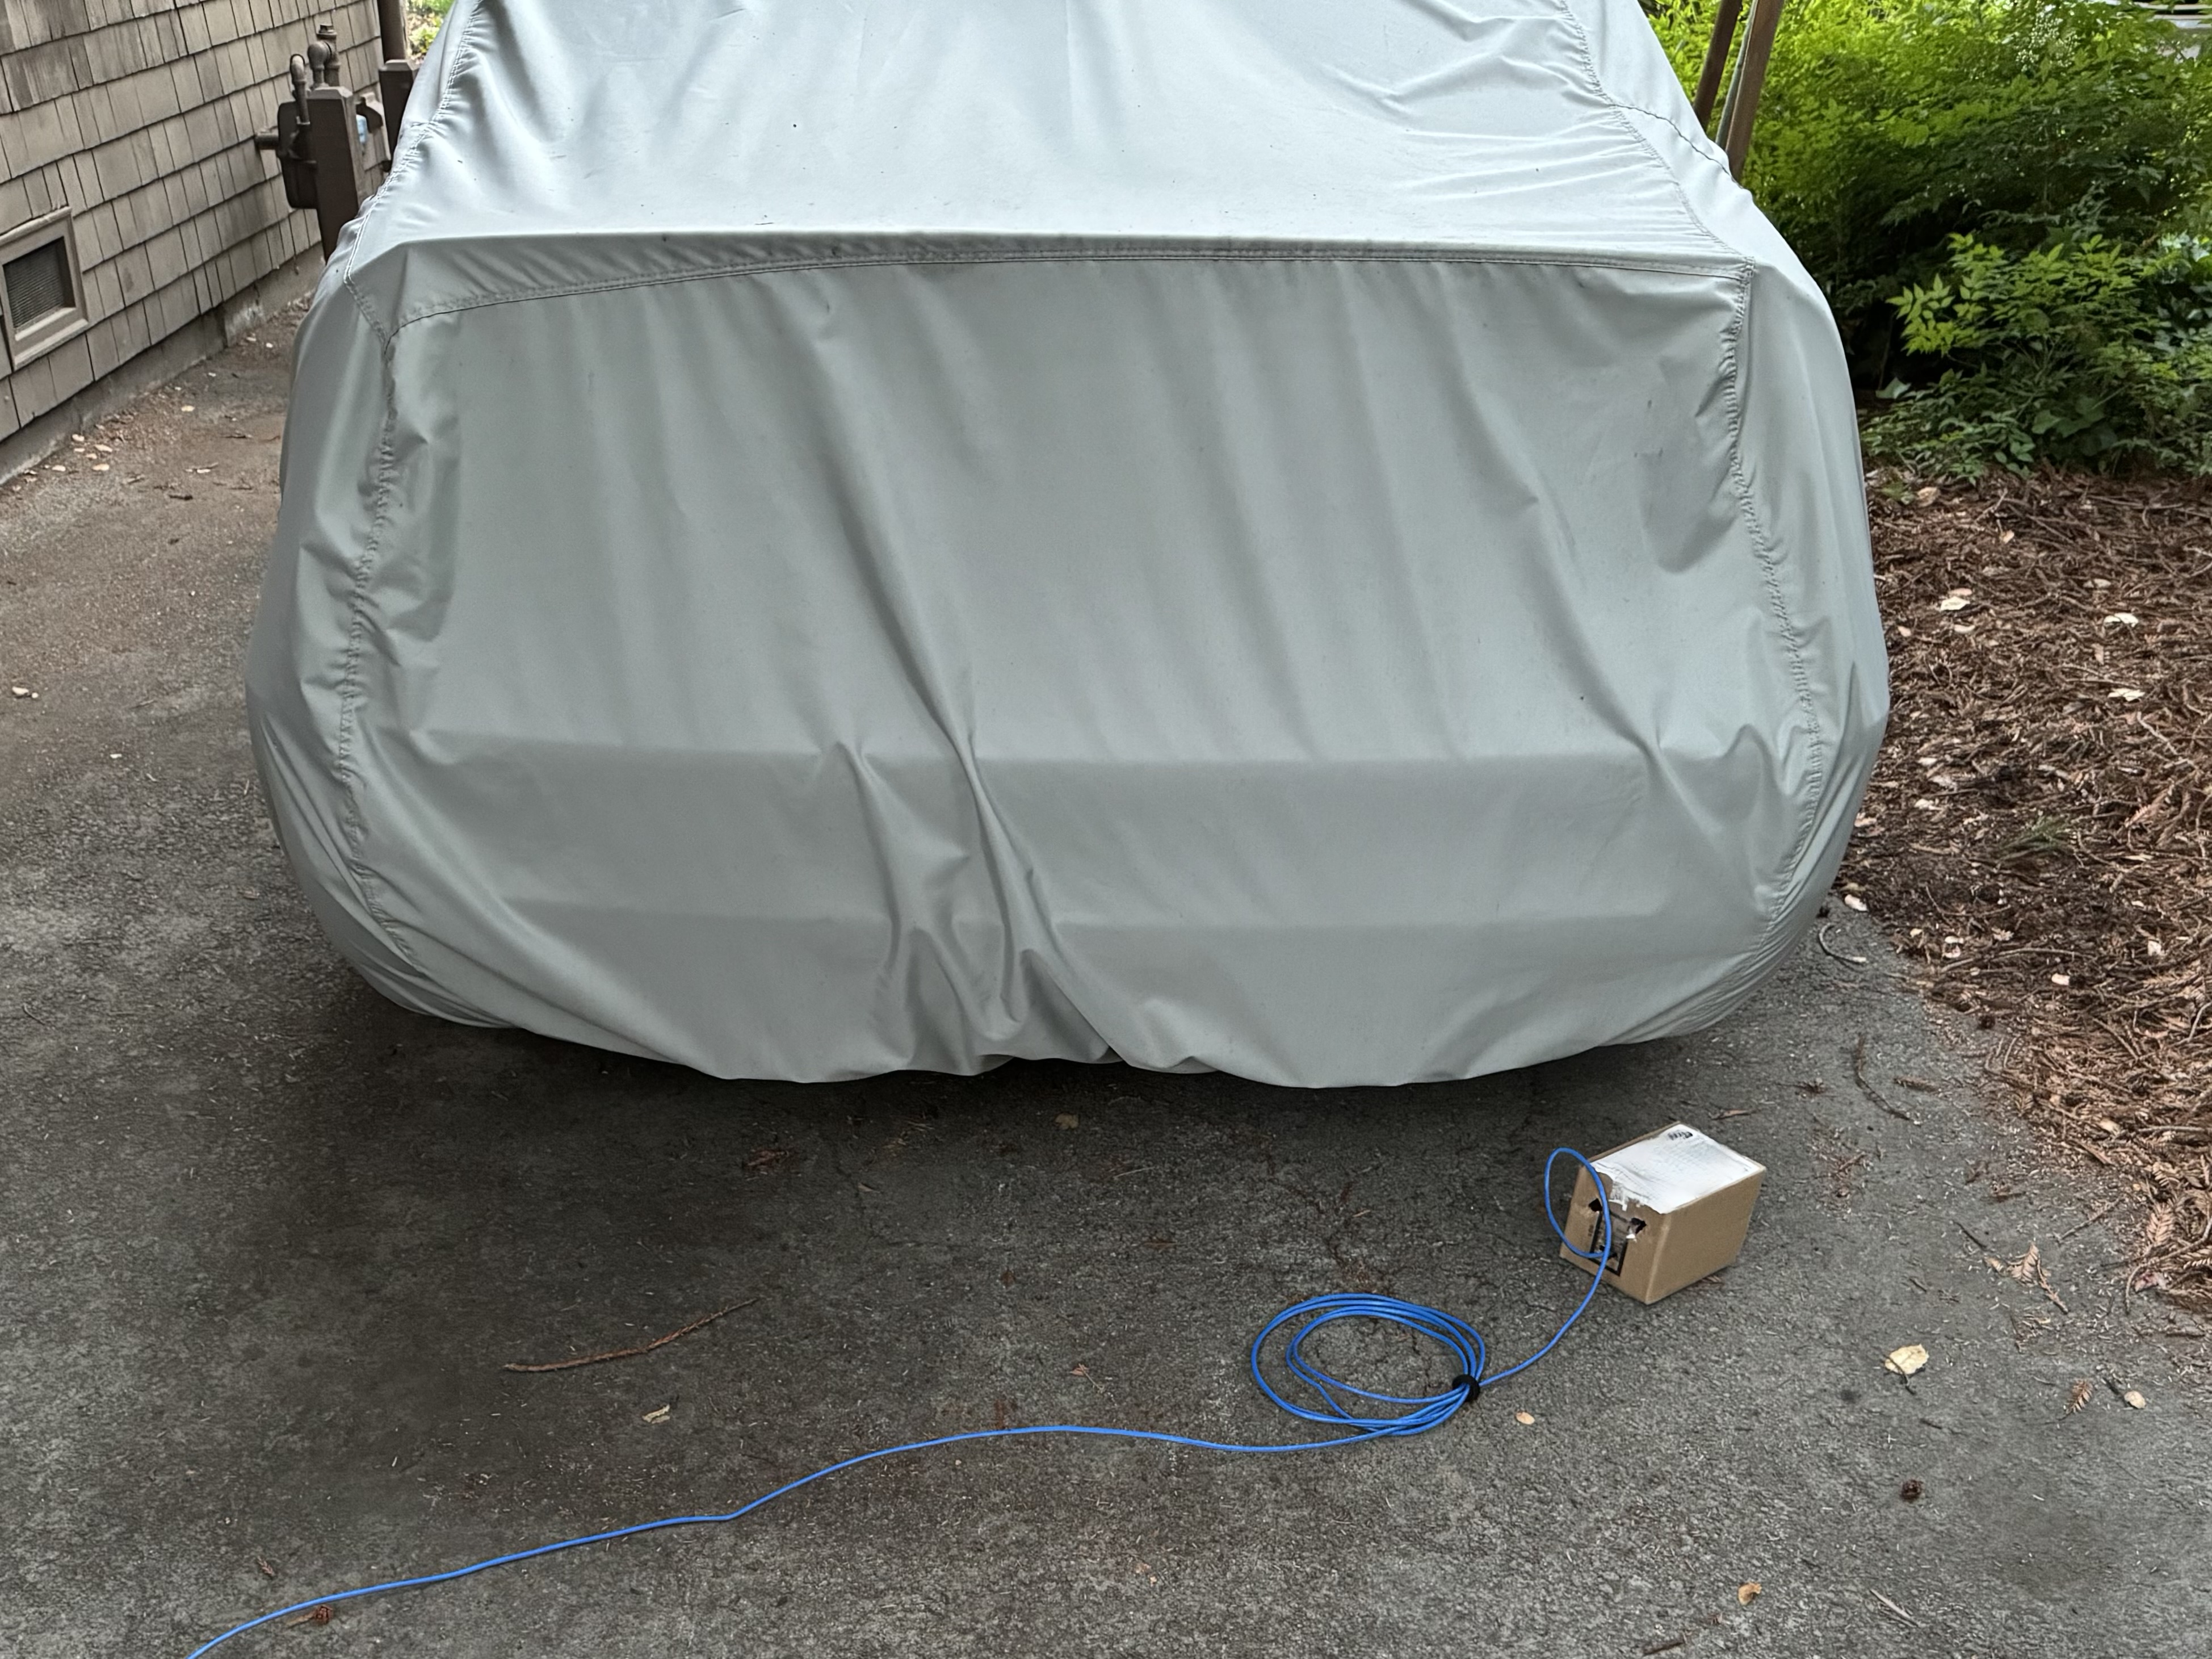
Once I had this high quality data logging, a variety of other options opened up. I had found one story of using a thermal camera to zone in on whichever circuit was causing the issue, so I gave that a go.
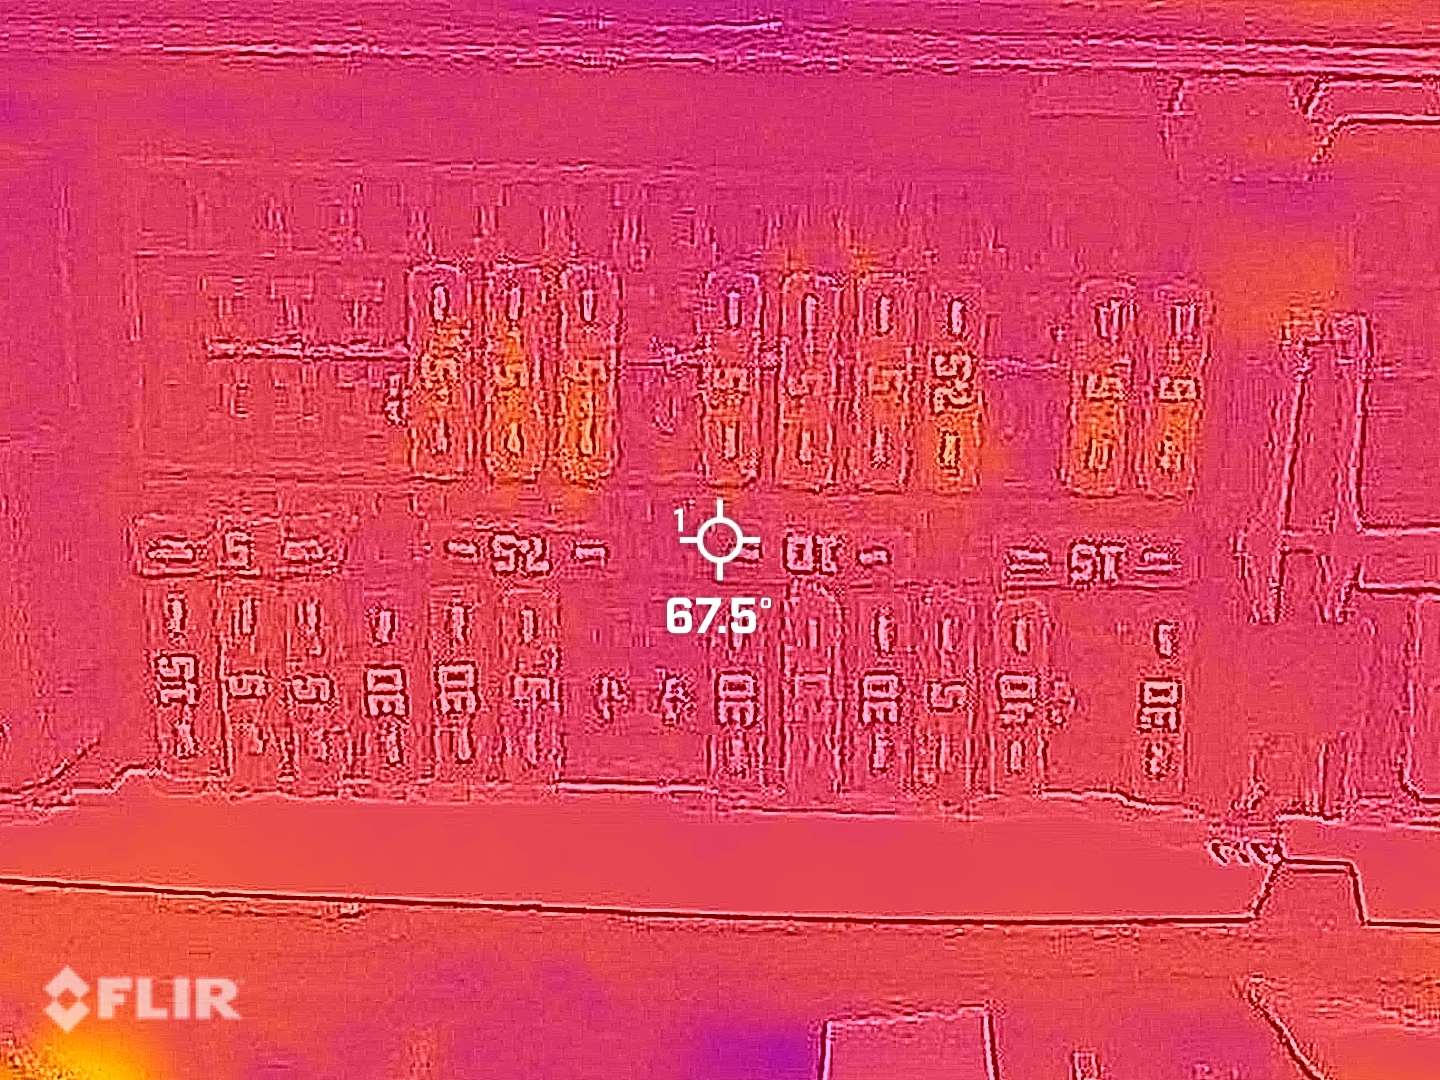
The idea here is that since a fuse has some resistance, any current running through it will cause a voltage drop and heat up ever so slightly. I've got an old FLIR One thermal imager which I setup pointed at the fuse box, started recording, and went to bed for the night. When I woke up I had collected an hours-long video of the whole fuse box. My logging showed that several current-draw events occurred overnight—but the video didn't really show any fuses warming up. I suspect it was too low of draw for too short of time to show up on this low-res recording. Back to the drawing board.
I finally gave in started the arduous task of pulling fuses overnight. I'd identify a suspect circuit, pull the fuse, and then checked out the current draw records in the morning. I was spending a lot time reading the Bentley service manual and various found technical documents around this time to try to understand how the various systems in the car went together.
| Fuses Removed | Circuit Description | Start | Stop | Drain Observed | Details | Notes | |
|---|---|---|---|---|---|---|---|
| - | Yes | -1.5A | Initial no fuses removed condition, observed several times | ||||
| 7, 39 | Telephone | 5/20/24 8:00 PM | 5/21/24 9:25 AM | Yes | -0.95A | ||
| 7, 41 | Navigation | 5/21/24 6:58 PM | 5/23/24 10:15 AM | Yes | -0.85A | Seems like various different components are causing drain—suspect bus traffic is waking everything up. | |
| 14, 67 | Immobilizer | 5/23/24 6:50 PM | 5/26/24 12:05 PM | Yes | -1.5A | ||
| 10, 34, 43 | Instrument Cluster | 5/26/24 12:05 PM | 5/27/24 10:21 AM | Yes | -1.5A | ||
| 9, 32 | Light Module | 5/27/24 2:12 AM | 5/28/24 9:05 AM | No | Suspect monitoring period too short. Try again | ||
| 9, 32 | Light Module | 5/28/24 6:40 PM | 5/30/24 1:13 PM | Yes | -1.5A | ||
| 24 | Parking aid | 5/31/24 8:53 AM | 5/31/24 6:31 PM | Yes | -1.5A | ||
| 49 | General Module | 5/31/24 6:33 PM | 6/3/24 9:26 AM | No | No sustained drain but little flickers of current draw | ||
| - | 6/3/24 9:26 AM | 6/4/24 6:56 PM | Yes | -1.5A | Double check | ||
| 49 | General Module | 6/4/24 6:56 PM | 6/6/24 10:50 AM | No | Bingo: Circuit 49 - General Module | ||
These first few fuse pulls were very interesting! After disconnecting the TCU and Navigation circuits I saw the current drain was reduced, but not eliminated. I hypothesized here that the car was "waking up" due to some signal, and these other accessories were just behaving normally by drawing some power for some fixed amount of time before going back to sleep. After this, I focused my investigation to other components on the K-Bus. Eventually this process led to the descriptively named "General Module", which appeared to be the instigator of all this trouble.
Deeper Investigation - K-Bus Traffic Analysis
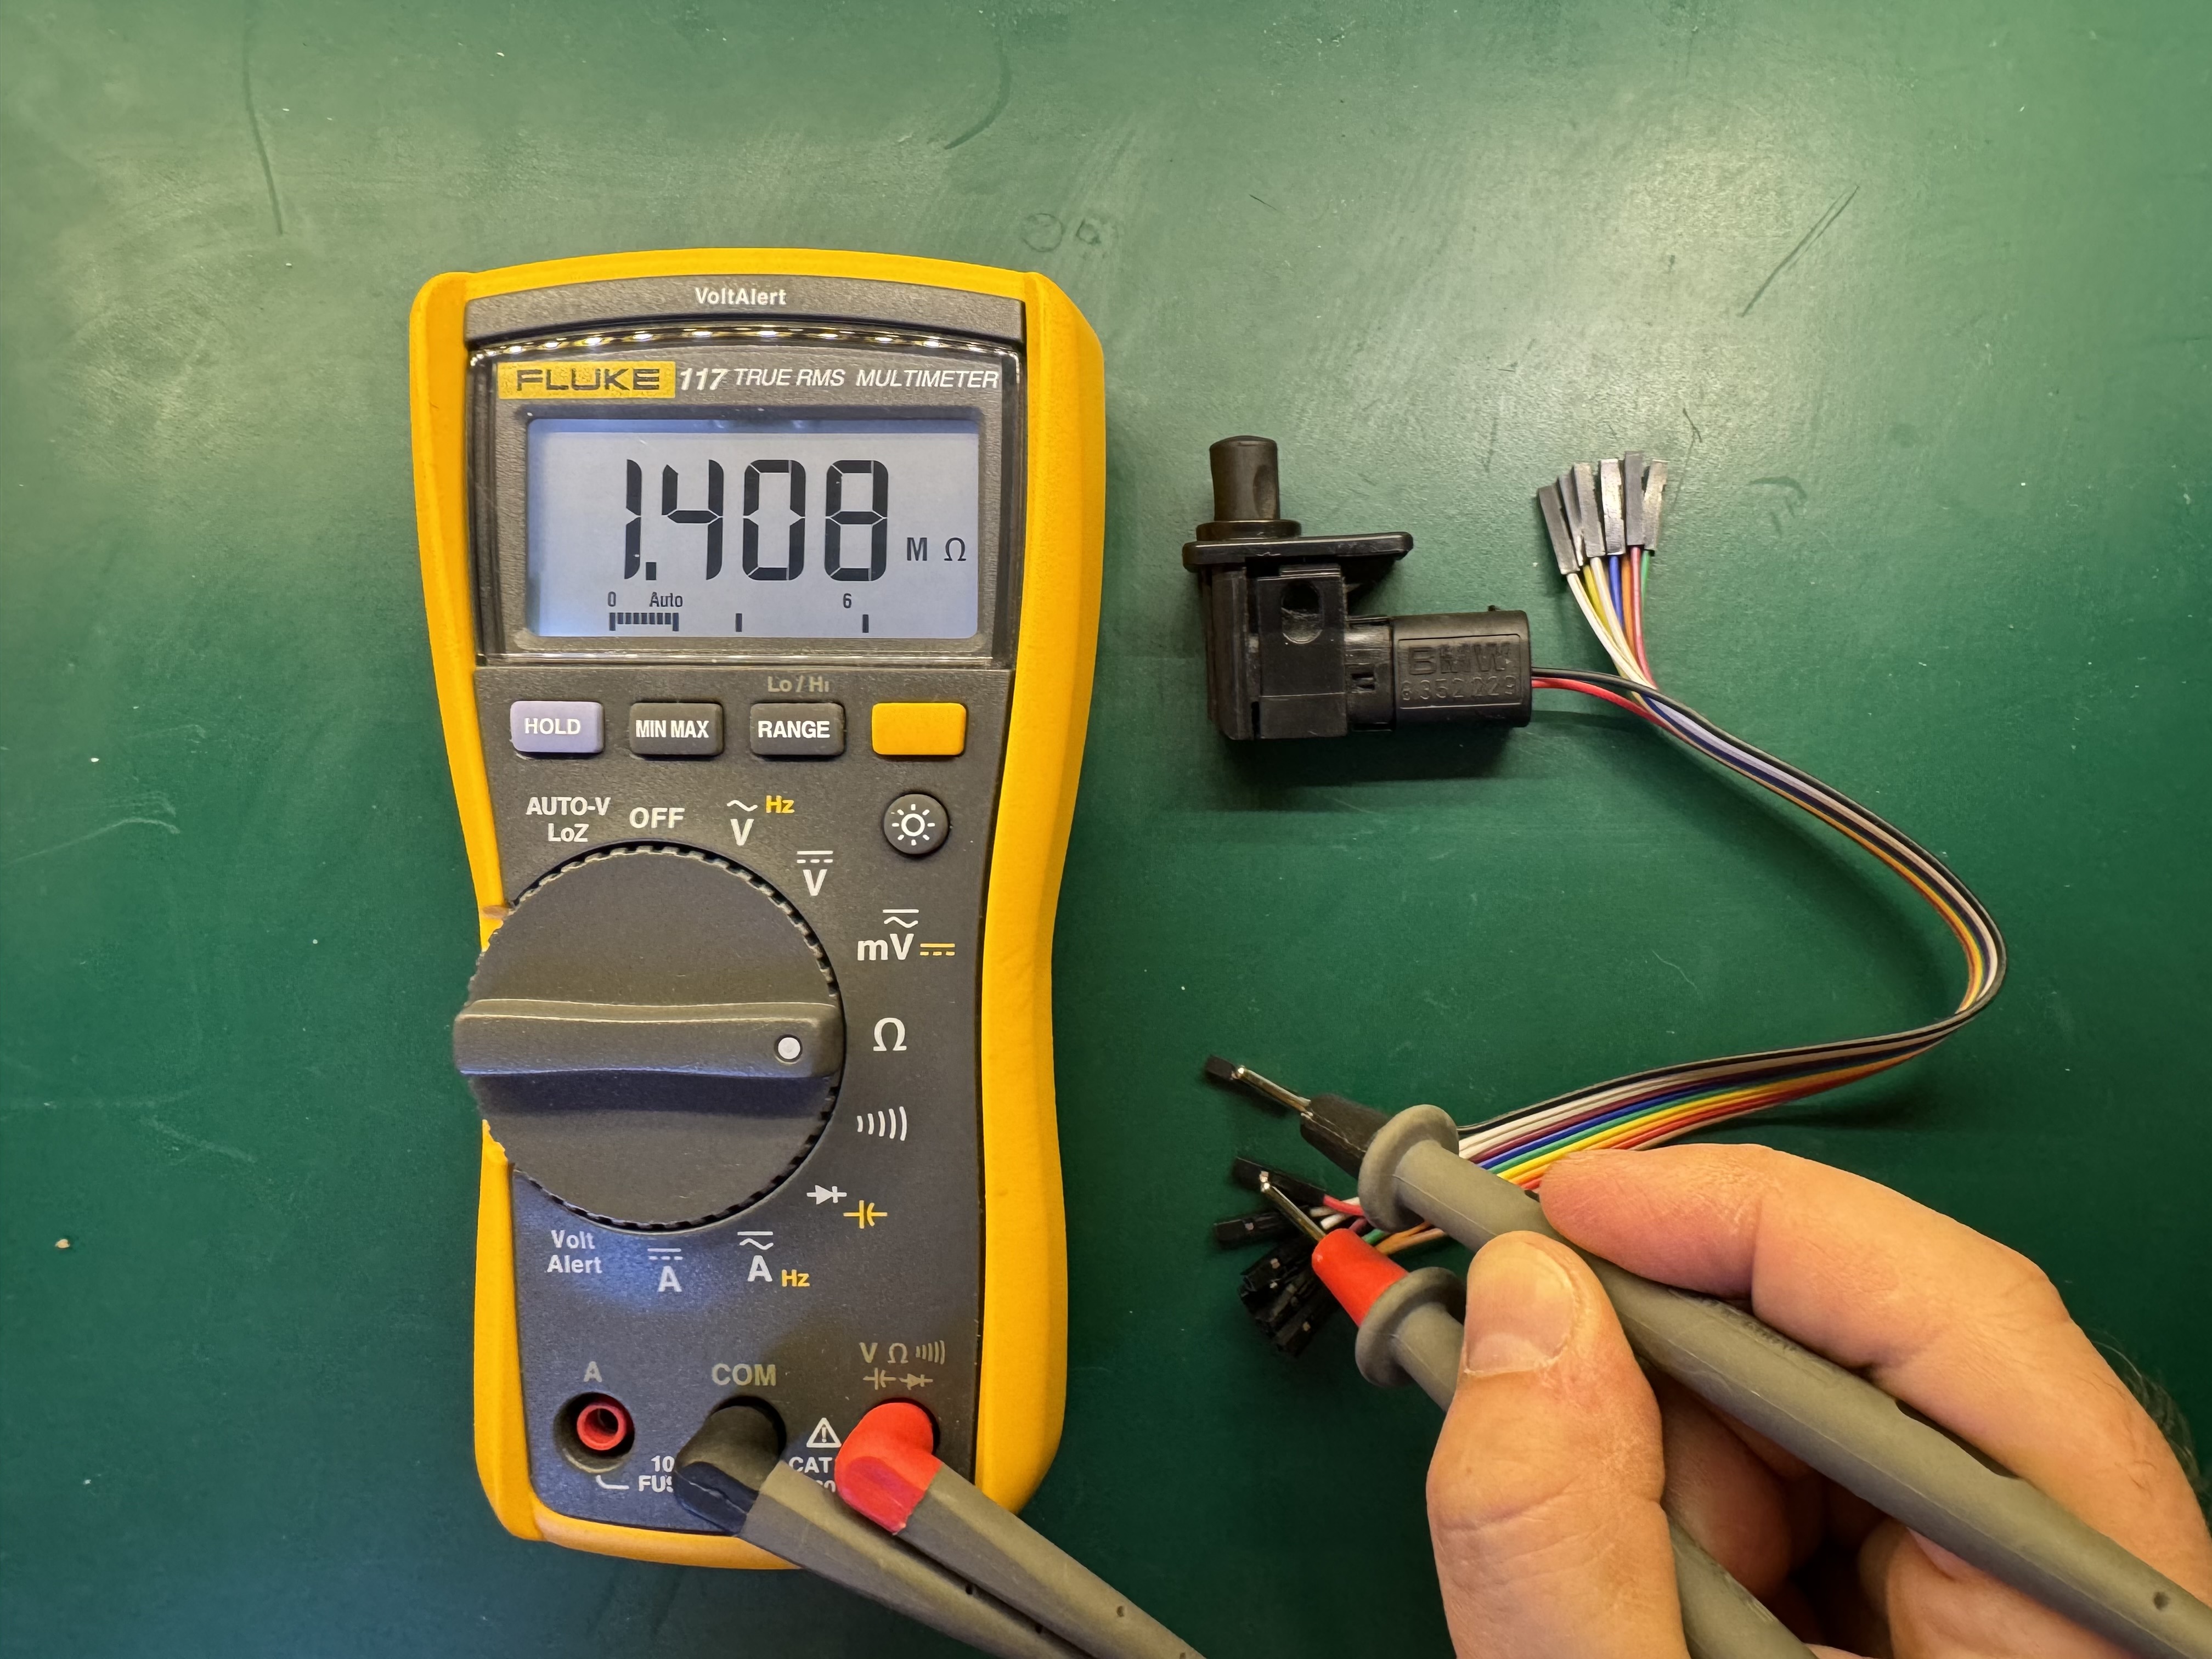
While it was satisfying to get as far as identifying the circuit—the particular module was itself quite frustrating, since the General Module controls a variety of things and has a number of sensor inputs. I found a website devoted to fixing failed General Modules which had a bunch of great diagnostic tips, but symptoms of the common bad relay failure didn't quite line up with what I was observing. Eventually I decided that to further test my theory about a device on the bus waking everything up, I needed more specific information about what that message was. I had previously been interested in the I/K-Bus, so I had a Resler IBUS interface on hand—but had never taken it out of the package. The time had come to hook it up and start sniffing bus traffic.
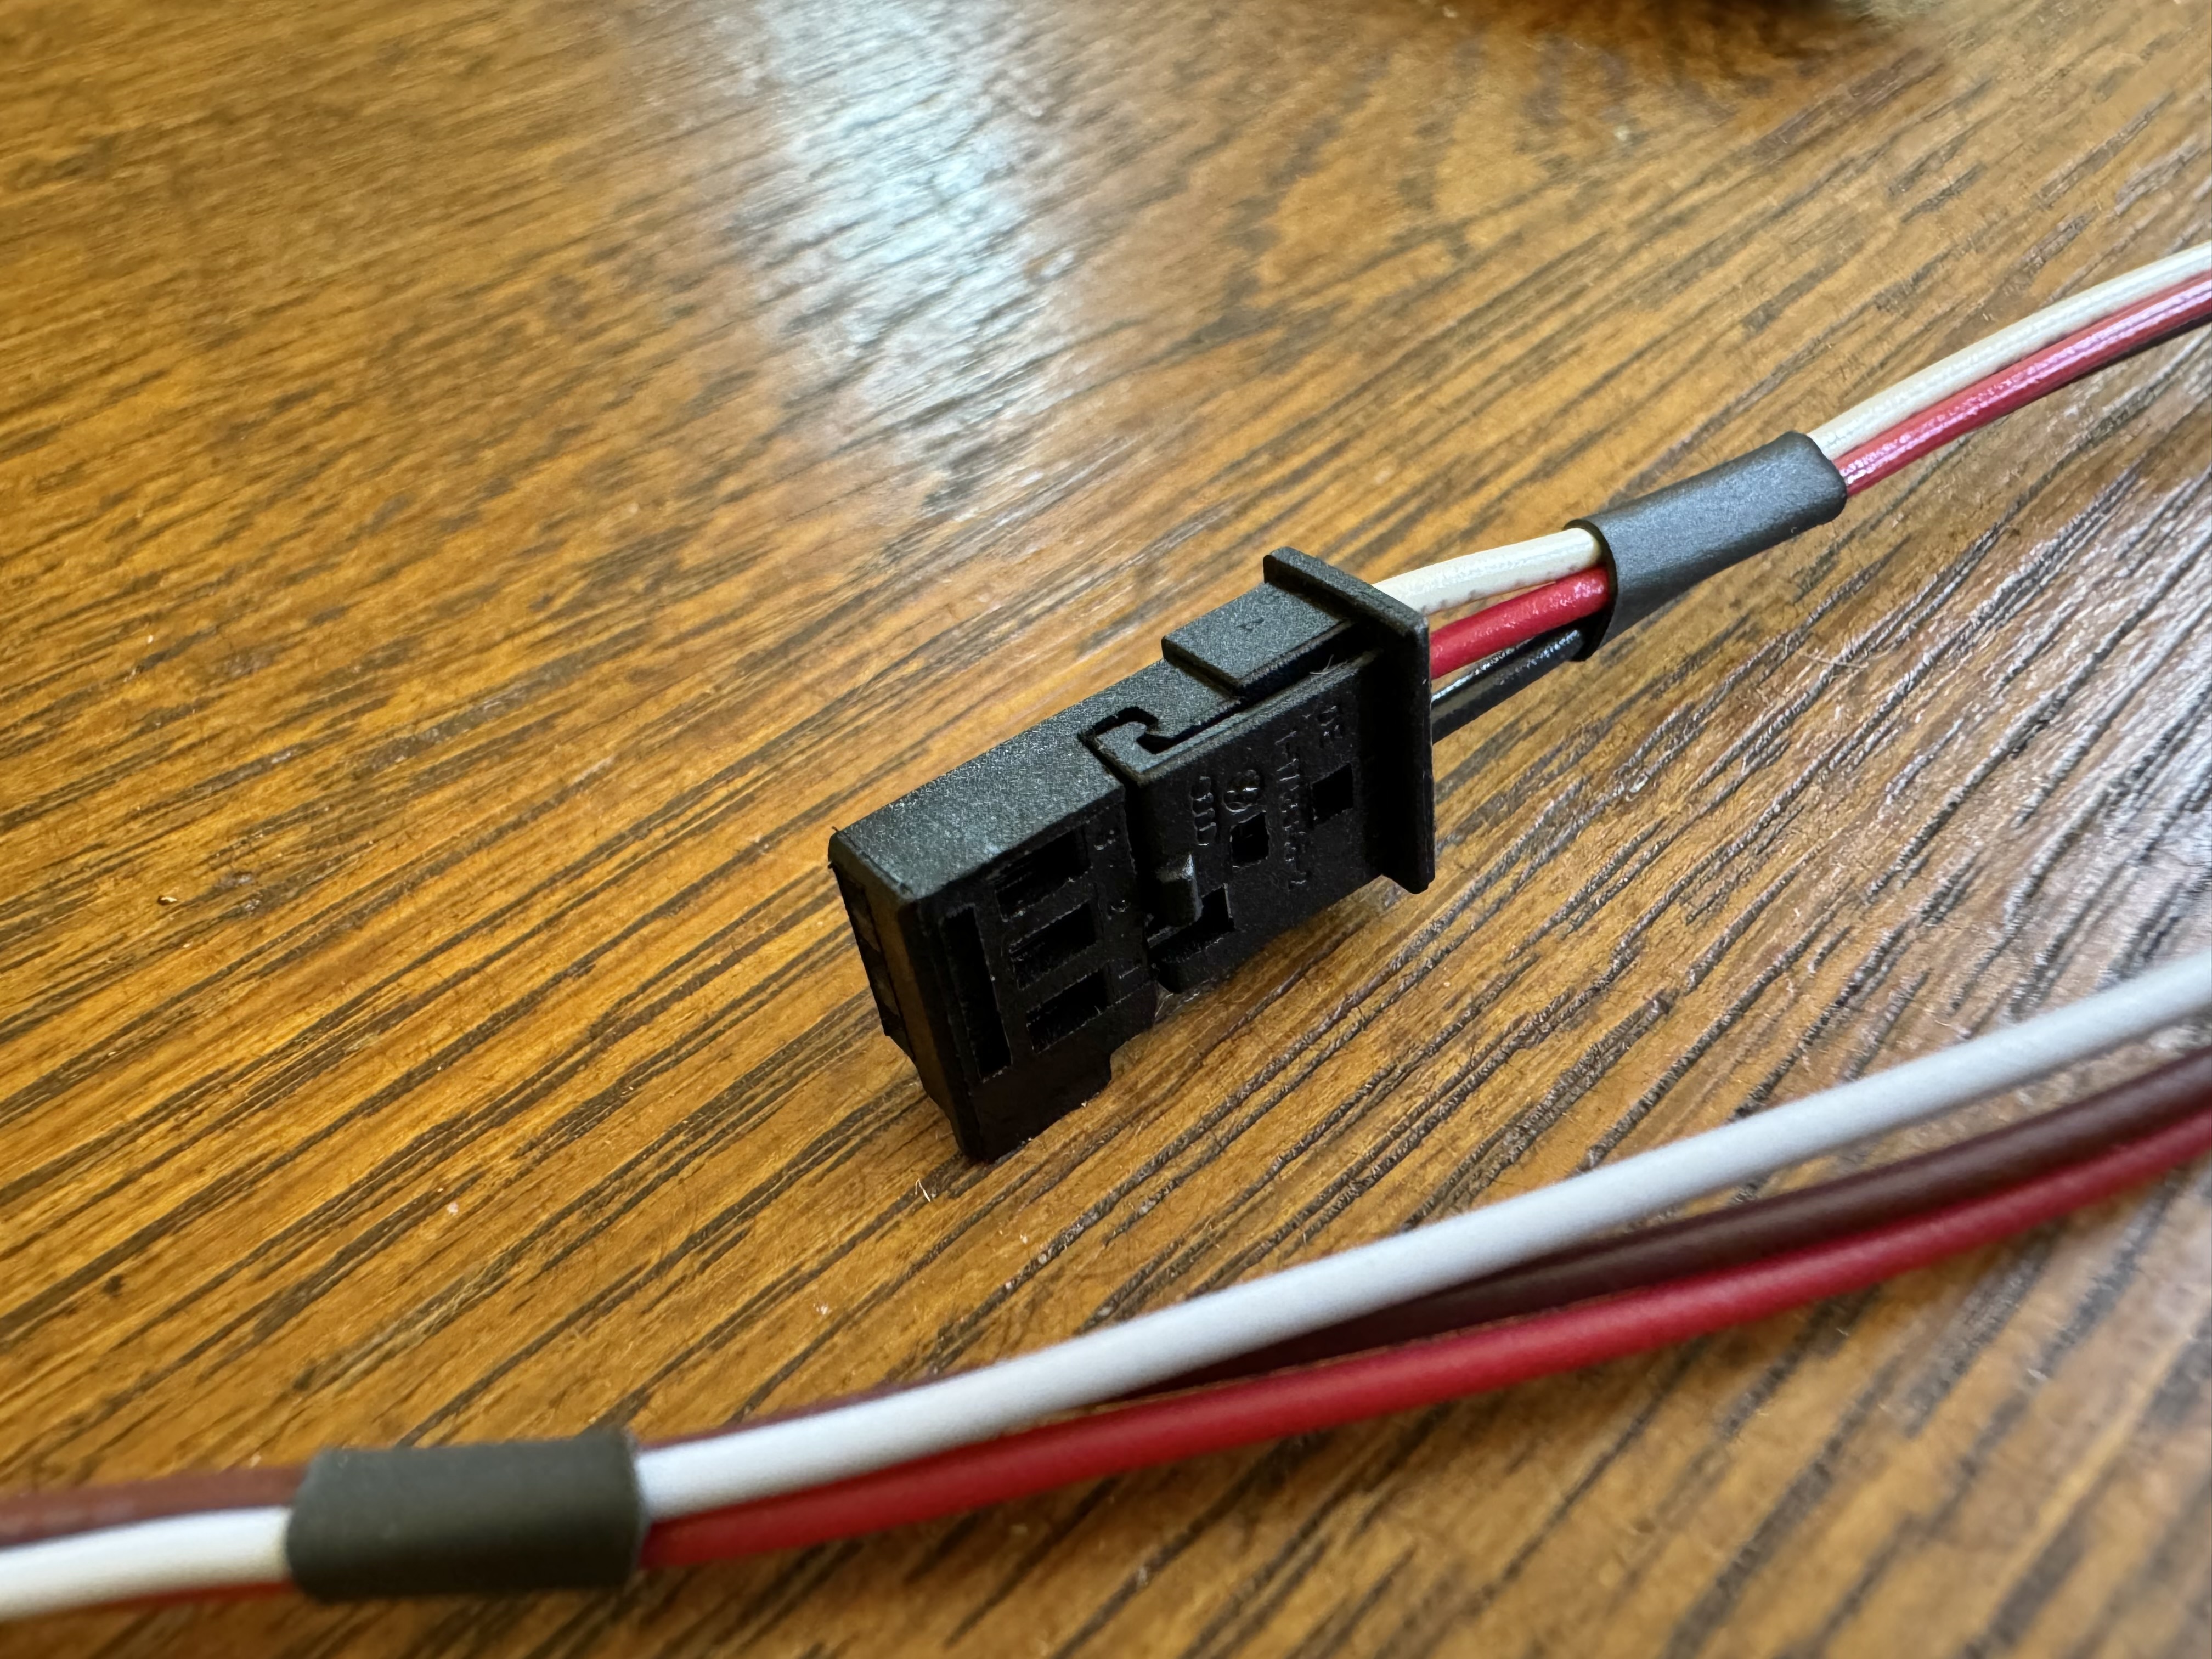
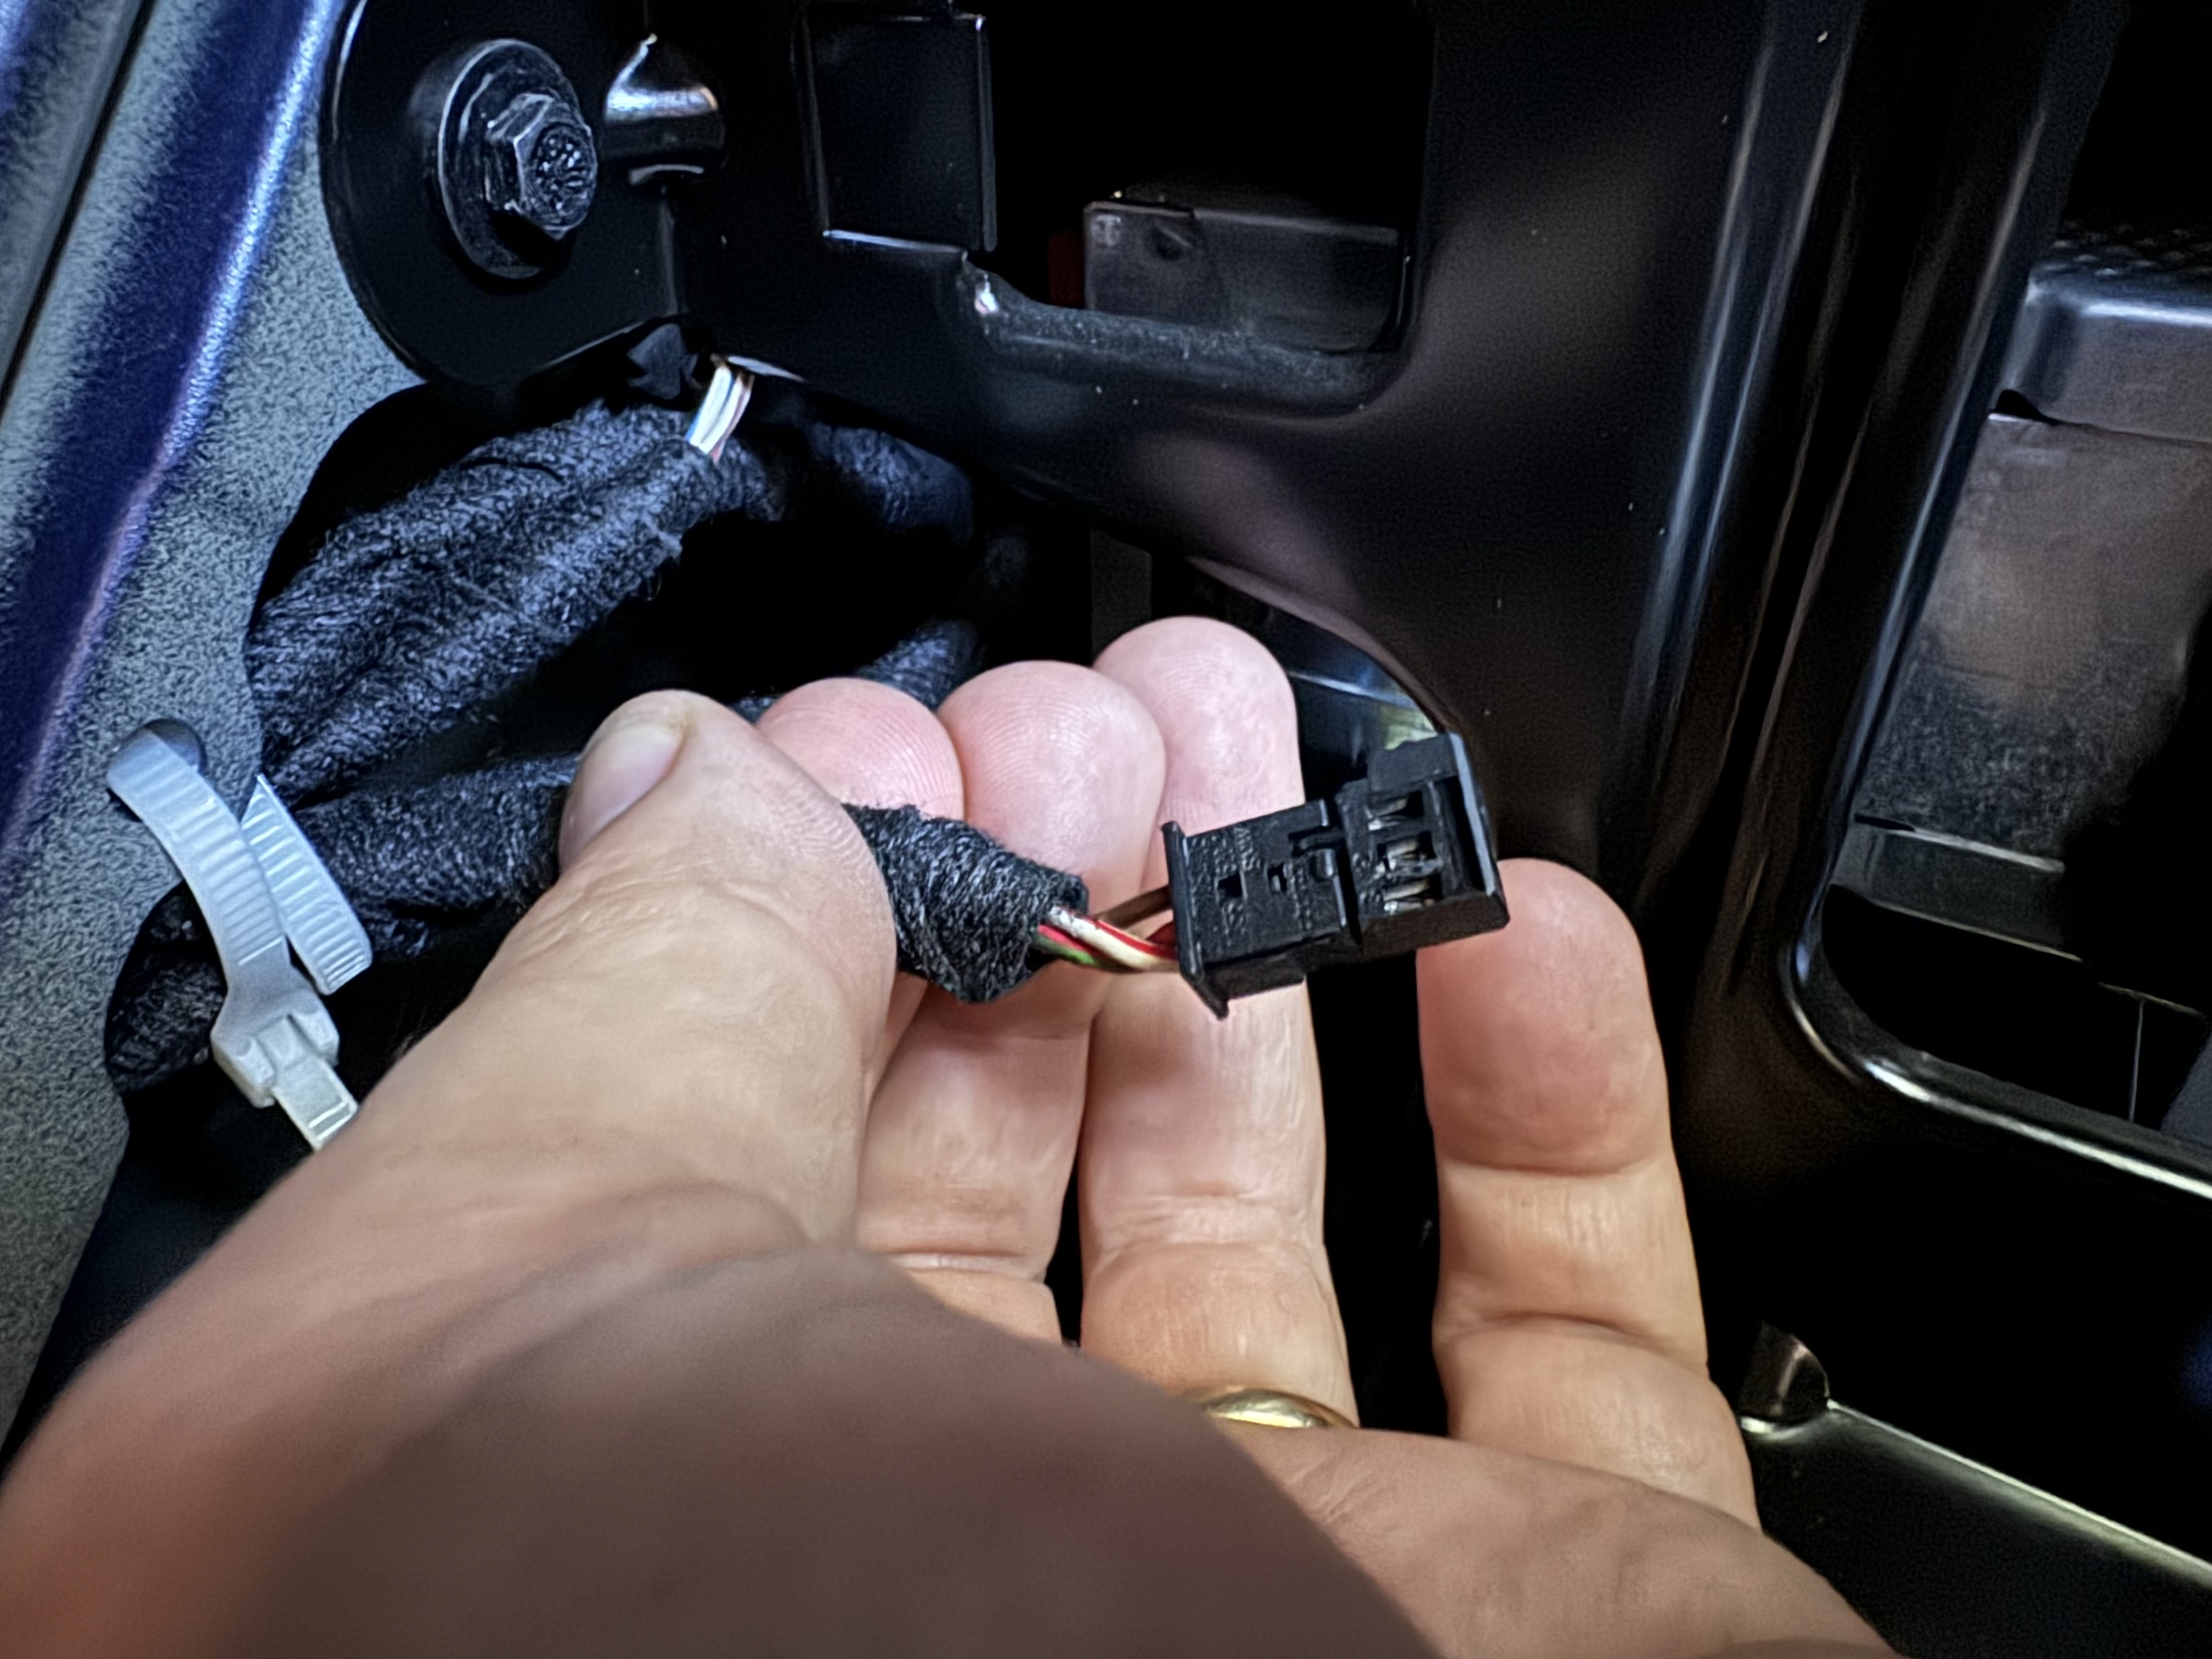
I'd always hesitated to hack up my car's wiring harness just to get some cool stats and poke around. I found many sources indicating what color wires I should splice into, or a particular pin to remove on the back of my radio—but I wanted something easily reversable. It turns out, there's a 3-pin connector that is used to connect a variety of devices to the K-Bus, including the DVD Navigation unit and other less commonly fit accessories such as Sirius Radio. It took some investigation to discover the details, but essentially BMW uses connectors from TE Connectivity for these bus connections on the E46, specifically the "MQS" series or Micro Quadlok System. This family includes nearly 20,000 parts, but the the particular ones we're interested in here consist of a Plug (drawing) and Socket (drawing). I ended up purchasing some kit on Amazon that included a couple of sets of plugs, sockets, and critically the matching pins. This whole assembly plugged in nicely to a spare plug in the equipment rack in the back.
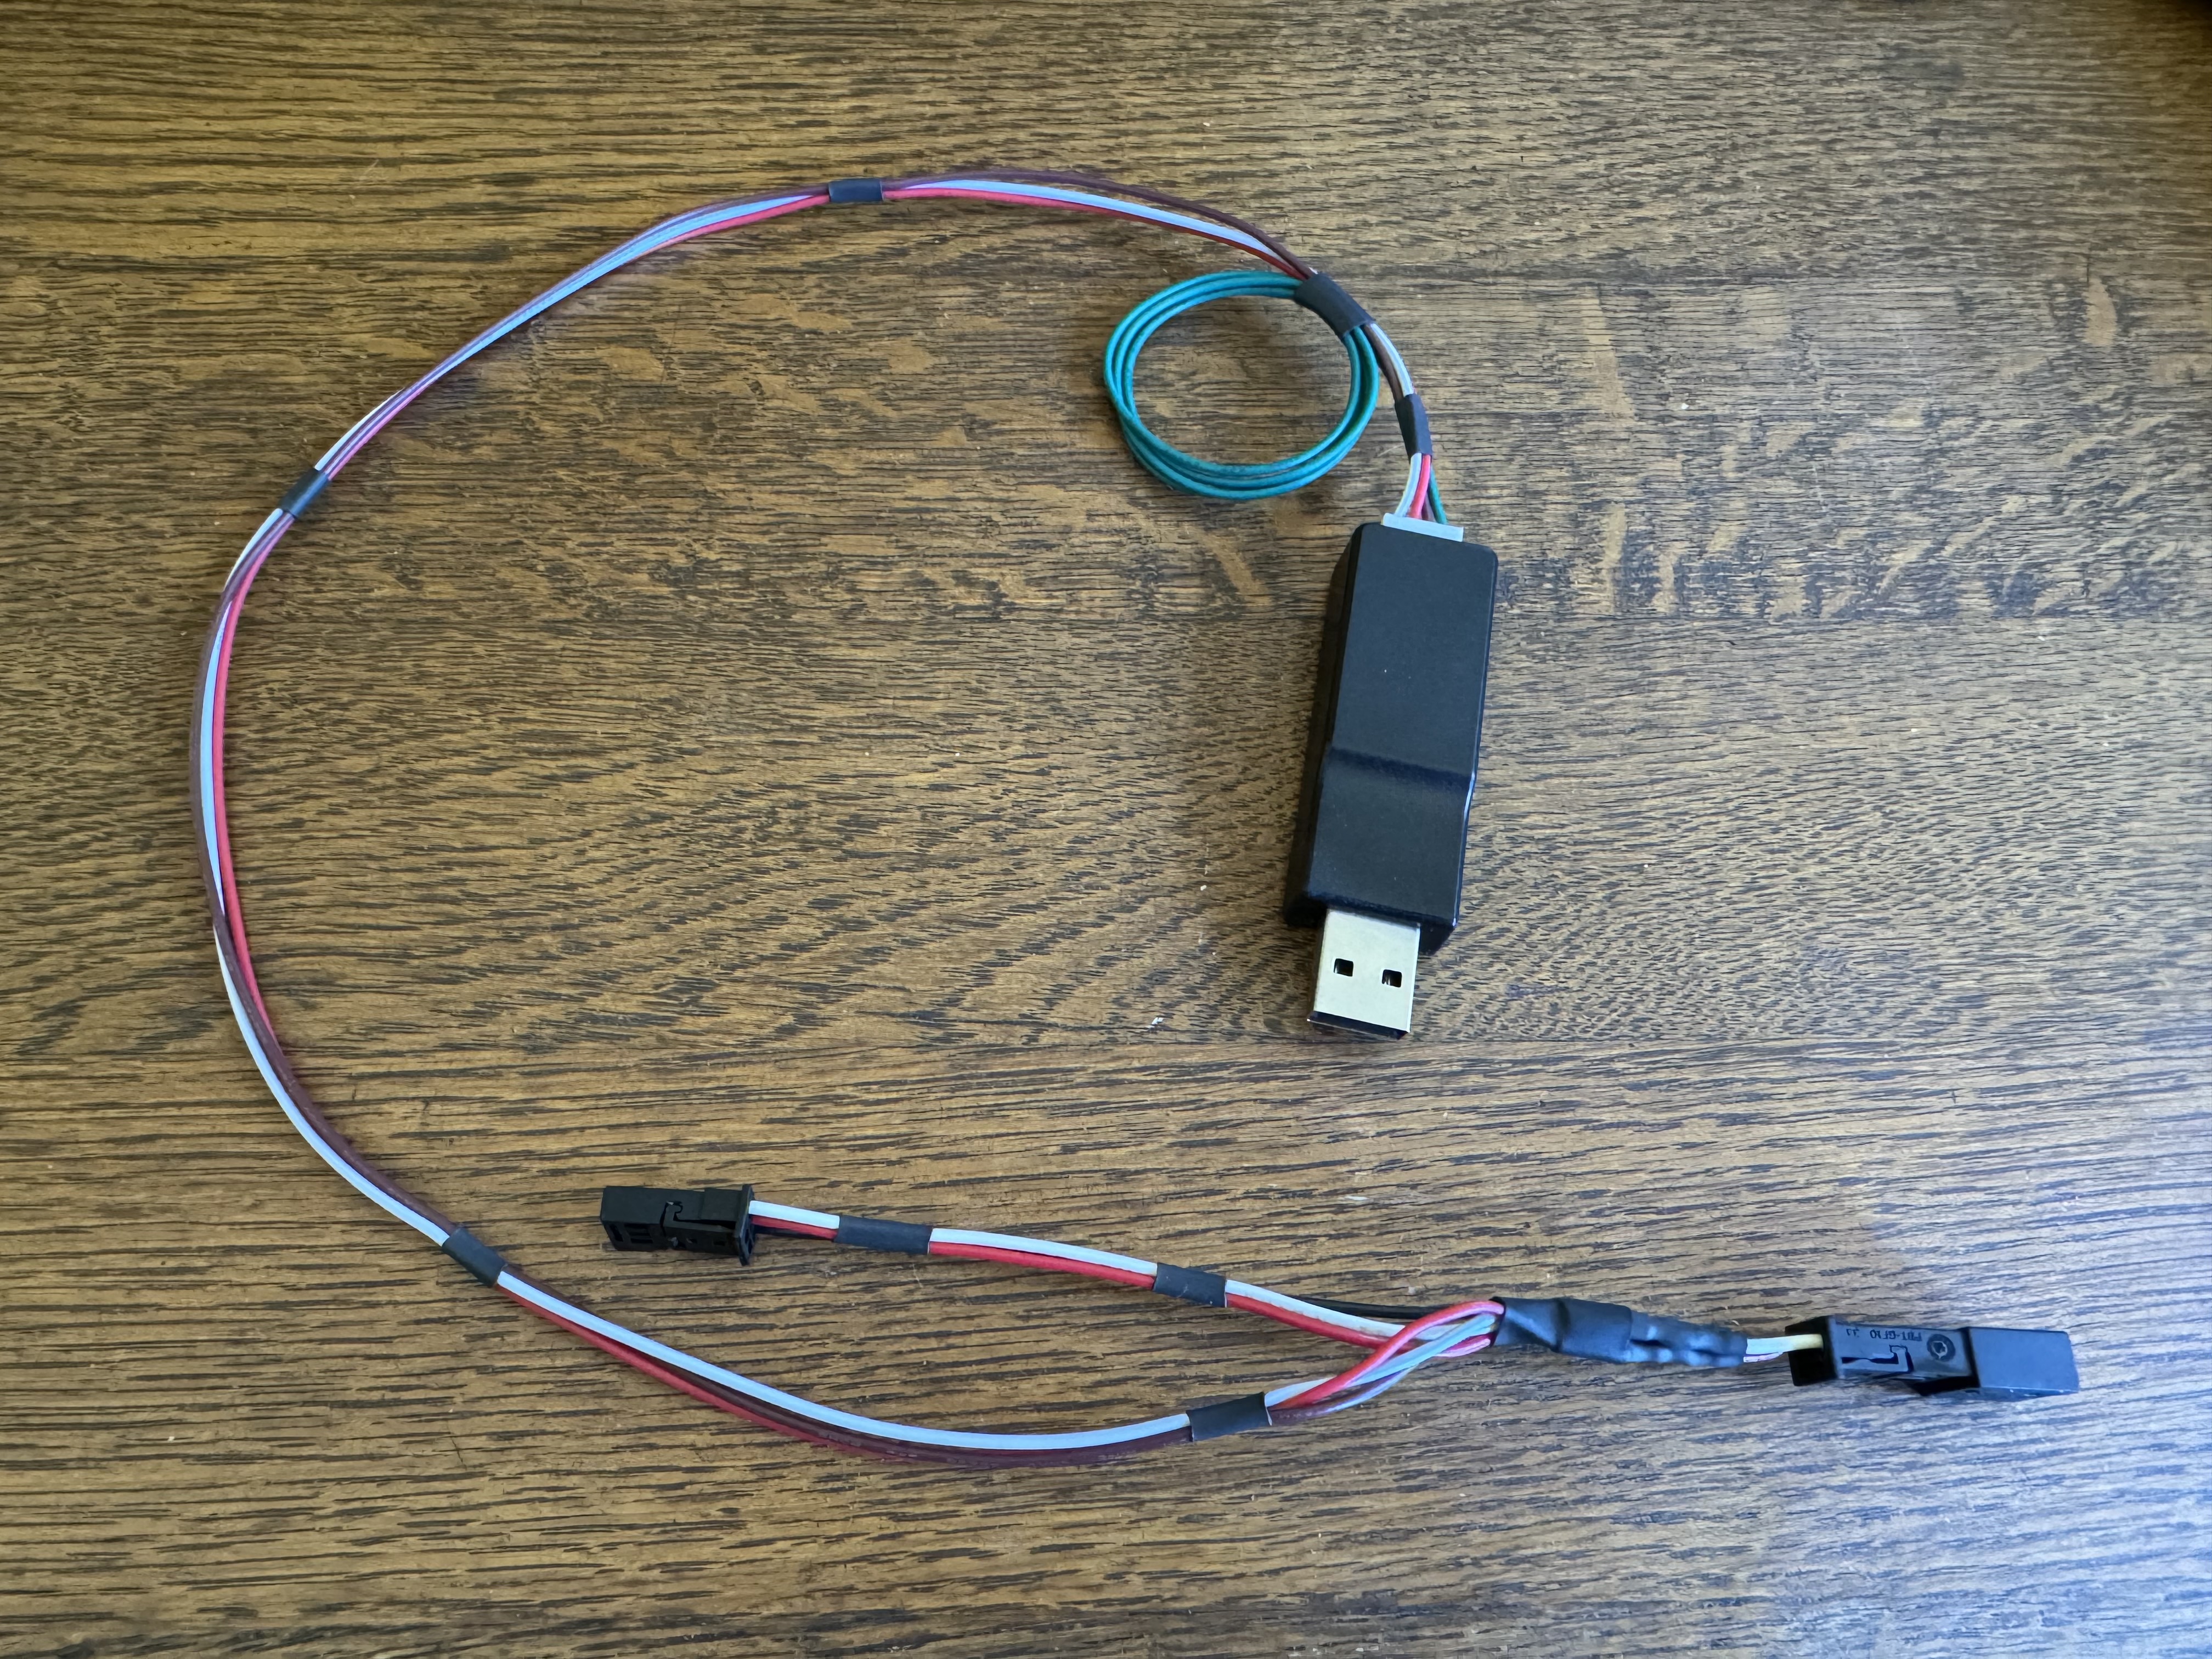
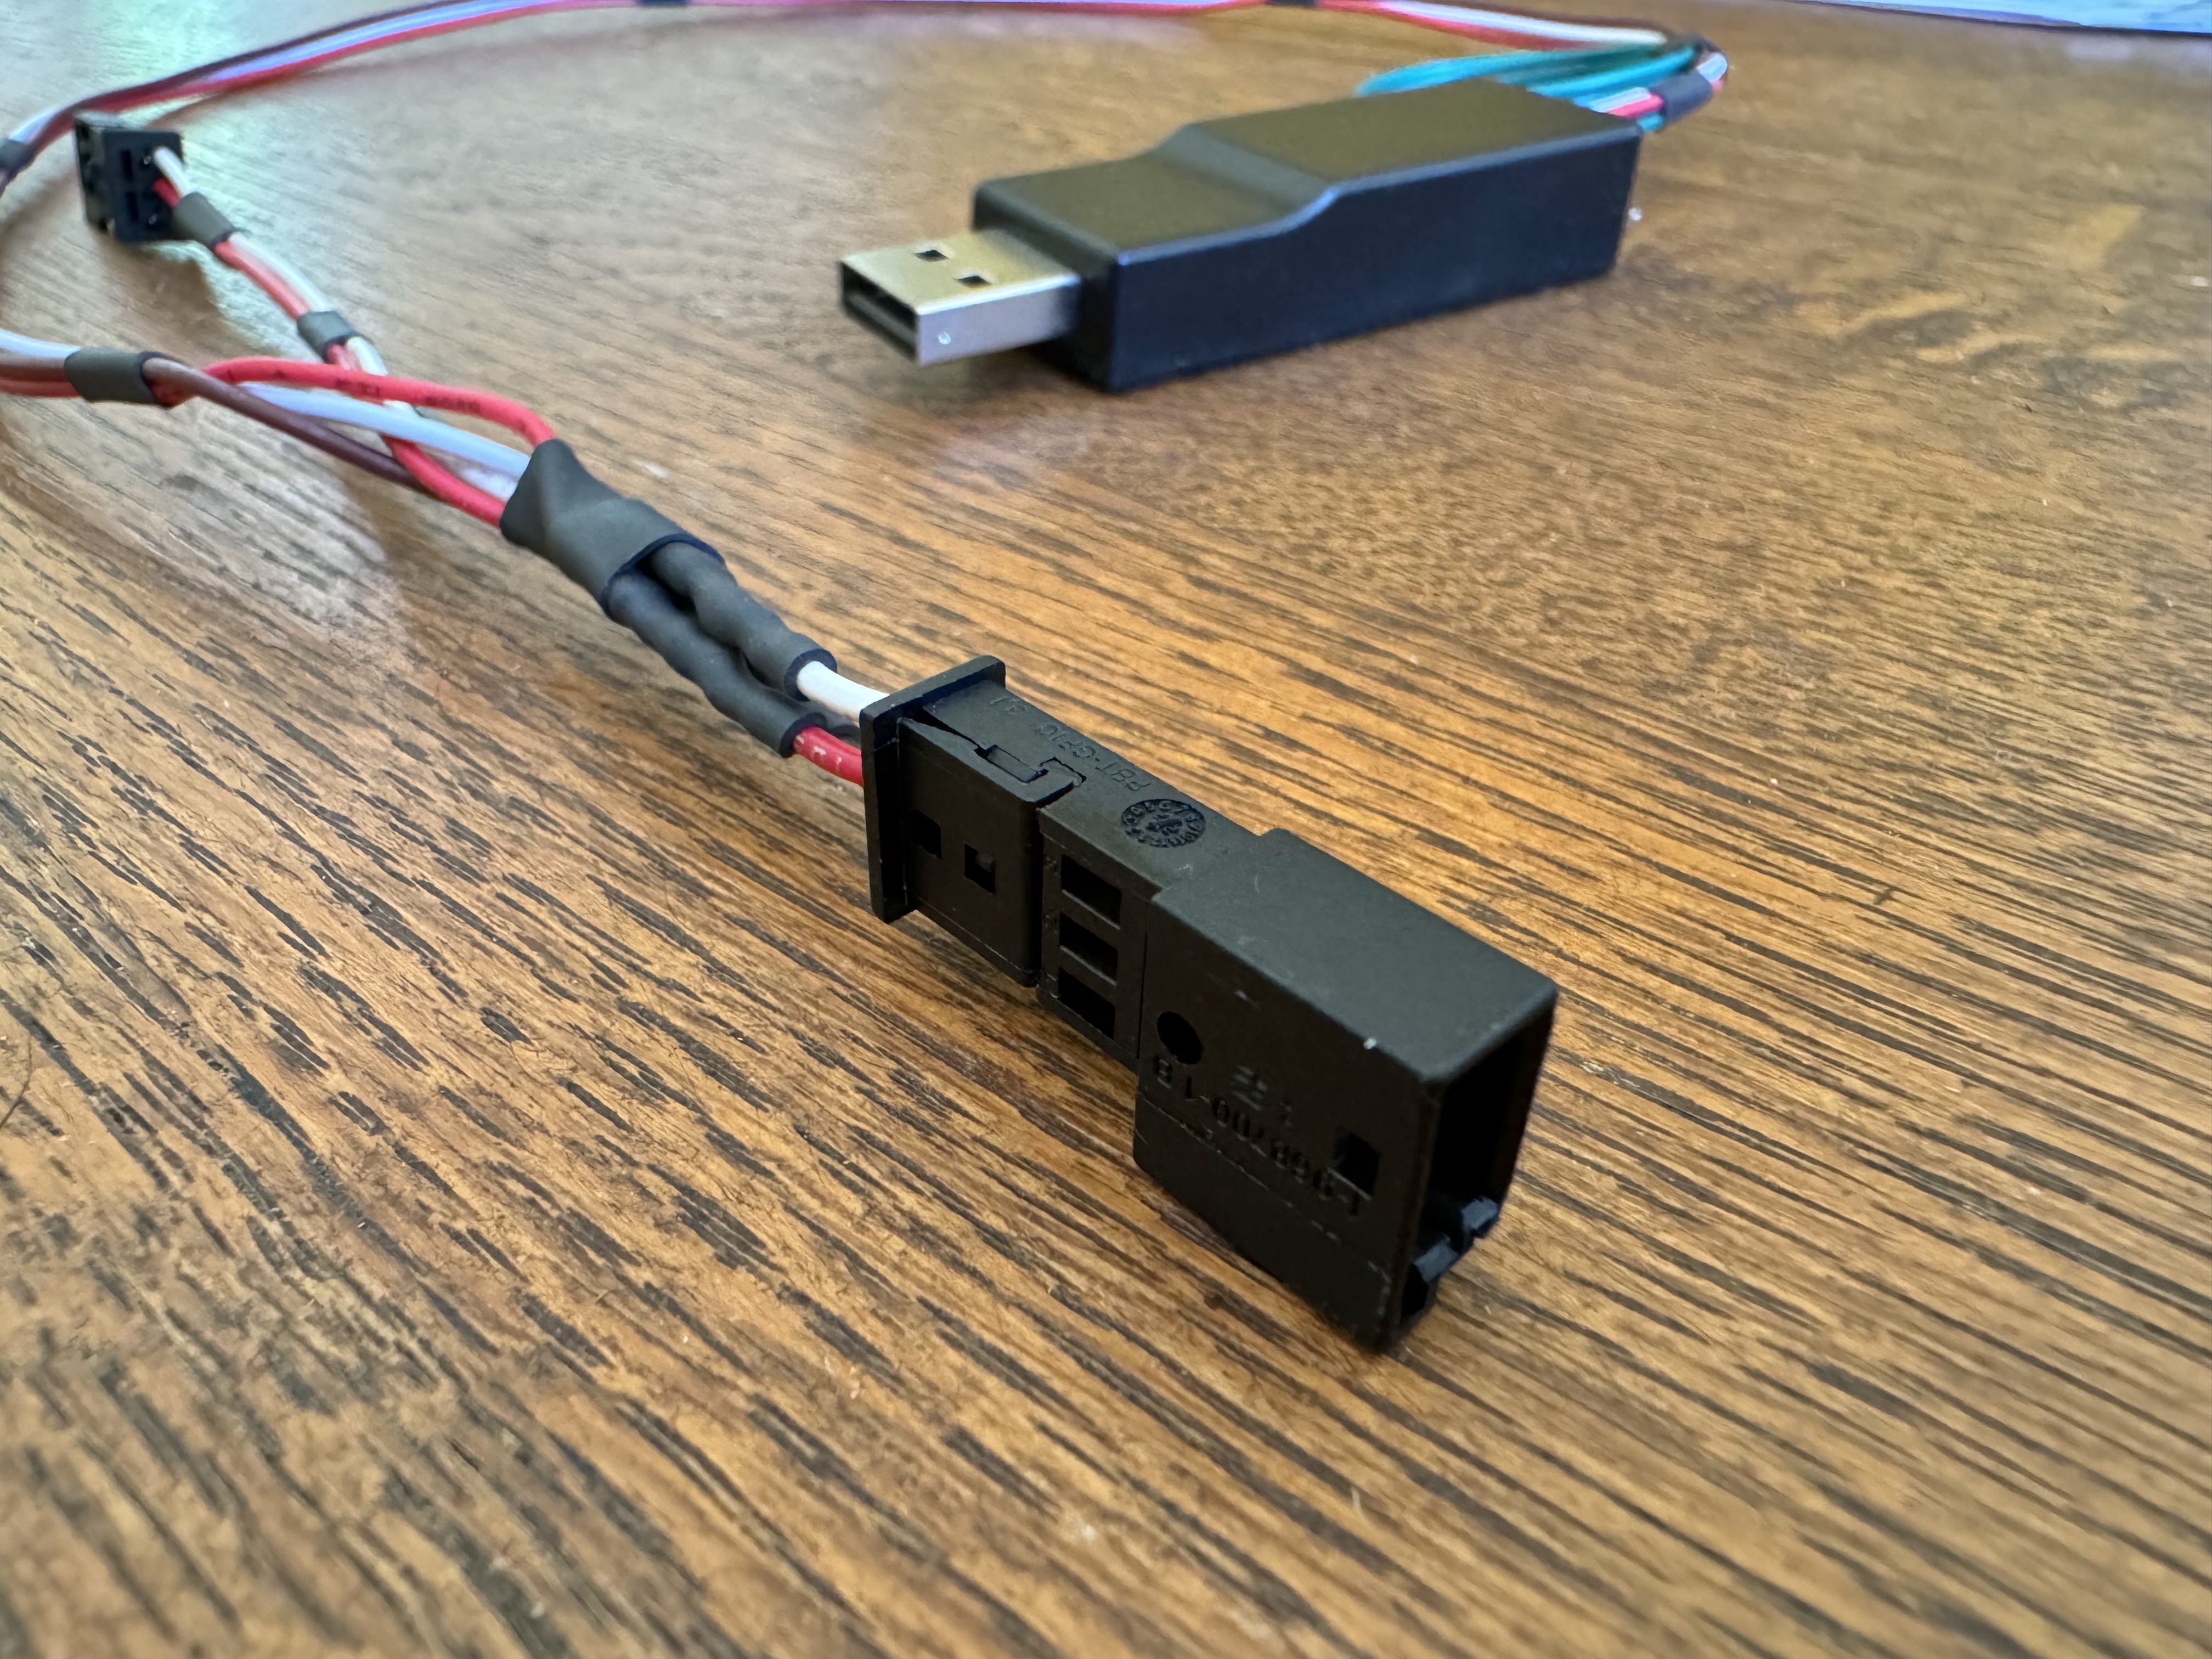
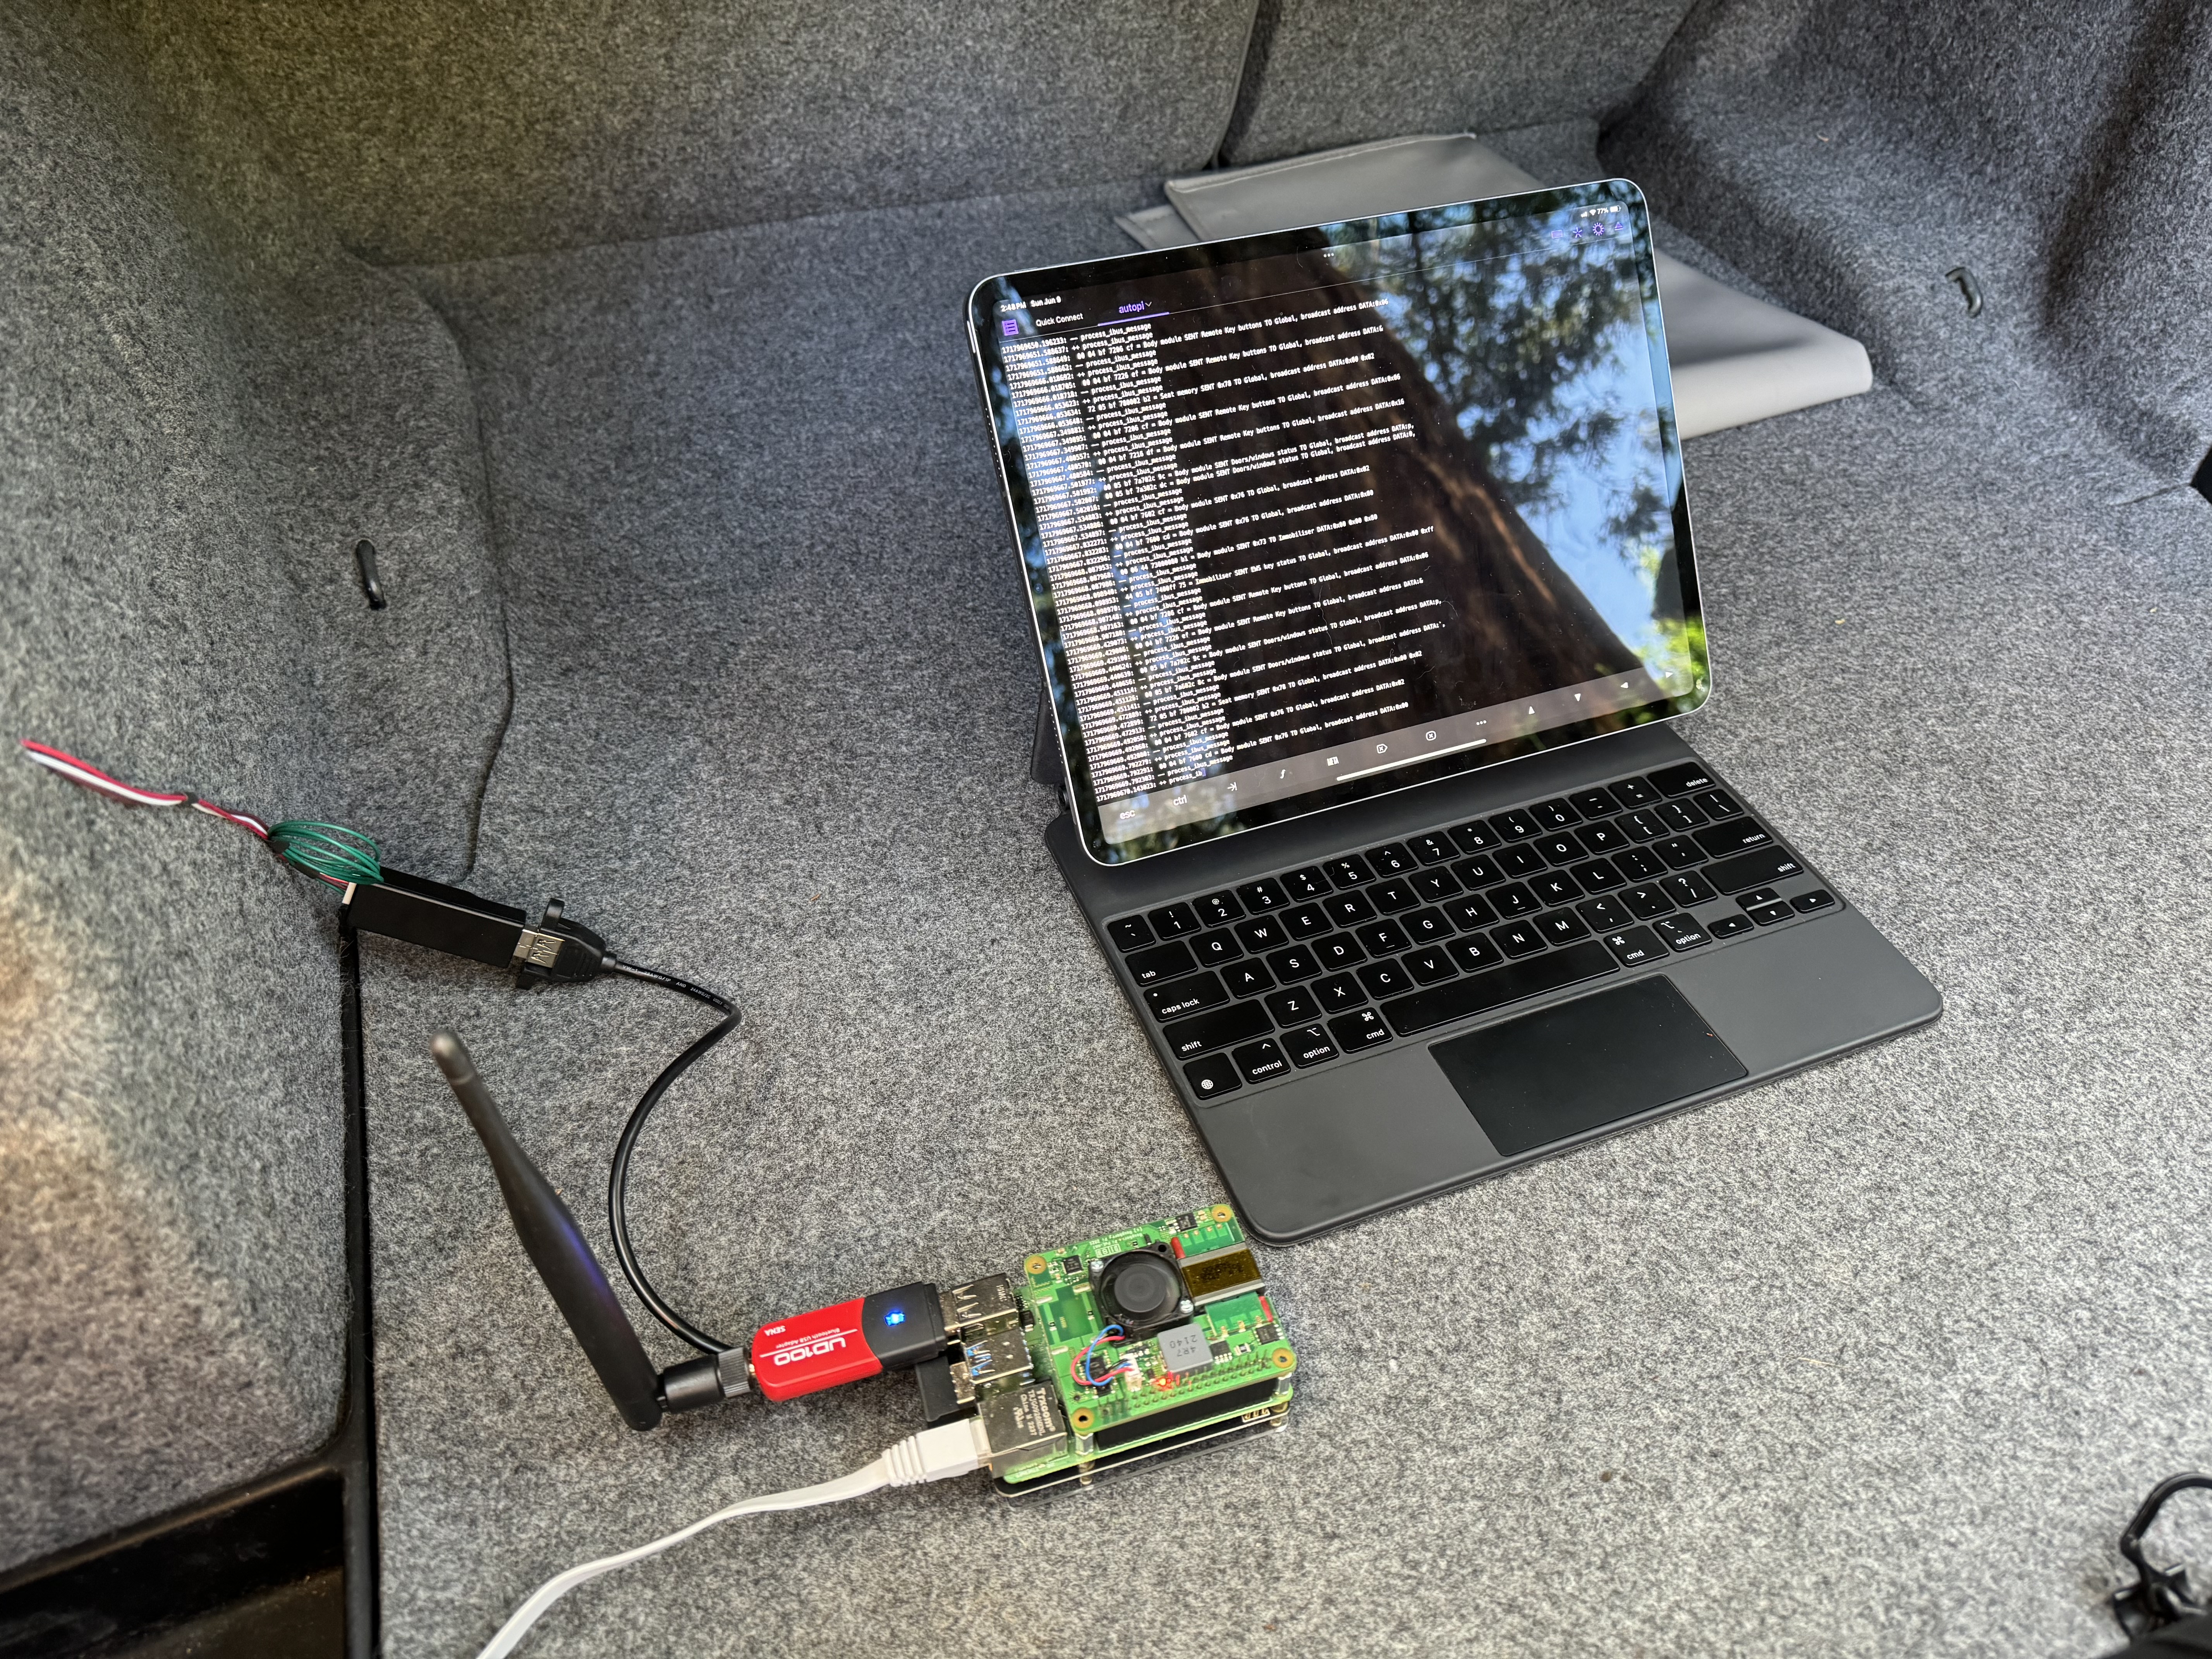
That Raspberry Pi I had earlier employed to capture current information now had an additional duty of capturing K-Bus data. I used a flat ethernet cable to extend the PoE into the trunk, plugged the Resler interface into a USB port. Once the hardware was squared away, I needed to find some software to start logging packets on the K-Bus. The most straightforward piece of software I could find to do this was bmw-ibus daemon, a compact bit of C code written more than a decade prior. I needed to hack it up a bit, as the original intent seems to have been to control an in-car media system, but with just a couple of lines patched, I had a reliable logging tool without a bunch of dependencies.
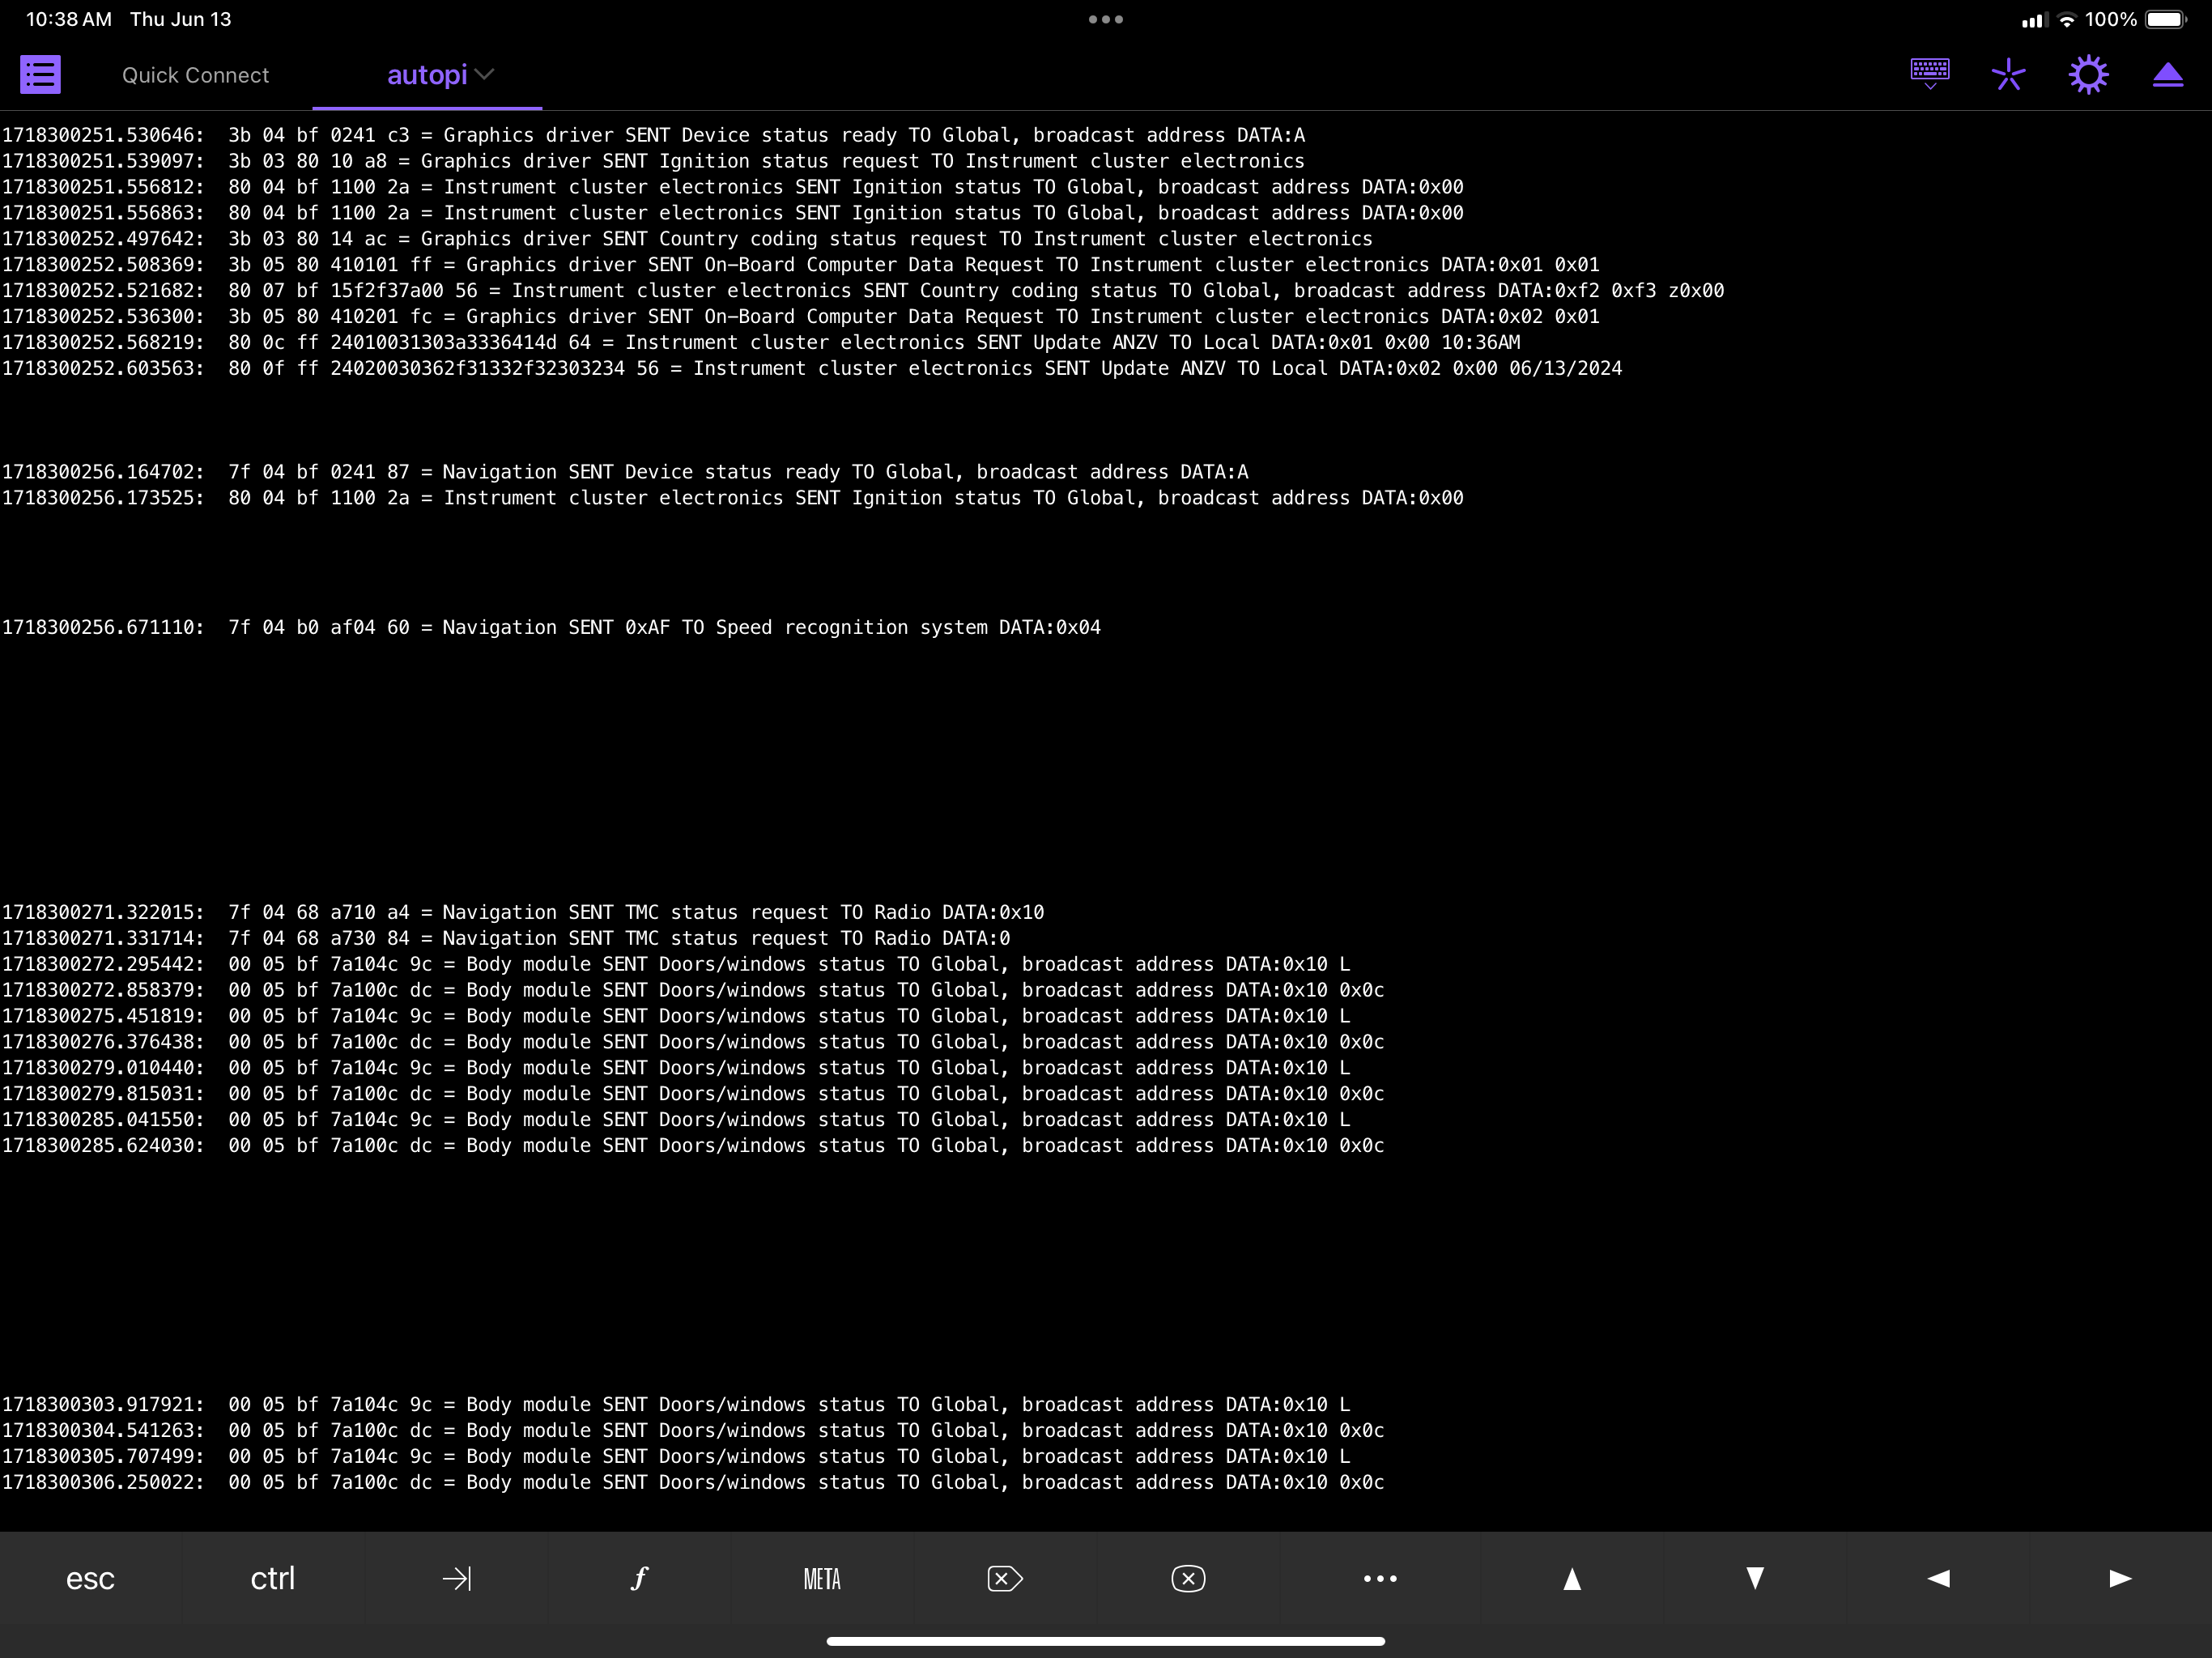
I ran the tool in a a screen session, and it provided output like the following:
1717996329.304601:  00 04 bf 0200 b9 = Body module SENT Device status ready TO Global, broadcast address DATA:0x00
1717996329.315563:  00 05 bf 7a300c fc = Body module SENT Doors/windows status TO Global, broadcast address DATA:00x0c
1717996329.325127:  80 04 bf 0200 39 = Instrument cluster electronics SENT Device status ready TO Global, broadcast address DATA:0x00
1717996329.333947:  80 04 bf 1100 2a = Instrument cluster electronics SENT Ignition status TO Global, broadcast address DATA:0x00
1717996329.418415:  f0 0b 68 390002000100010100 a9 = On-board monitor operating part SENT CD status TO Radio DATA:0x00 0x02 0x00 0x01 0x00 0x01 0x01 0x00
1717996329.716831:  f0 04 bf 0270 39 = On-board monitor operating part SENT Device status ready TO Global, broadcast address DATA:p
1717996329.729145:  80 04 bf 1100 2a = Instrument cluster electronics SENT Ignition status TO Global, broadcast address DATA:0x00
<SNIP/>
1717996330.390878:  80 04 bf 1100 2a = Instrument cluster electronics SENT Ignition status TO Global, broadcast address DATA:0x00
1717996330.752628:  00 05 bf 7a304c bc = Body module SENT Doors/windows status TO Global, broadcast address DATA:0L
1717996330.813473:  00 05 bf 7a300c fc = Body module SENT Doors/windows status TO Global, broadcast address DATA:00x0c
1717996331.999470:  00 05 bf 7a304c bc = Body module SENT Doors/windows status TO Global, broadcast address DATA:0L
1717996332.120094:  00 05 bf 7a300c fc = Body module SENT Doors/windows status TO Global, broadcast address DATA:00x0c
1717996336.079718:  00 05 bf 7a304c bc = Body module SENT Doors/windows status TO Global, broadcast address DATA:0L
1717996336.522102:  00 05 bf 7a300c fc = Body module SENT Doors/windows status TO Global, broadcast address DATA:00x0c
1717996336.878741:  7f 04 68 0201 10 = Navigation SENT Device status ready TO Radio DATA:0x01
...
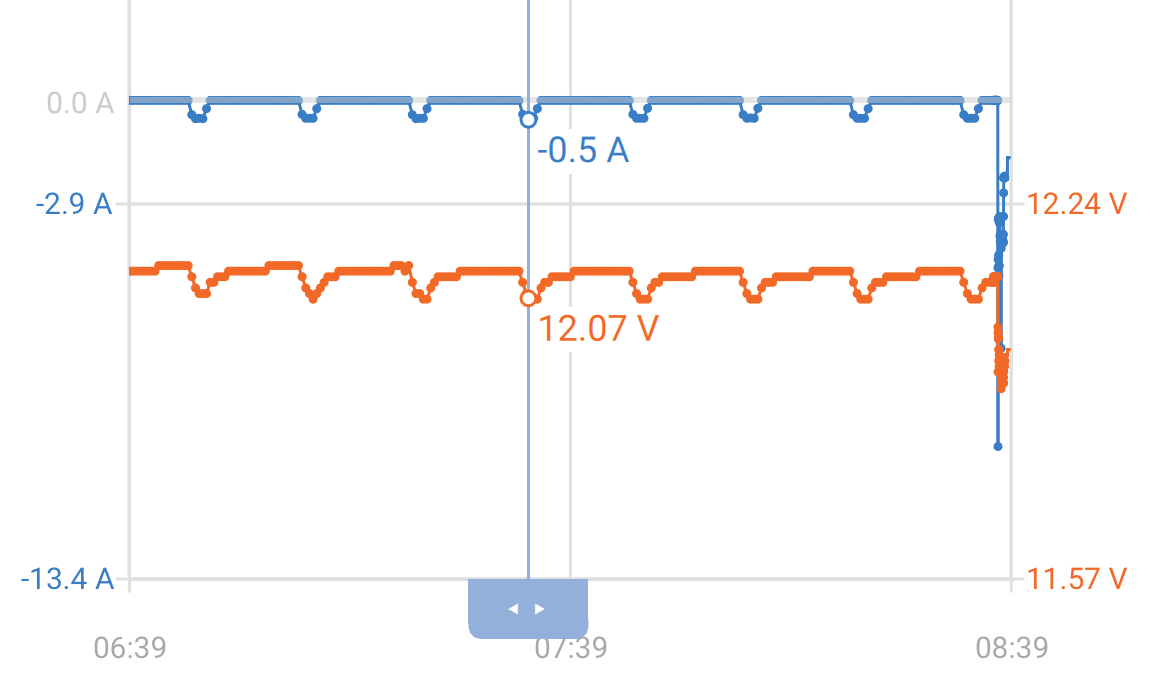
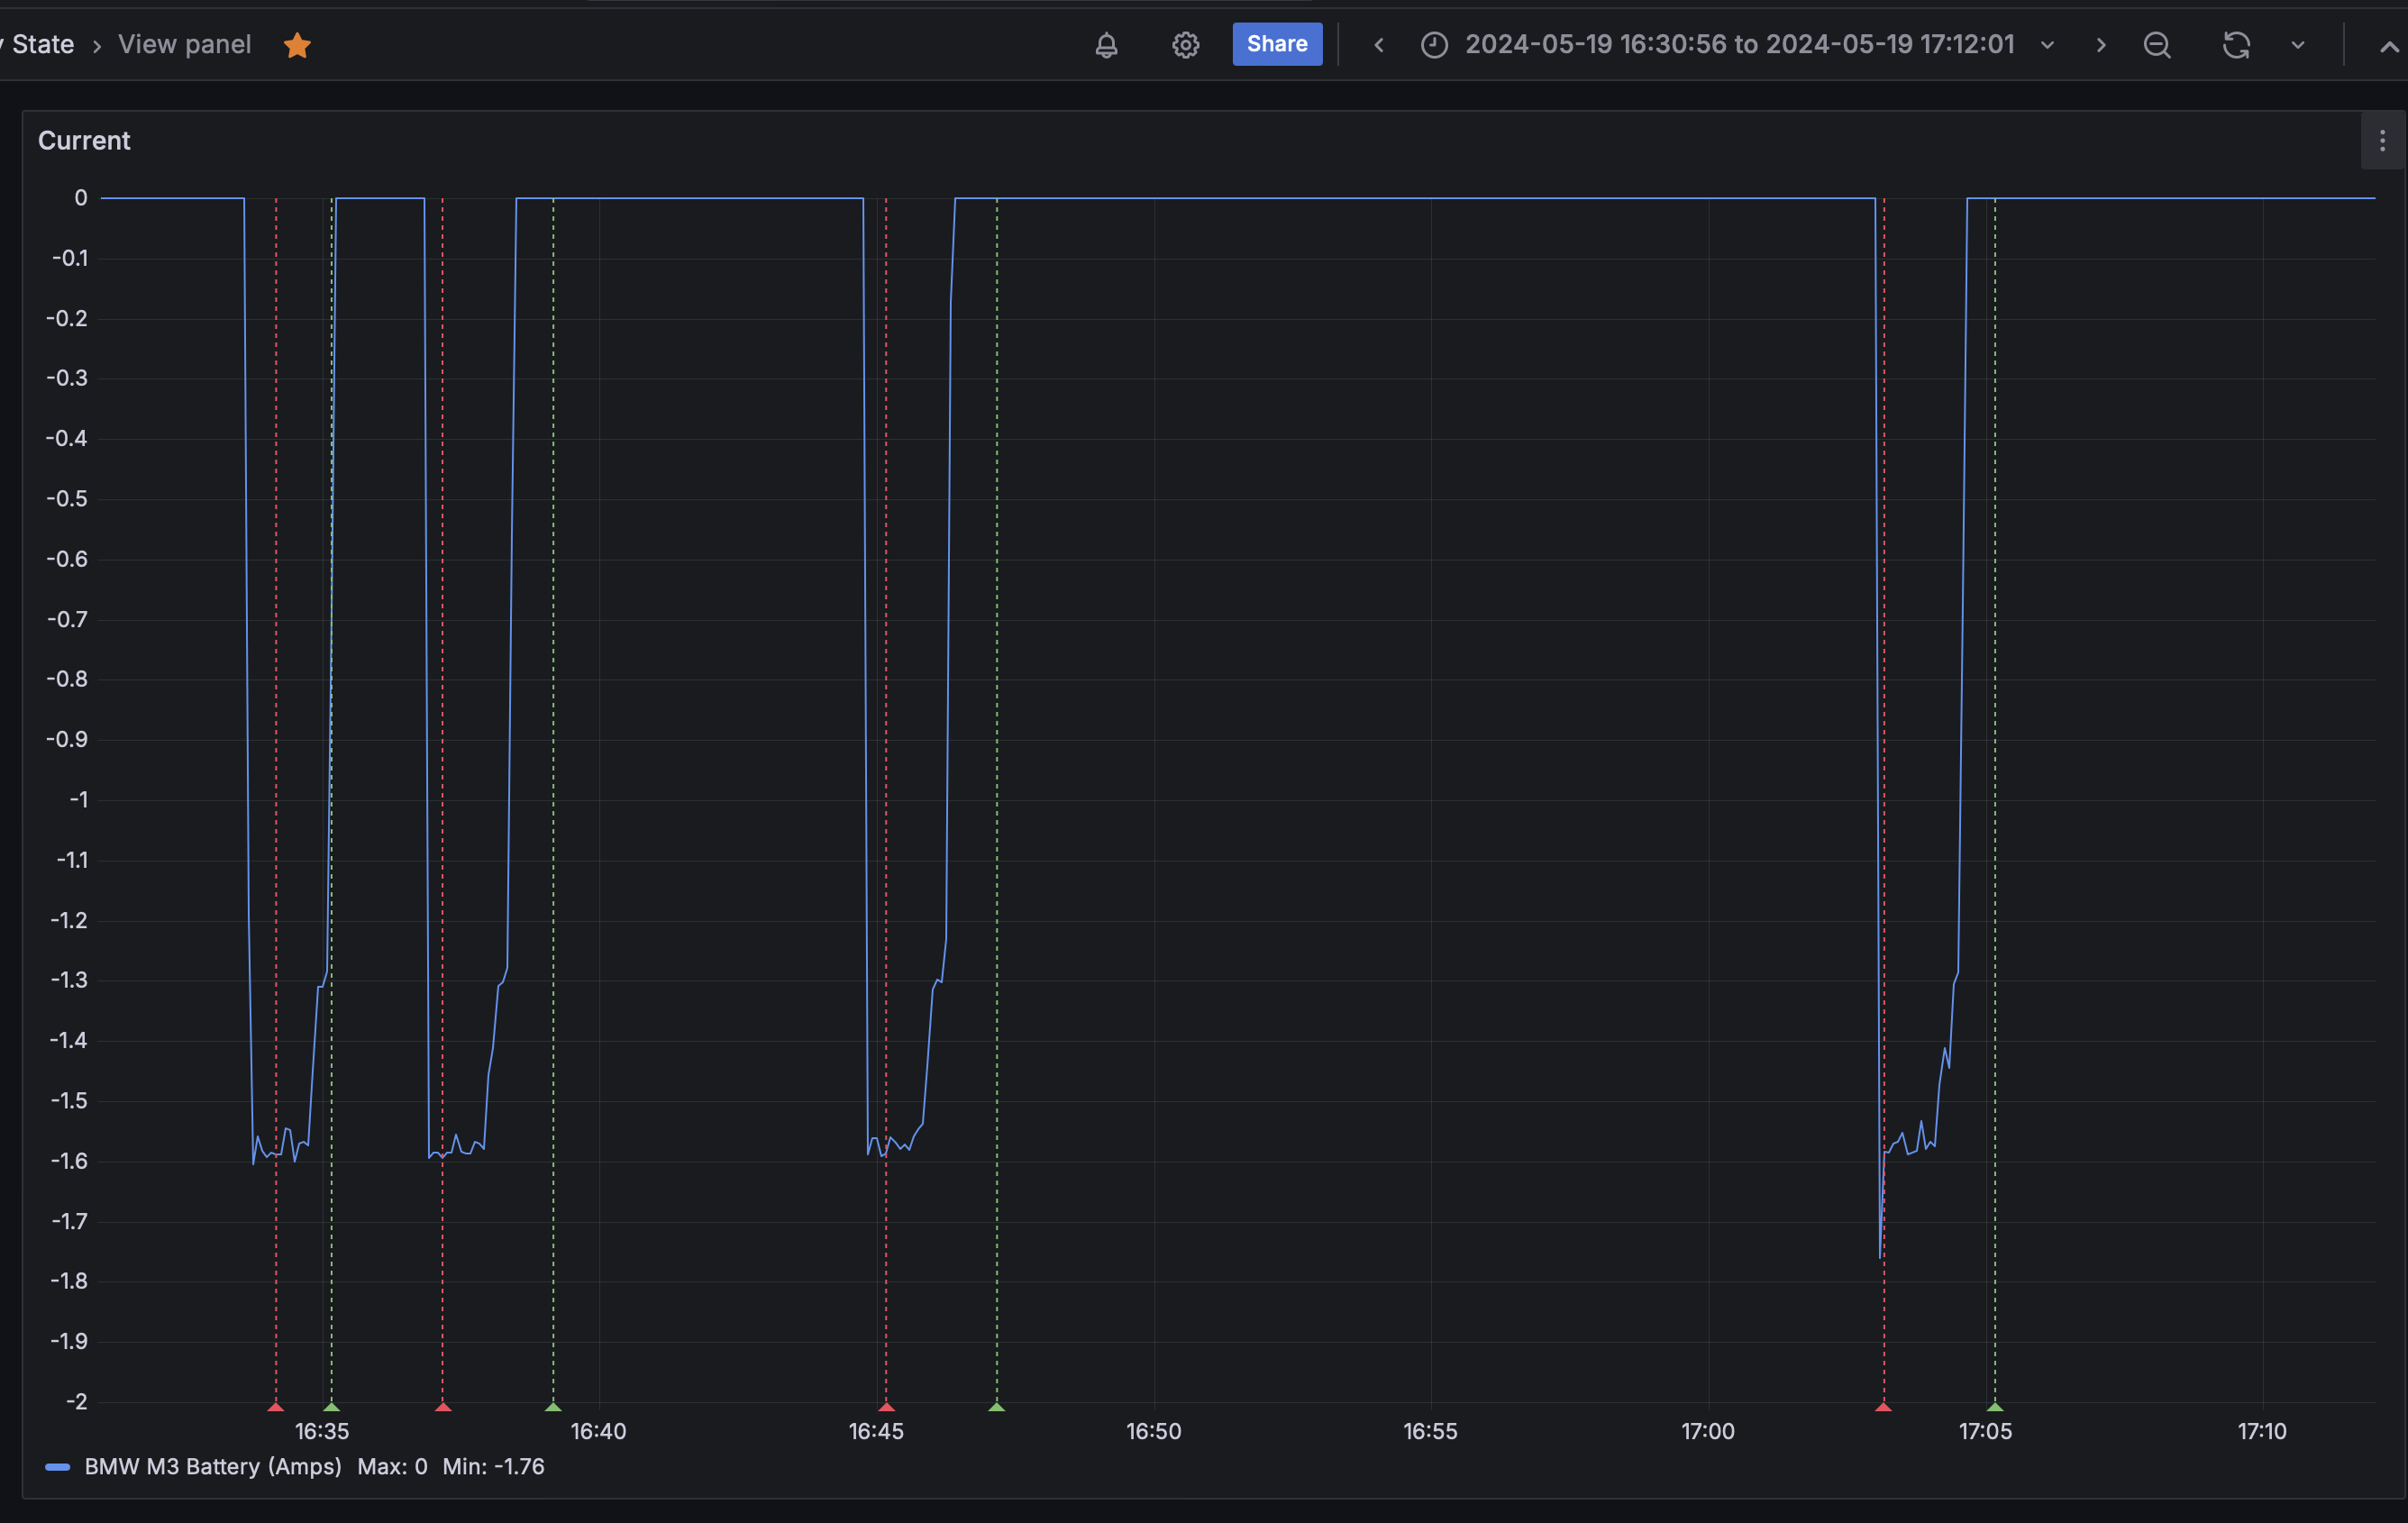
This rapid swapping between 0x7a304c and 0x7a300c was immediately suspicious. The 1717996330 timestamp converts to June 9, 2024 10:12 PM local time, so I took a look at the current draw history in Grafana:
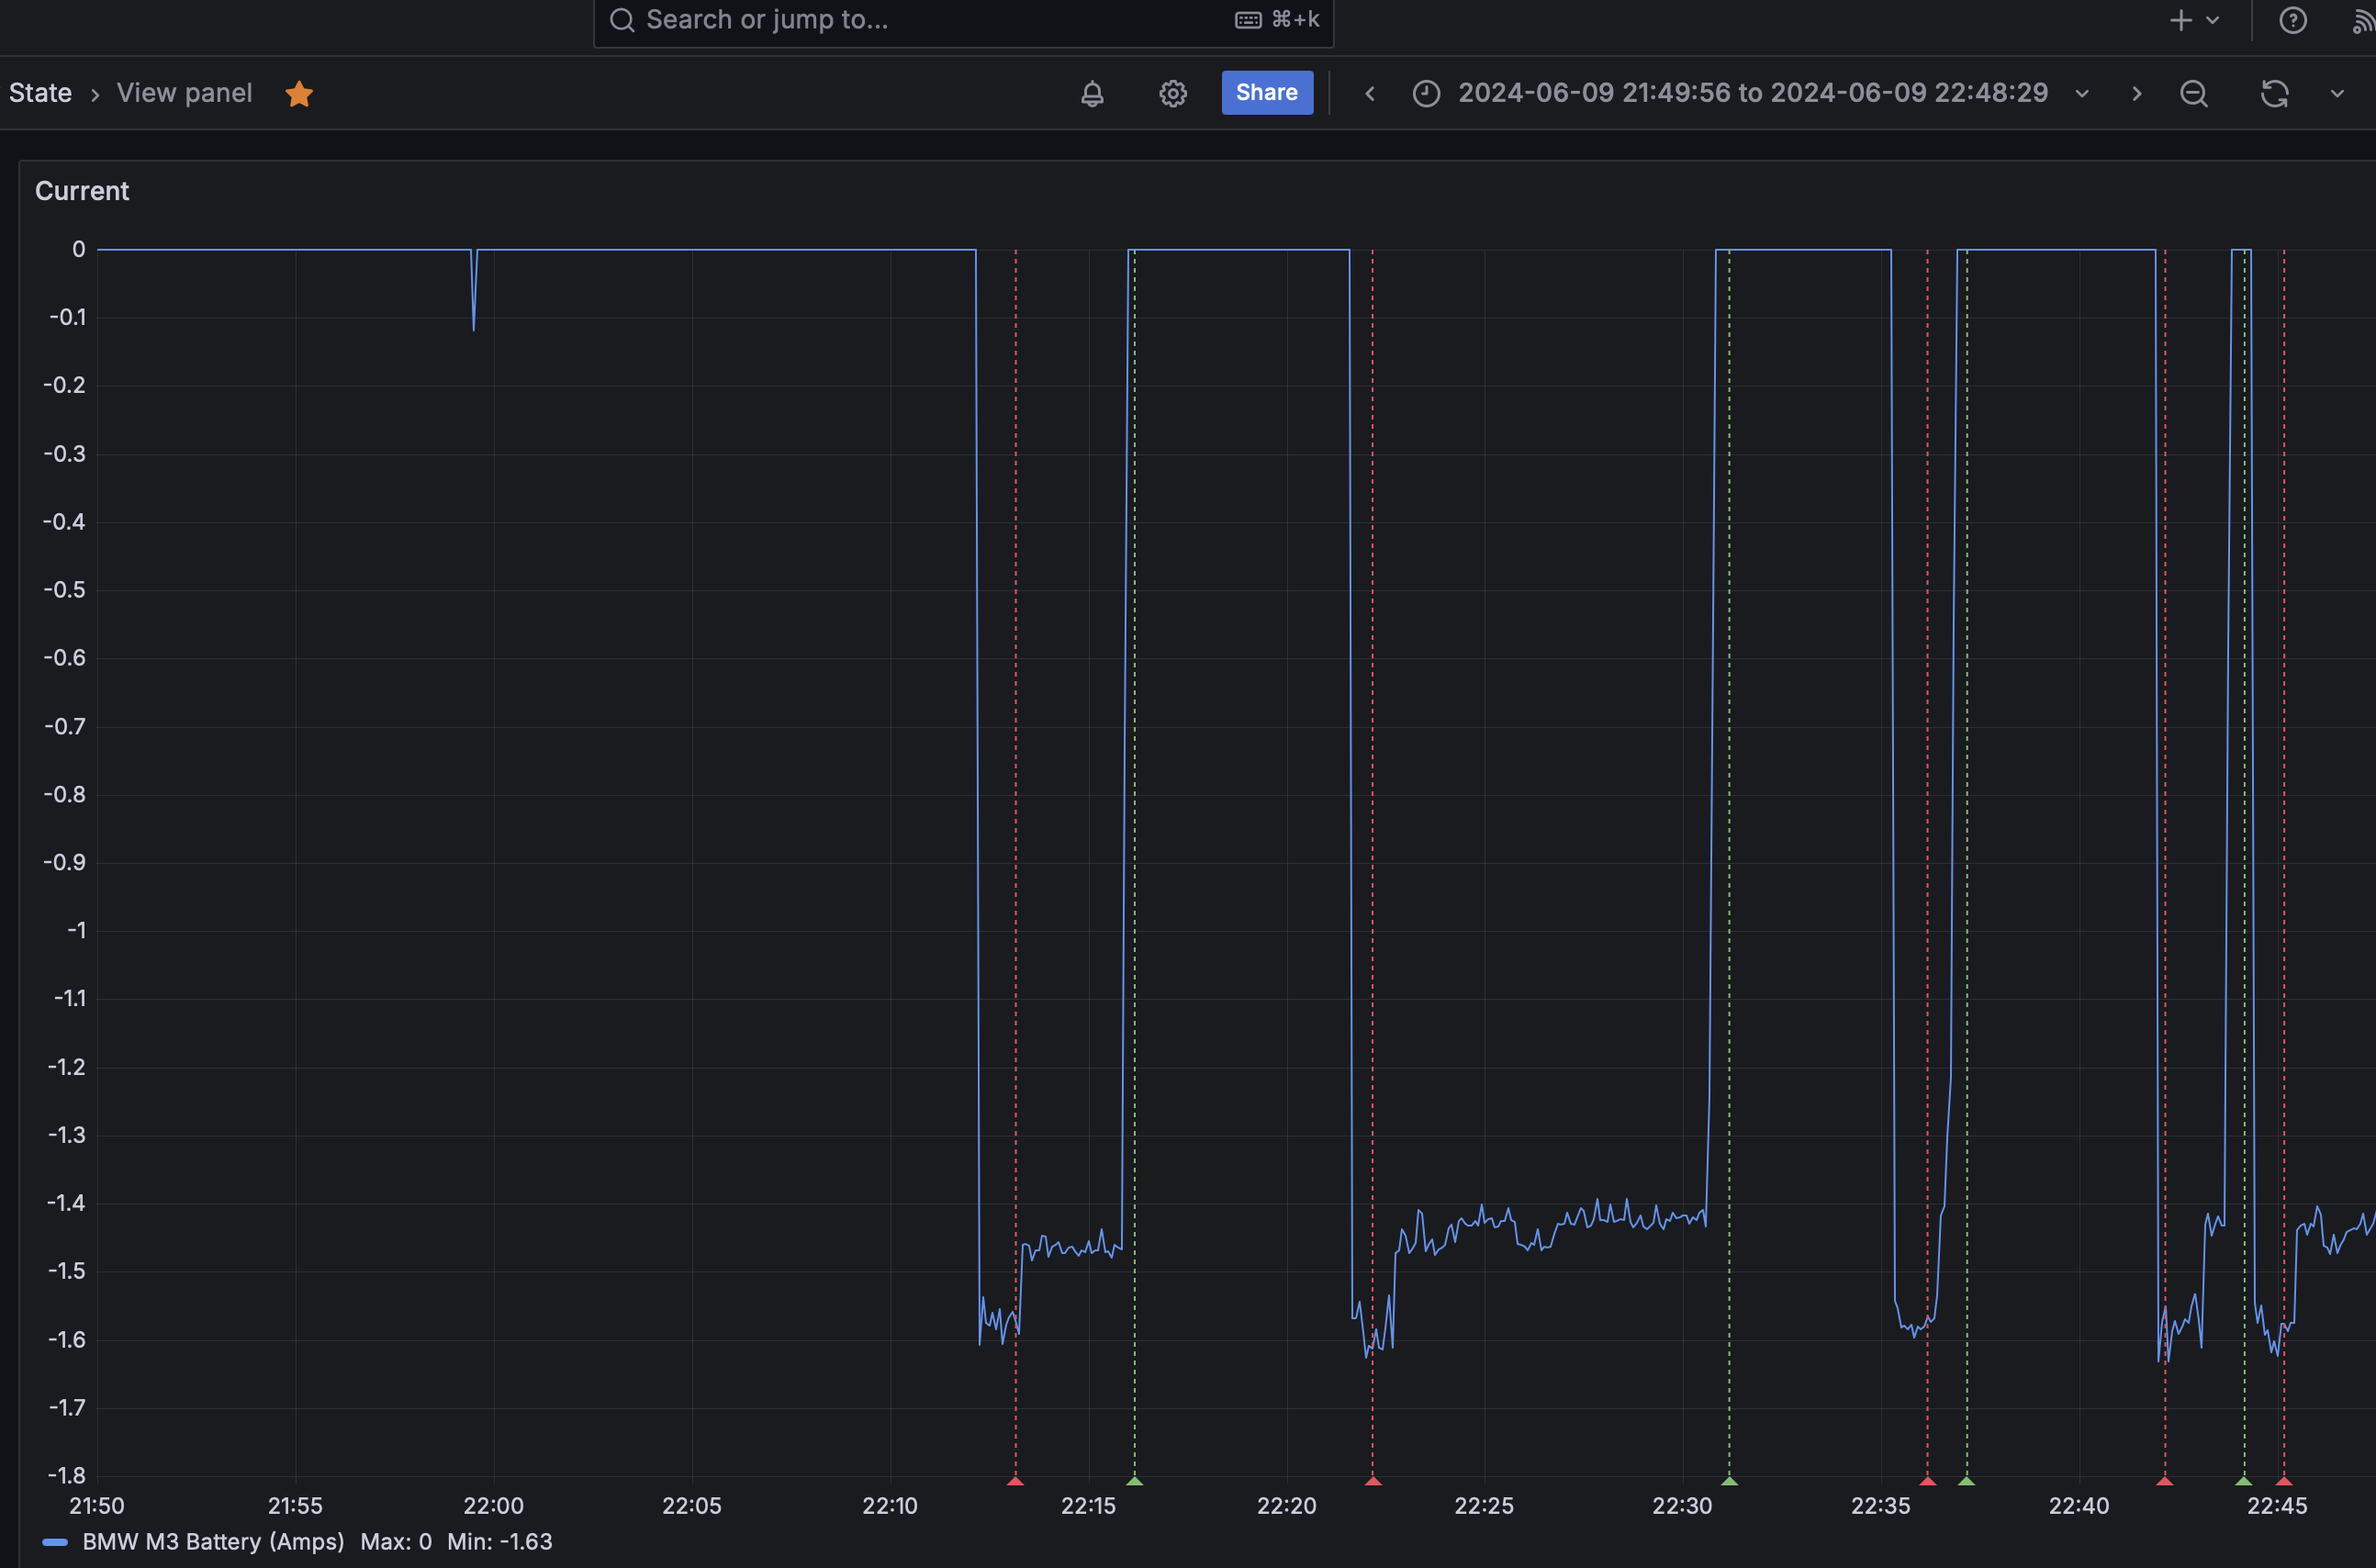
…and it was clear as day. I had an immense sense of accomplshment and relief at this point because it showed a clear link between wacky bus traffic and the current draw! Now just to decode those bits.
I was greatful to find this repository with I/K-Bus Protocol Documentation on Github. Decoding I/K Bus messages is best left described elsewhere, but essentially: 0x7a meant it was a Door/Lid status message, then the second-to-last byte value 4 means Front lid (hood/bonnet) open (or closed if 0. The last byte C appears to mean the two rear doors are not closed. It's a 2-door car, so I guess that can be ignored.
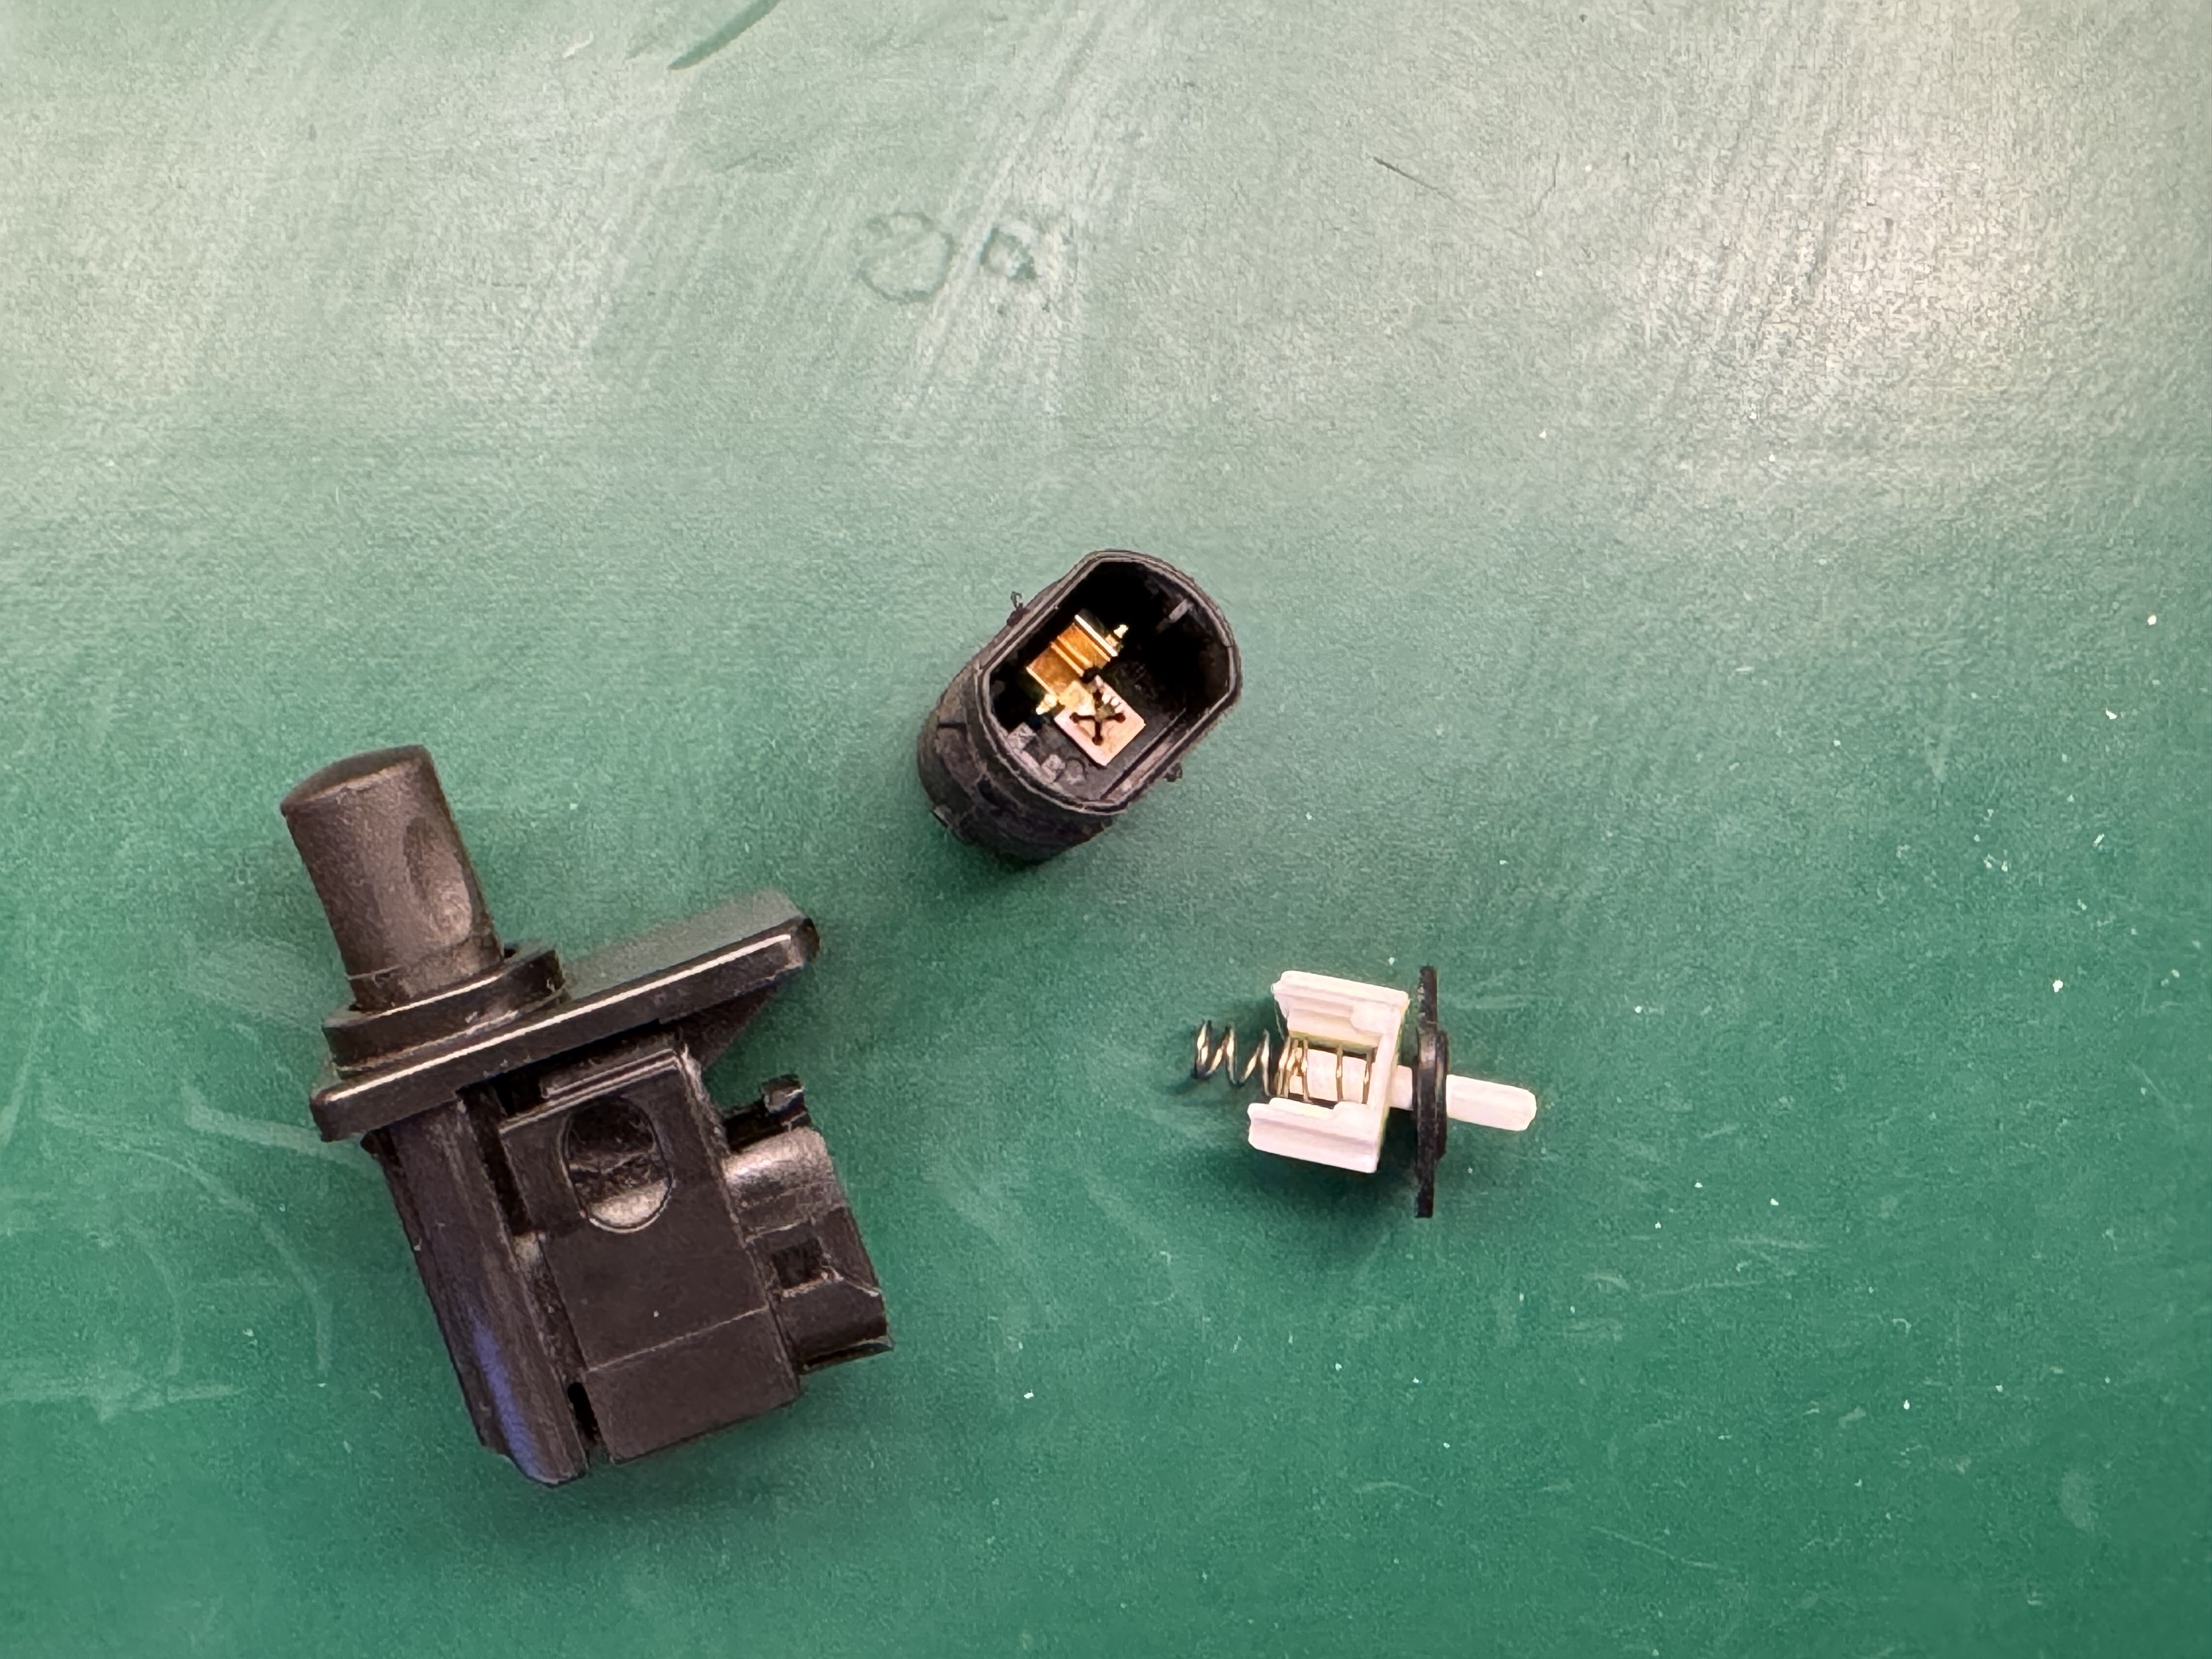
So it was the Hood Sensor…
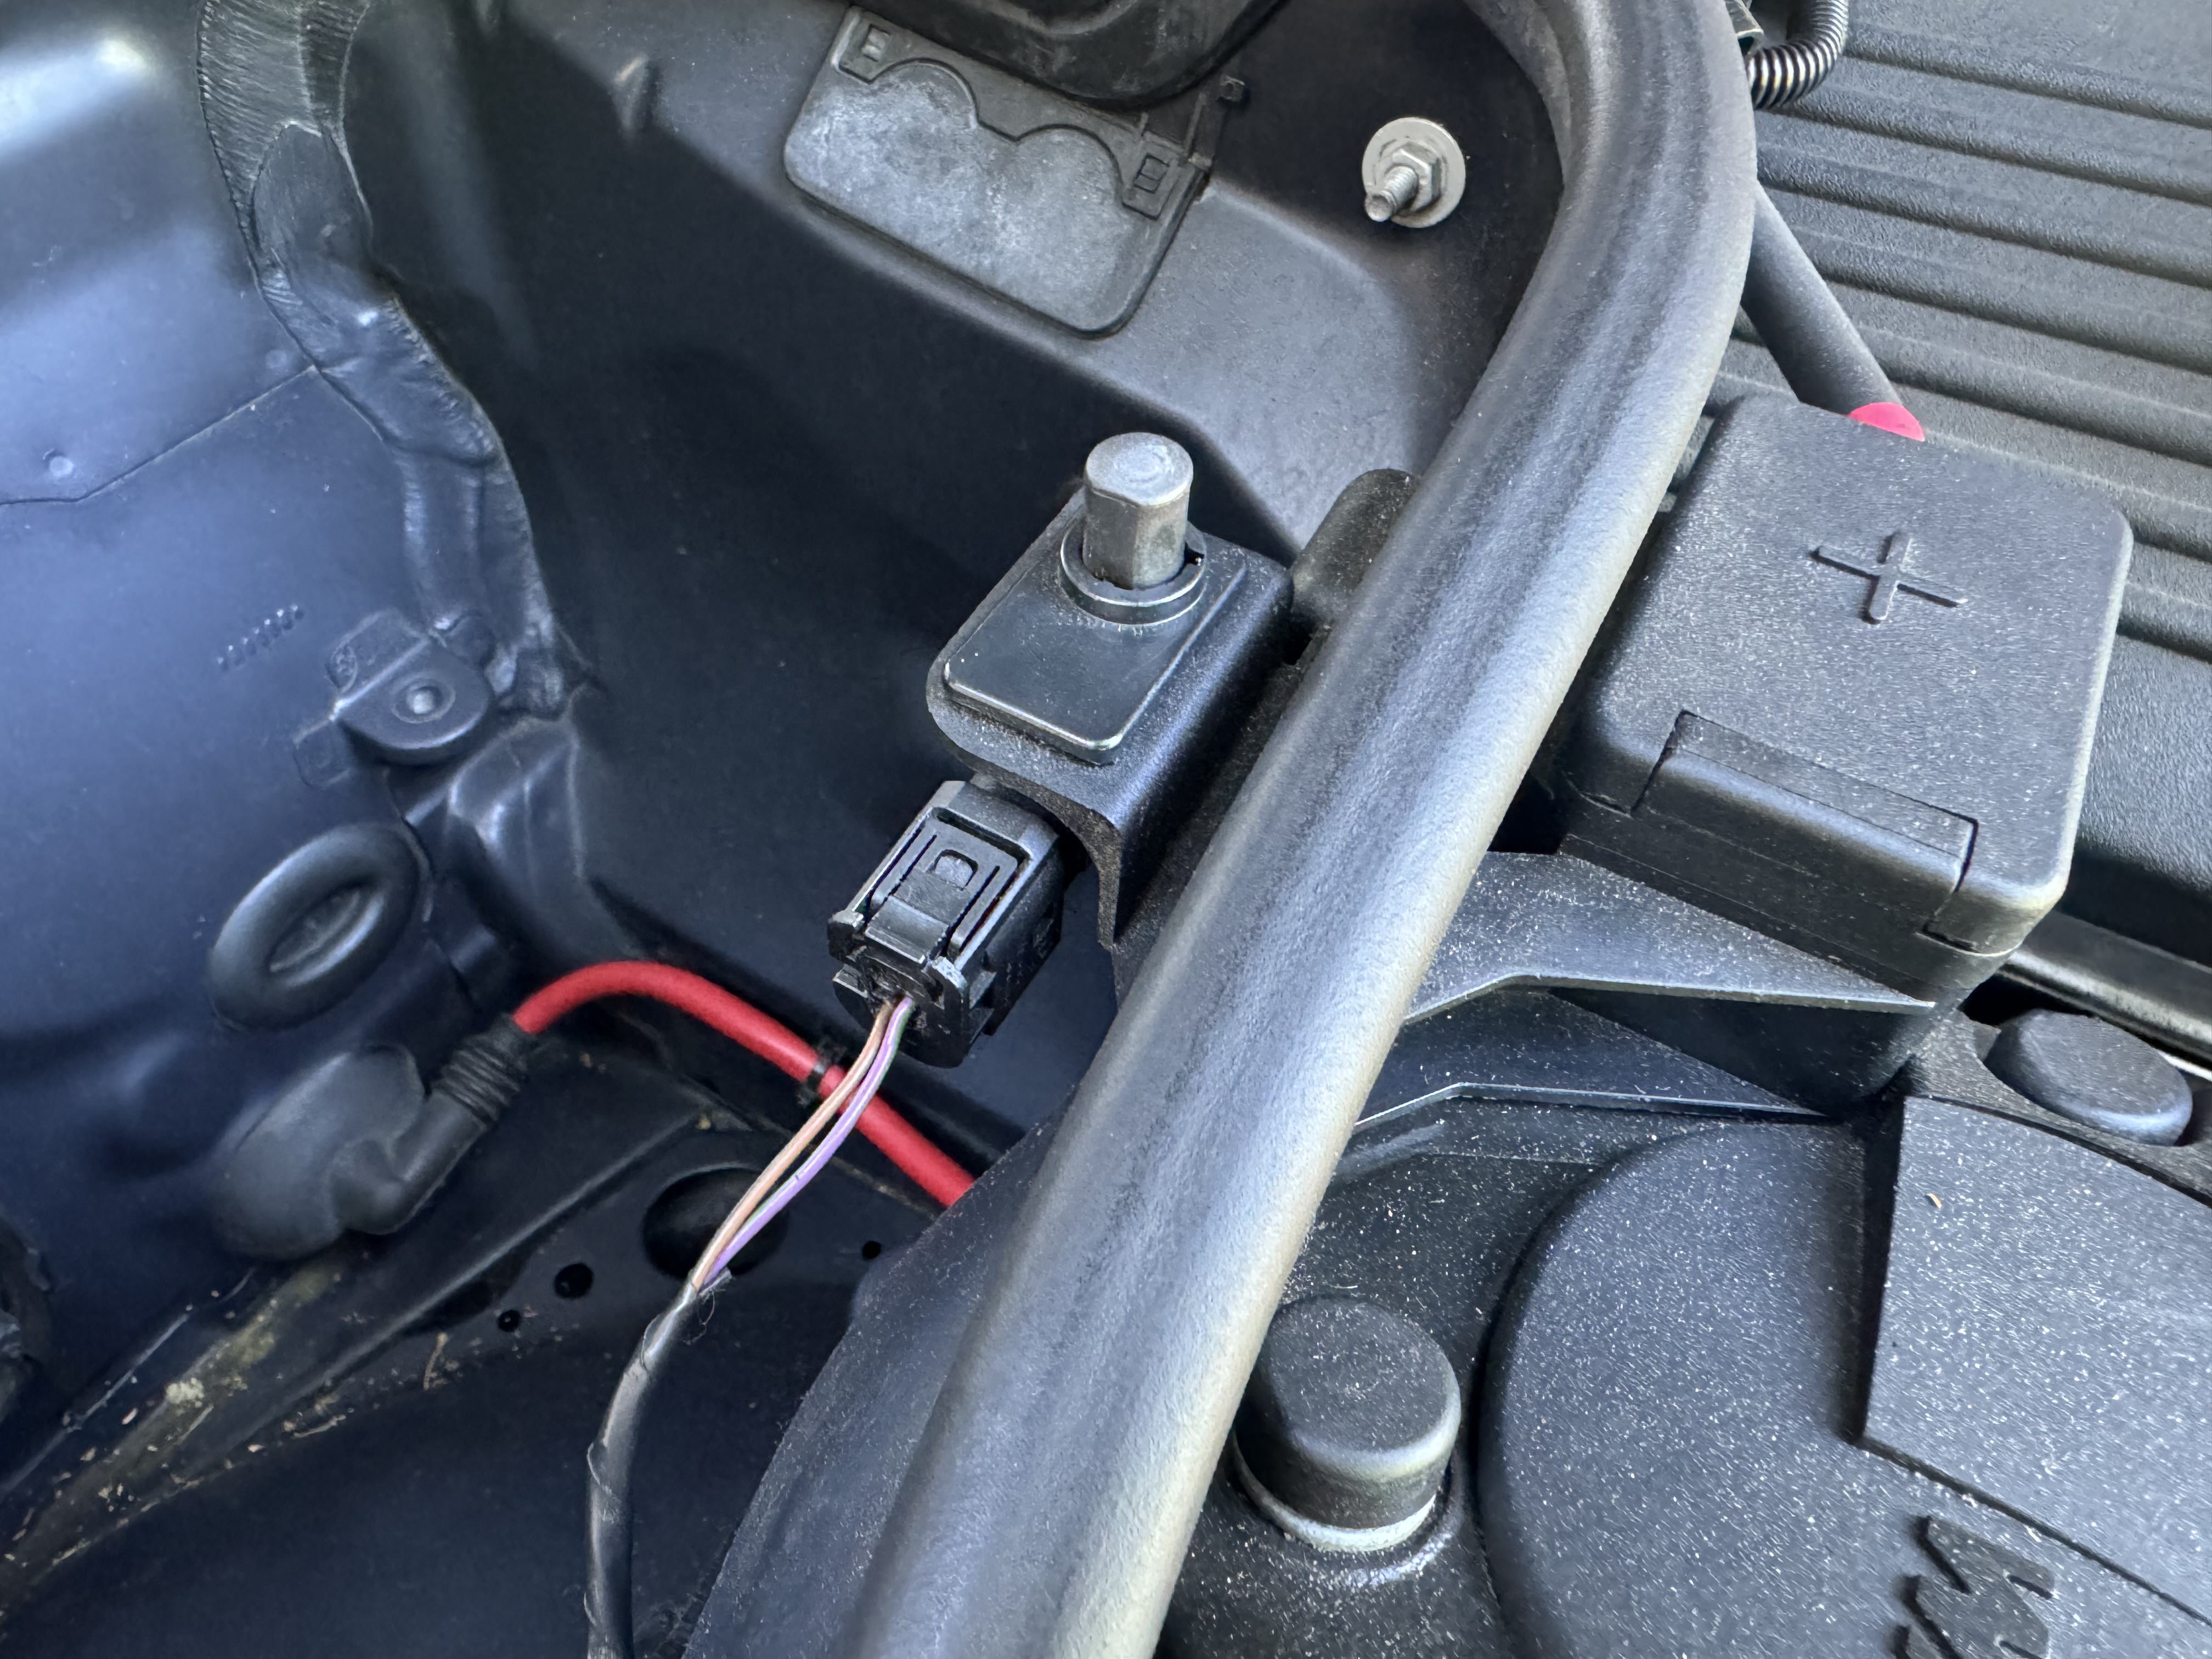
Since the hood wasn't being opened or closed it was pretty clear the issue was with the hood sensor circuit. I still didn't know for sure if it was a wiring problem, an issue with the switch itself, or something deeper in the General Module. To verify the hypothesis that the switch itself was at fault, the most direct tactic was to watch bus traffic while pressing the switch, then watch again while shorting the pins in the connector directly with a paperclip.
No recognition of hood sensor being depressed
Shorting pins results in expected logging
Results were clear; the switch didn't trigger any bus traffic and shorting the contacts worked fine. I did some final analysis on the switch with a multimeter just to understand the issue a bit more, but it was mostly for fun. ~$40 later, I had a fix in the form of a new hood switch. I monitored for a week or two with no symptoms and declared success.
As in all good parasitic battery drain adventures I finally replaced the car battery for good measure. It was about due for replacement after 5 years and had been through a number of deep discharges due to the malfunction.
In retrospect, after finding forum posts like this, I suspect an experienced mechanic (such as the one I frequent) would have been able to diagnose this problem much more quickly and efficiently than I did. I'd be interested to know if the pros approach would be to just test out the usual suspects or if it is common practice to log and monitor bus traffic these days. It was extremely satisfying to perform this debug myself though—I learned a lot about how my car works and how to troubleshoot electrical issues in the future. All in all, totally worth the trouble!
Digital Clock DC-002
It seems like everybody interested in electronics ends up building a clock. I learned about the HPDL-1414 display module on Hackaday in 2014 and my fate was set.
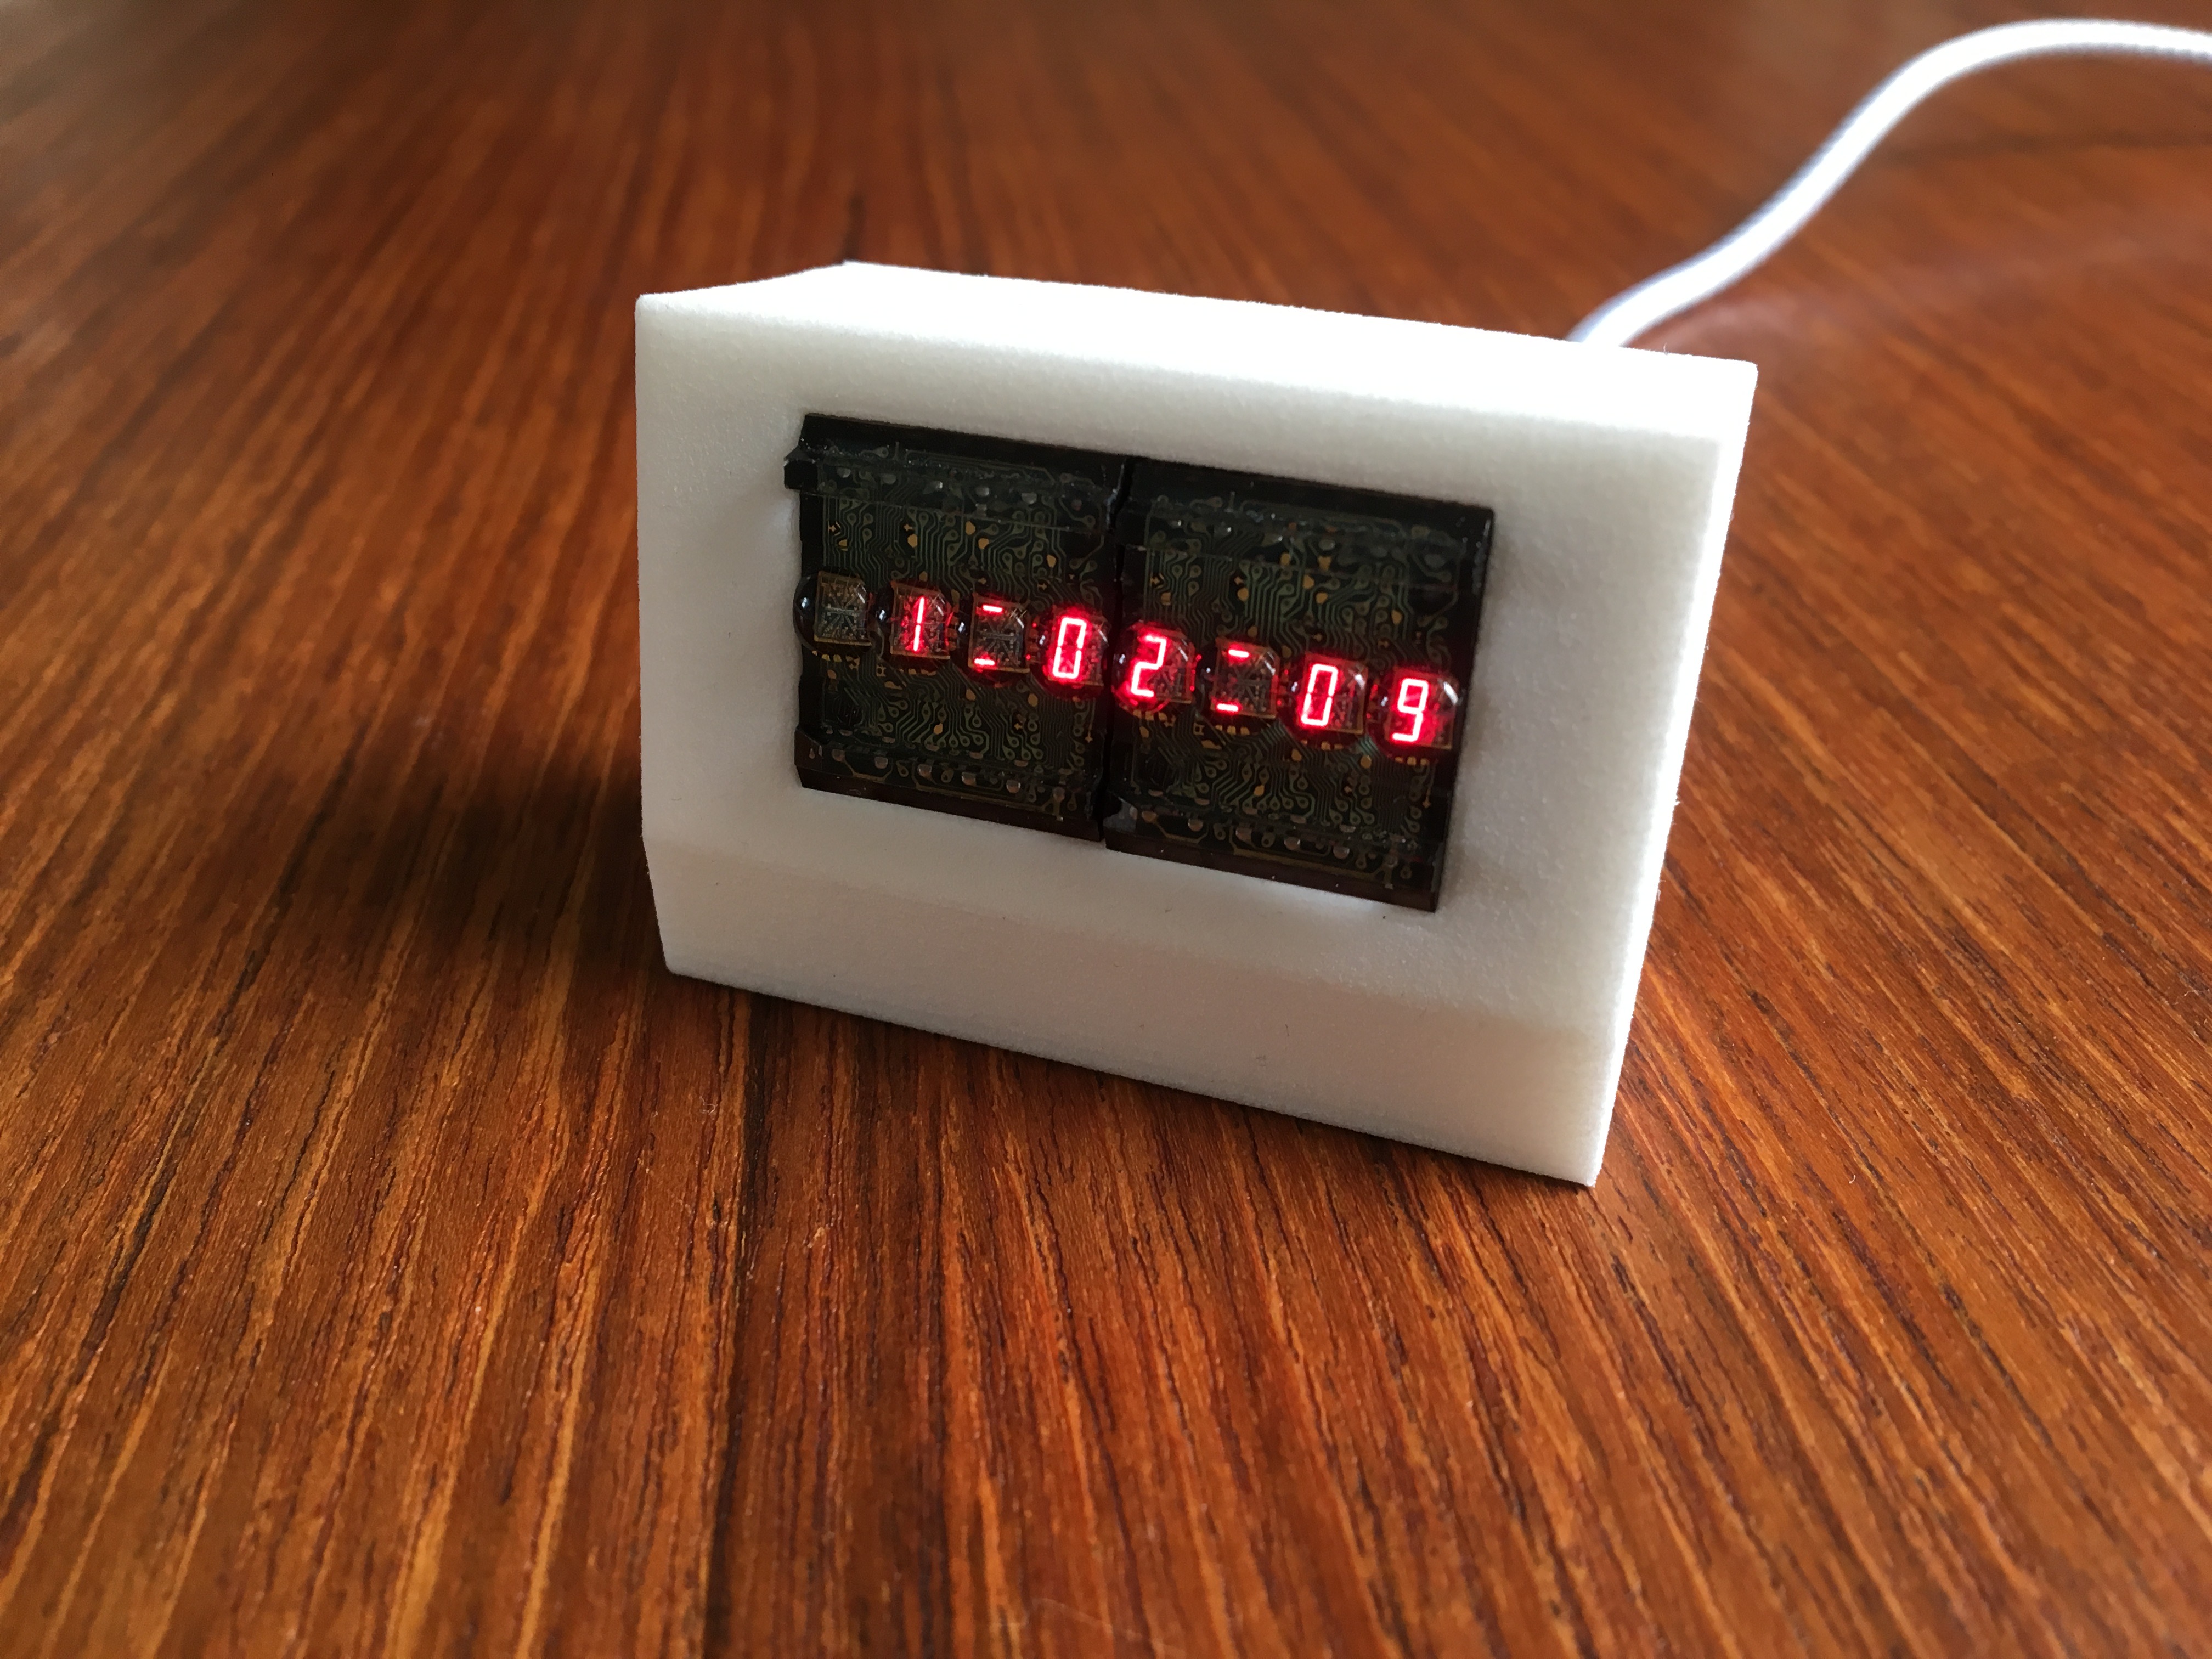
I built Digital Clock DC-001 as a gift in 2015, then made a batch of eight DC-002 units in 2016, also to give away as gifts. A big part of what made it interesting for me was to expand beyond the circuitry to an enclosure and packaging.
As a little bit of a relaunch to this website, I've finally finished writing up the DC-002 clock project and published it here. It was always the plan to document the build; I'm happy to have completed that goal even after such a long wait.
MightyOhm Geiger Counter Enhancements
This post was migrated from a Twitter thread with minor edits. I back-dated it to the original date of publication; first publication on this site in December 2022.
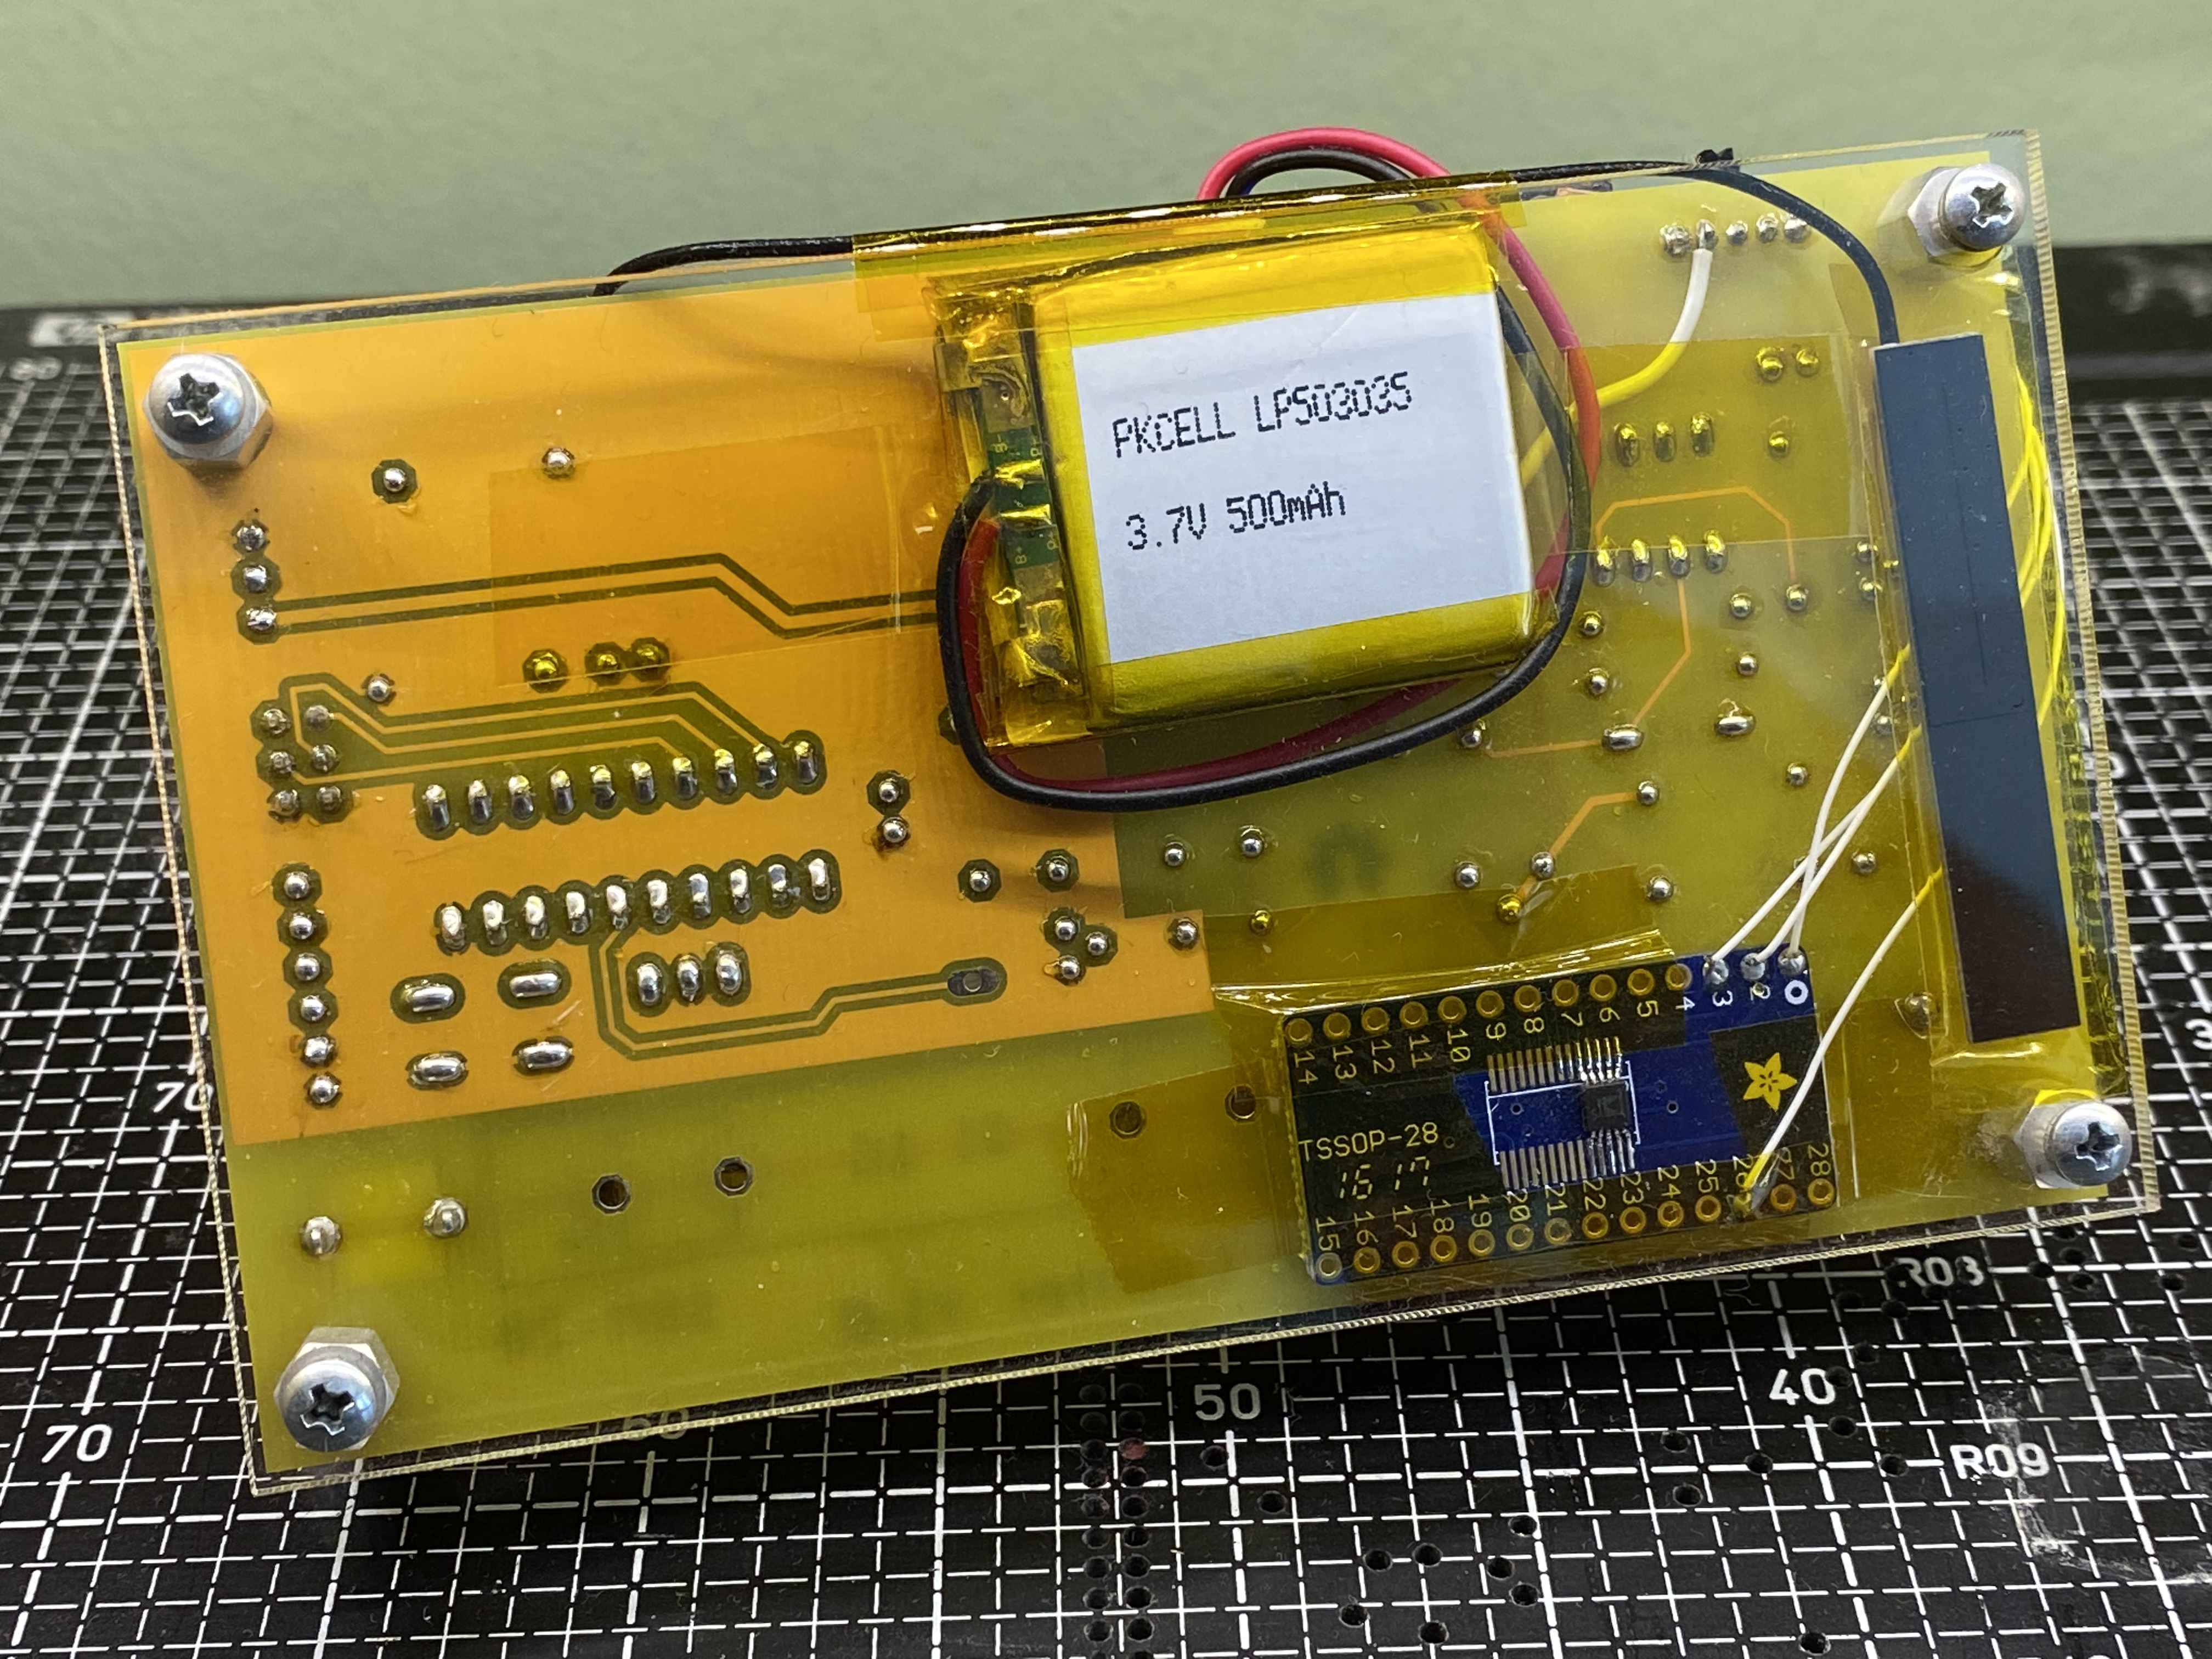
I had a really fun time building the Geiger Counter kit from MightyOhm while at home during pandemic lockdown and explored some neat enhancements.
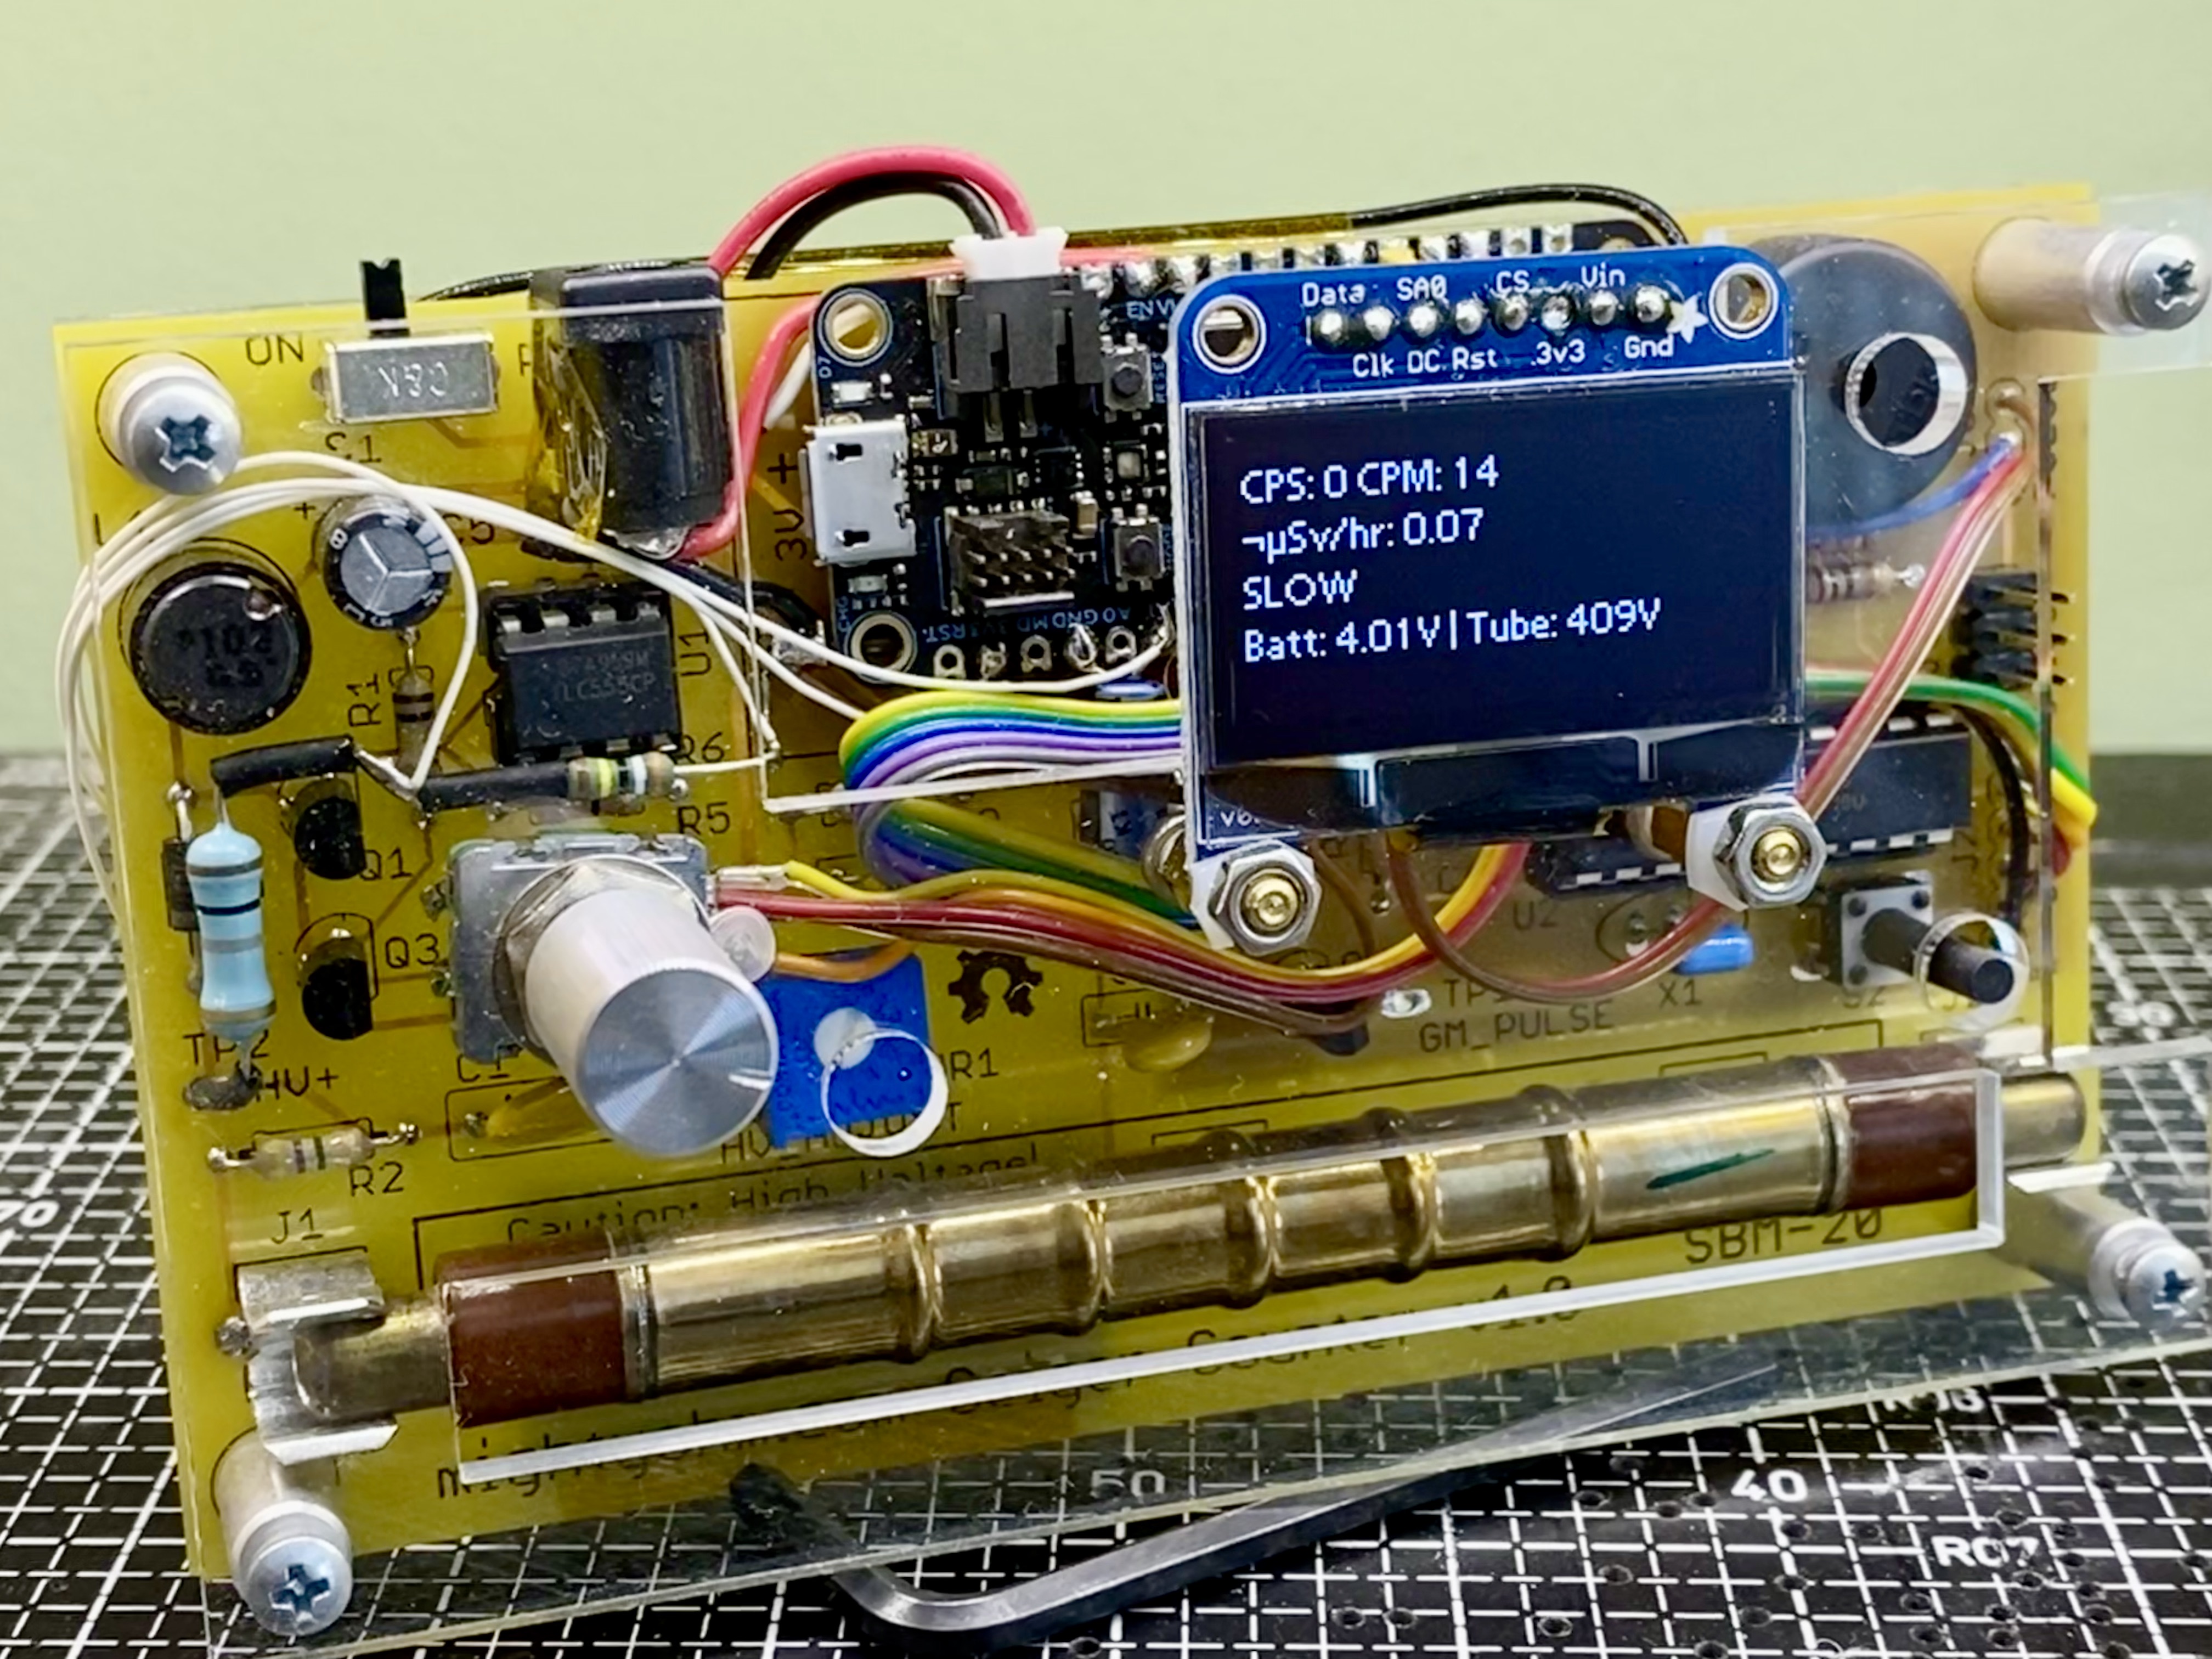
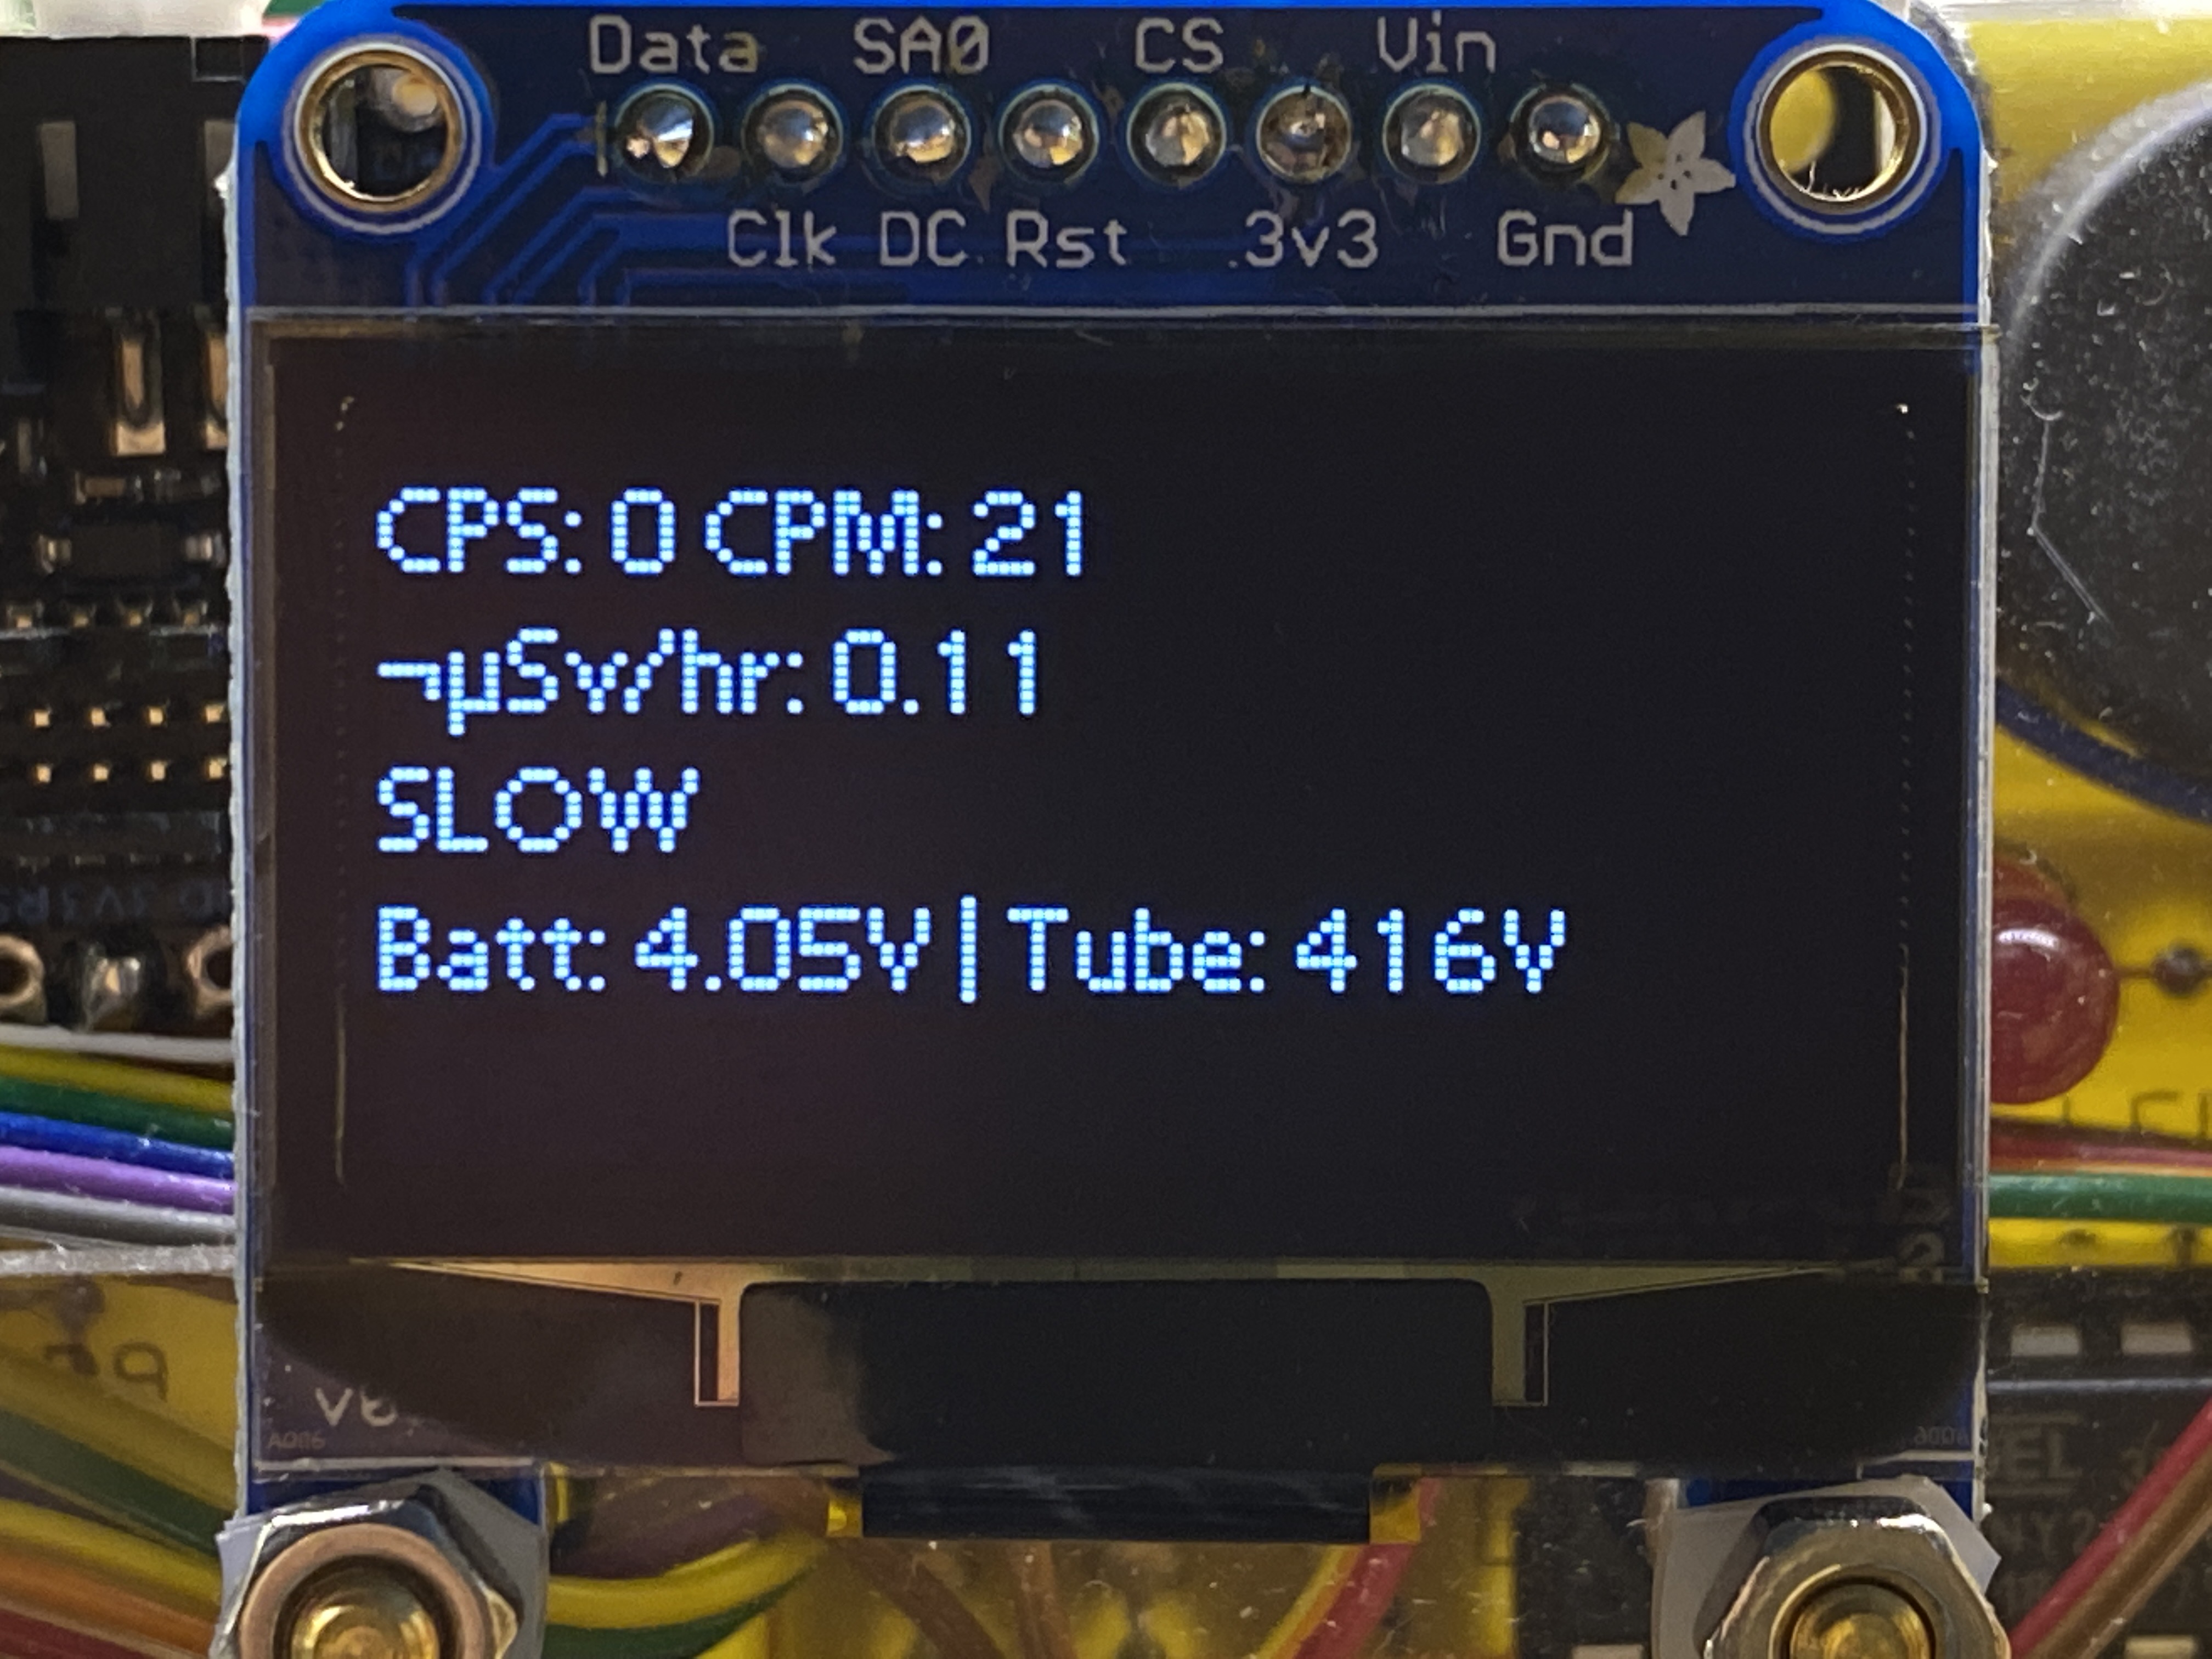
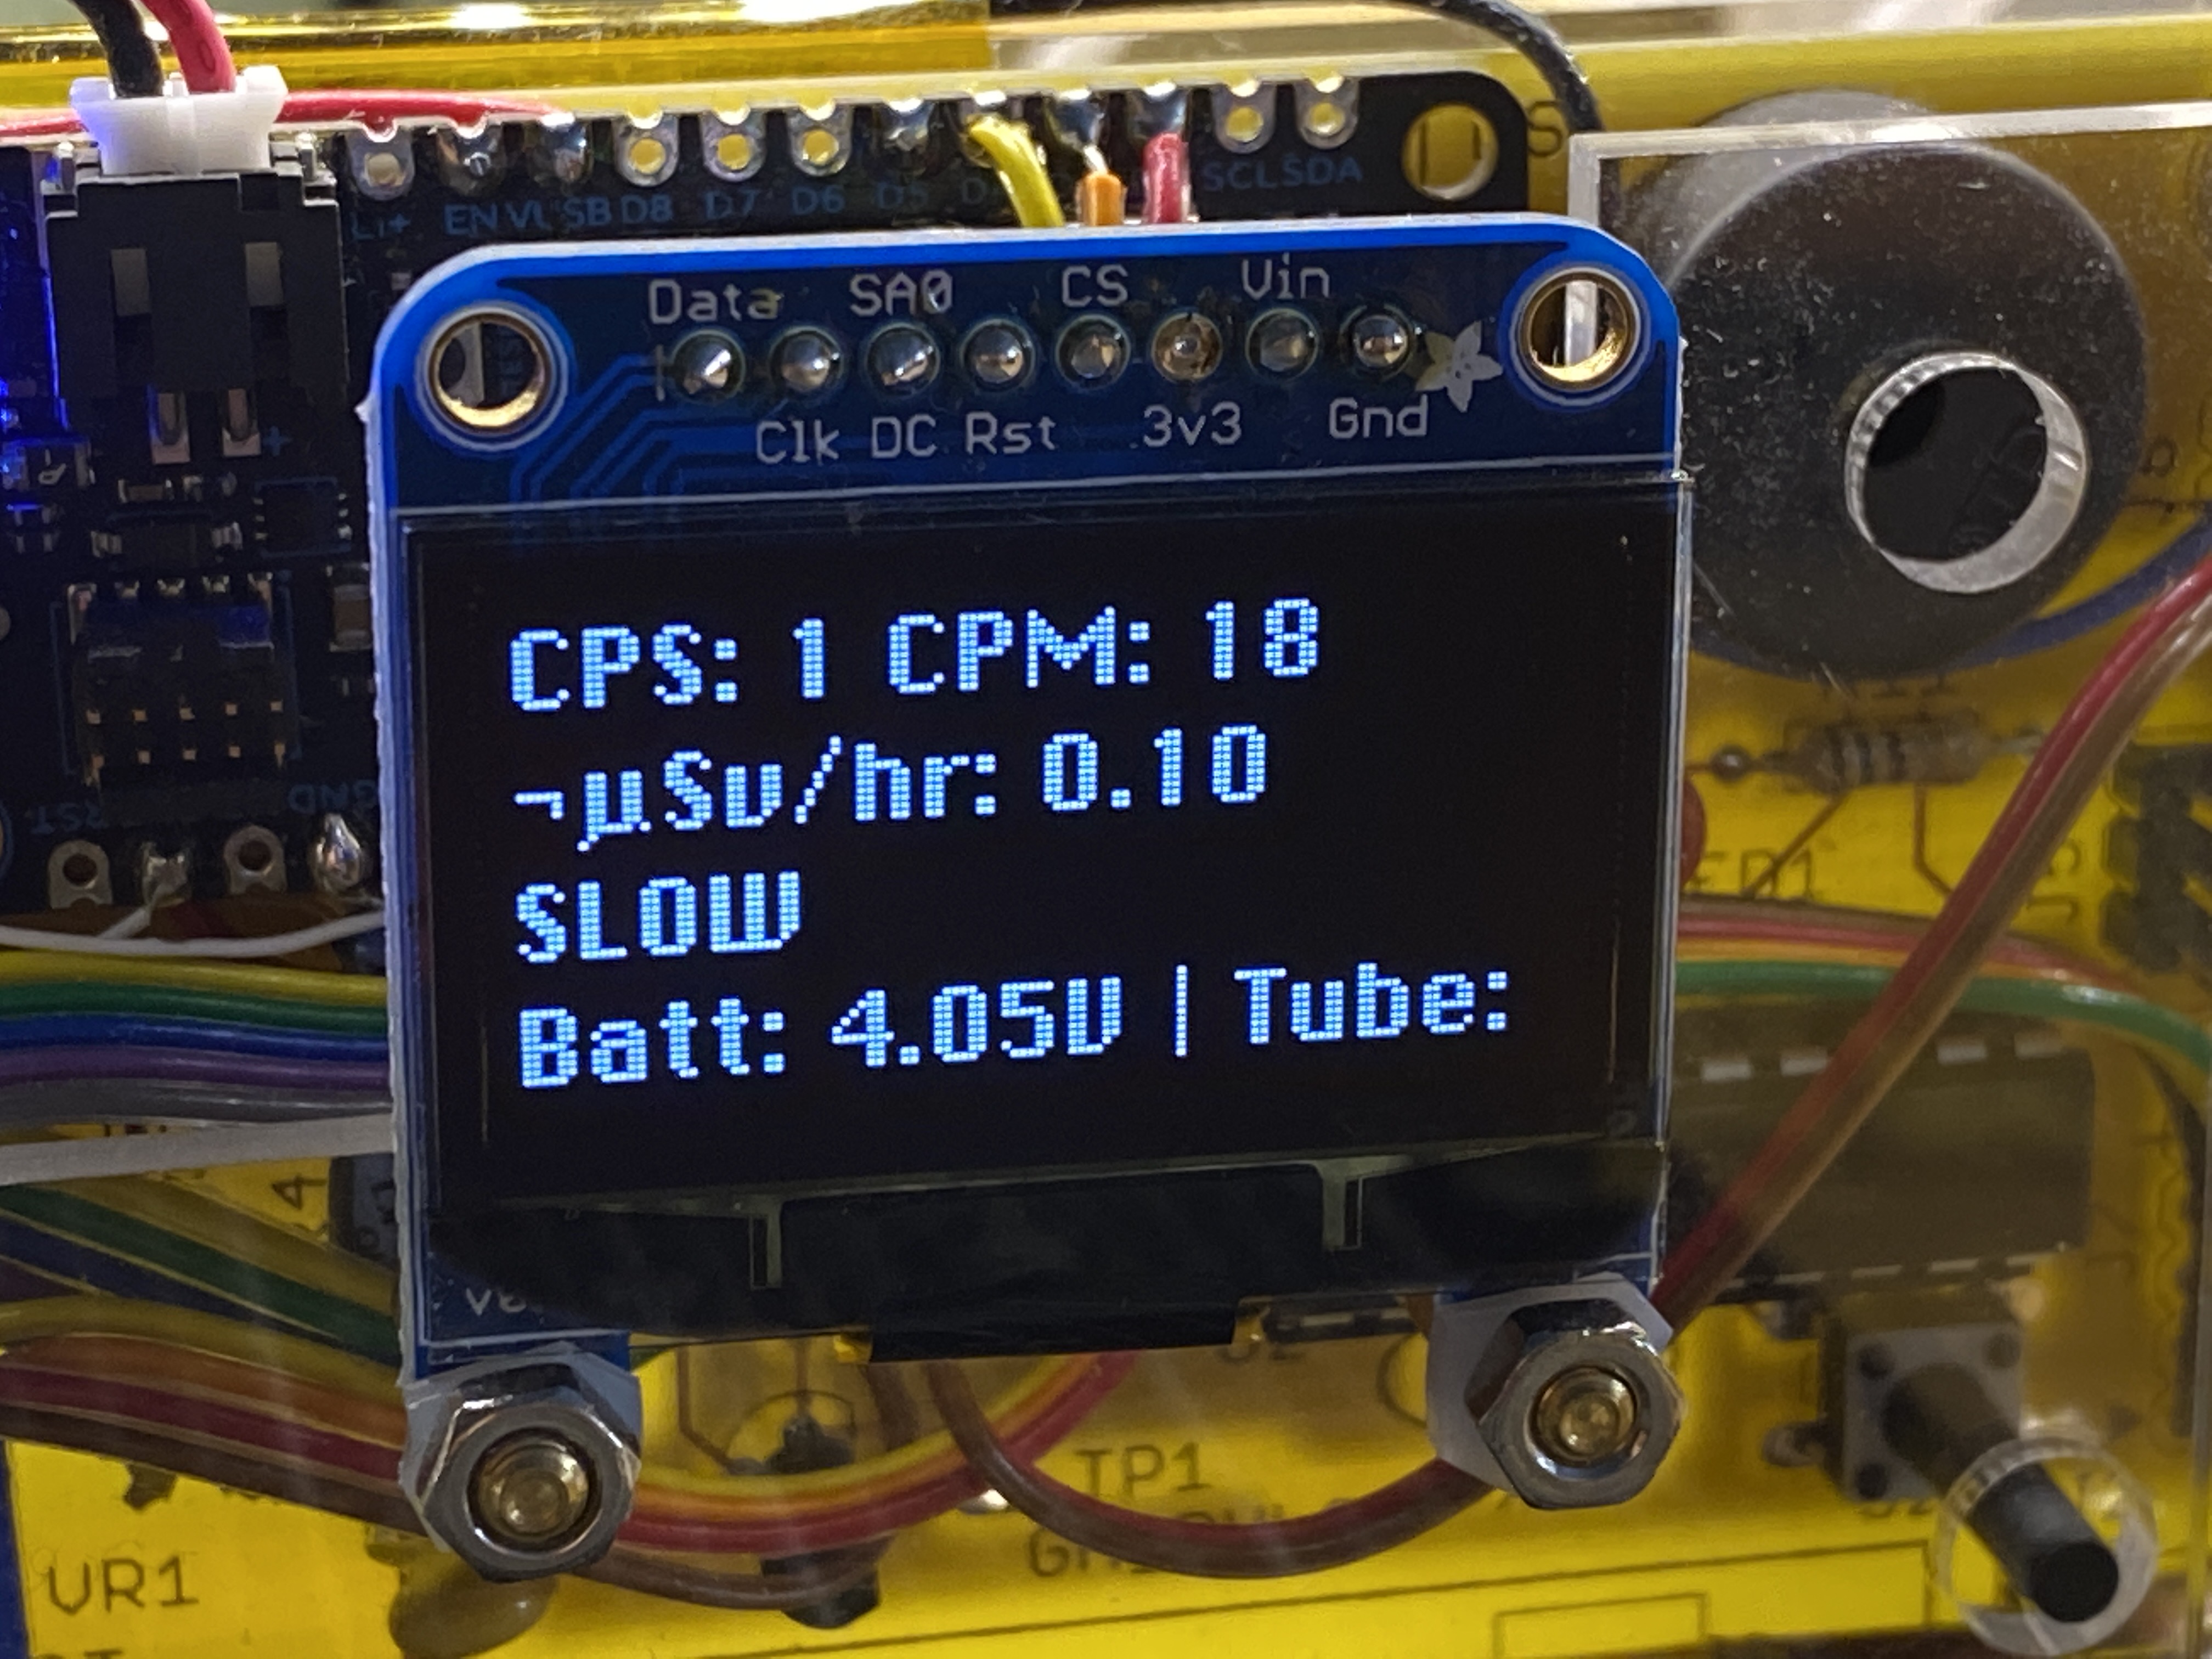
I added an Adafruit 128x64 graphical OLED display, Particle Argon WiFi microcontroller, LiPo battery pack, and tube voltage monitoring circuit. It features an Analog Devices AD8244 high-input-impedance buffer and a 1 GΩ/3.9 MΩ voltage divider to connect to an ADC pin on the Argon.
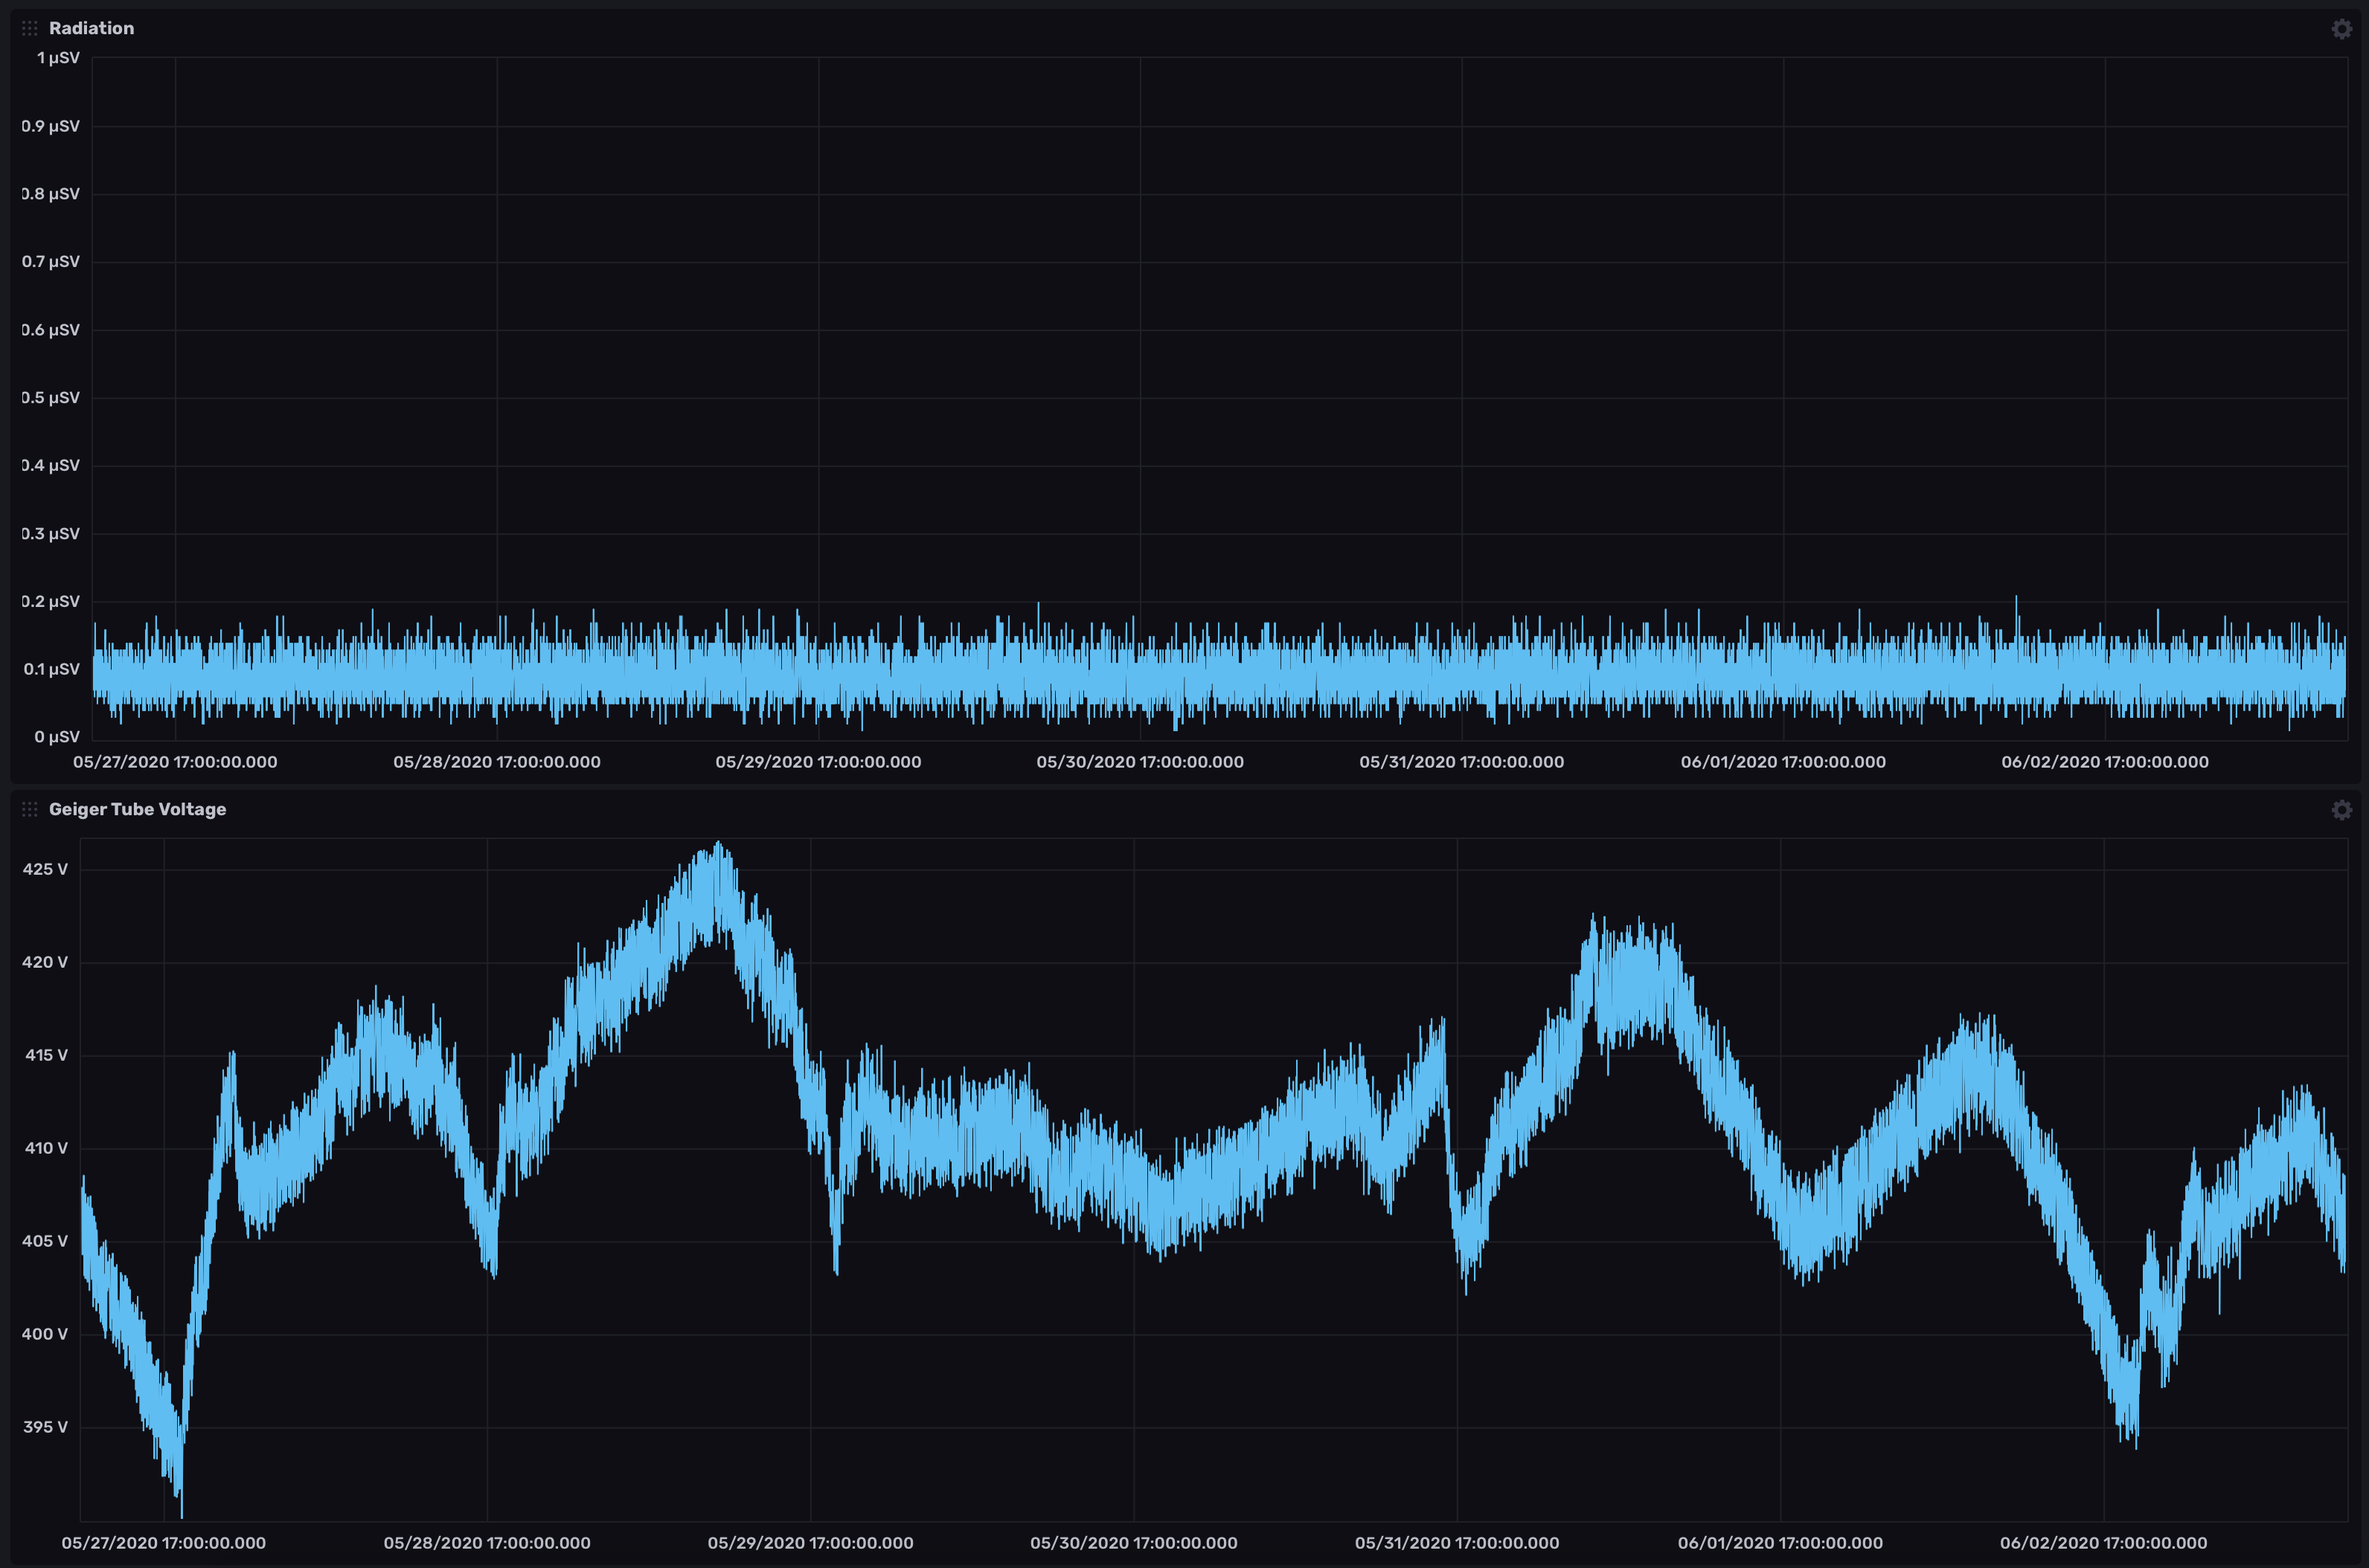
I started logging tube voltage, battery voltage, and radiation levels to InfluxDB and noticed something interesting—the tube voltage is highly temperature dependent. Doesn’t seem to affect the radiation measurement though!
I’ve got some ideas to improve the display with a nice graph, and implement a dynamic algorithm to change the integration time automatically based on radiation level, leveraging the horsepower of the Argon.
Oh yeah, and I converted some classic Mac fonts to use with the Adafruit_GFX library—Espy Sans, Chicago, and Geneva—for the ultimate UI bitmap font style.

Michele is a fan of the Chicago version, IIRC. :)
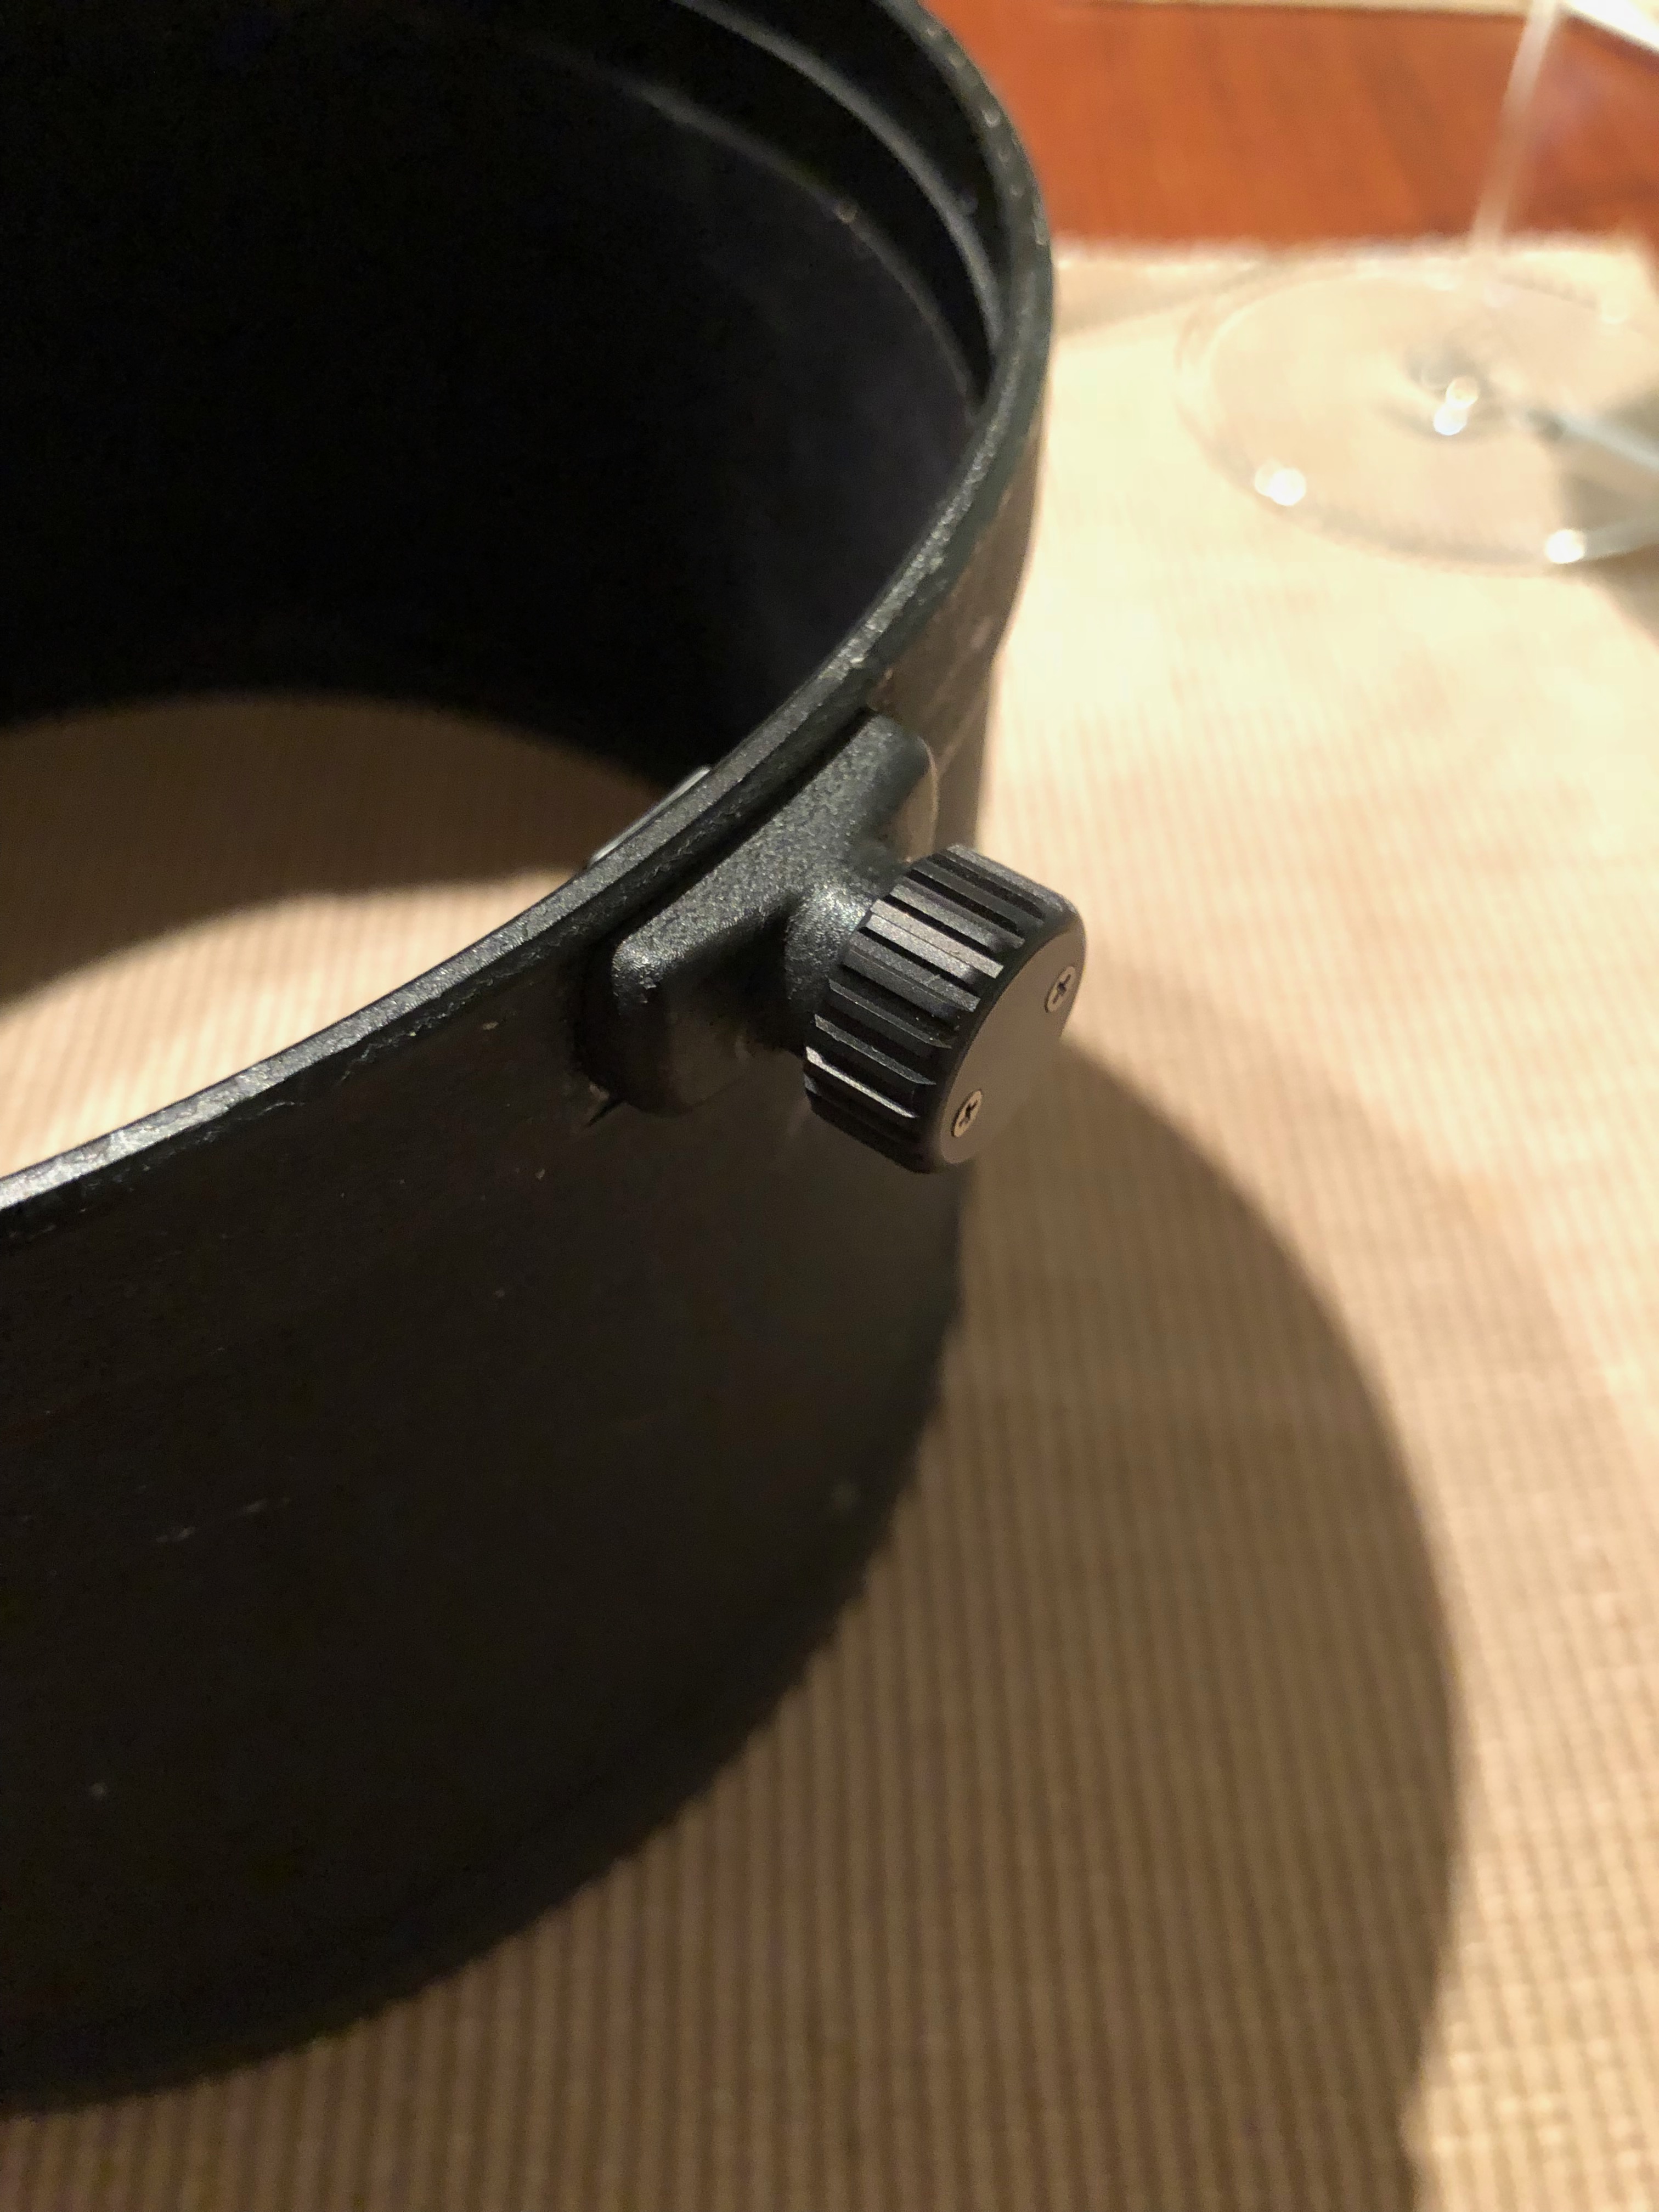
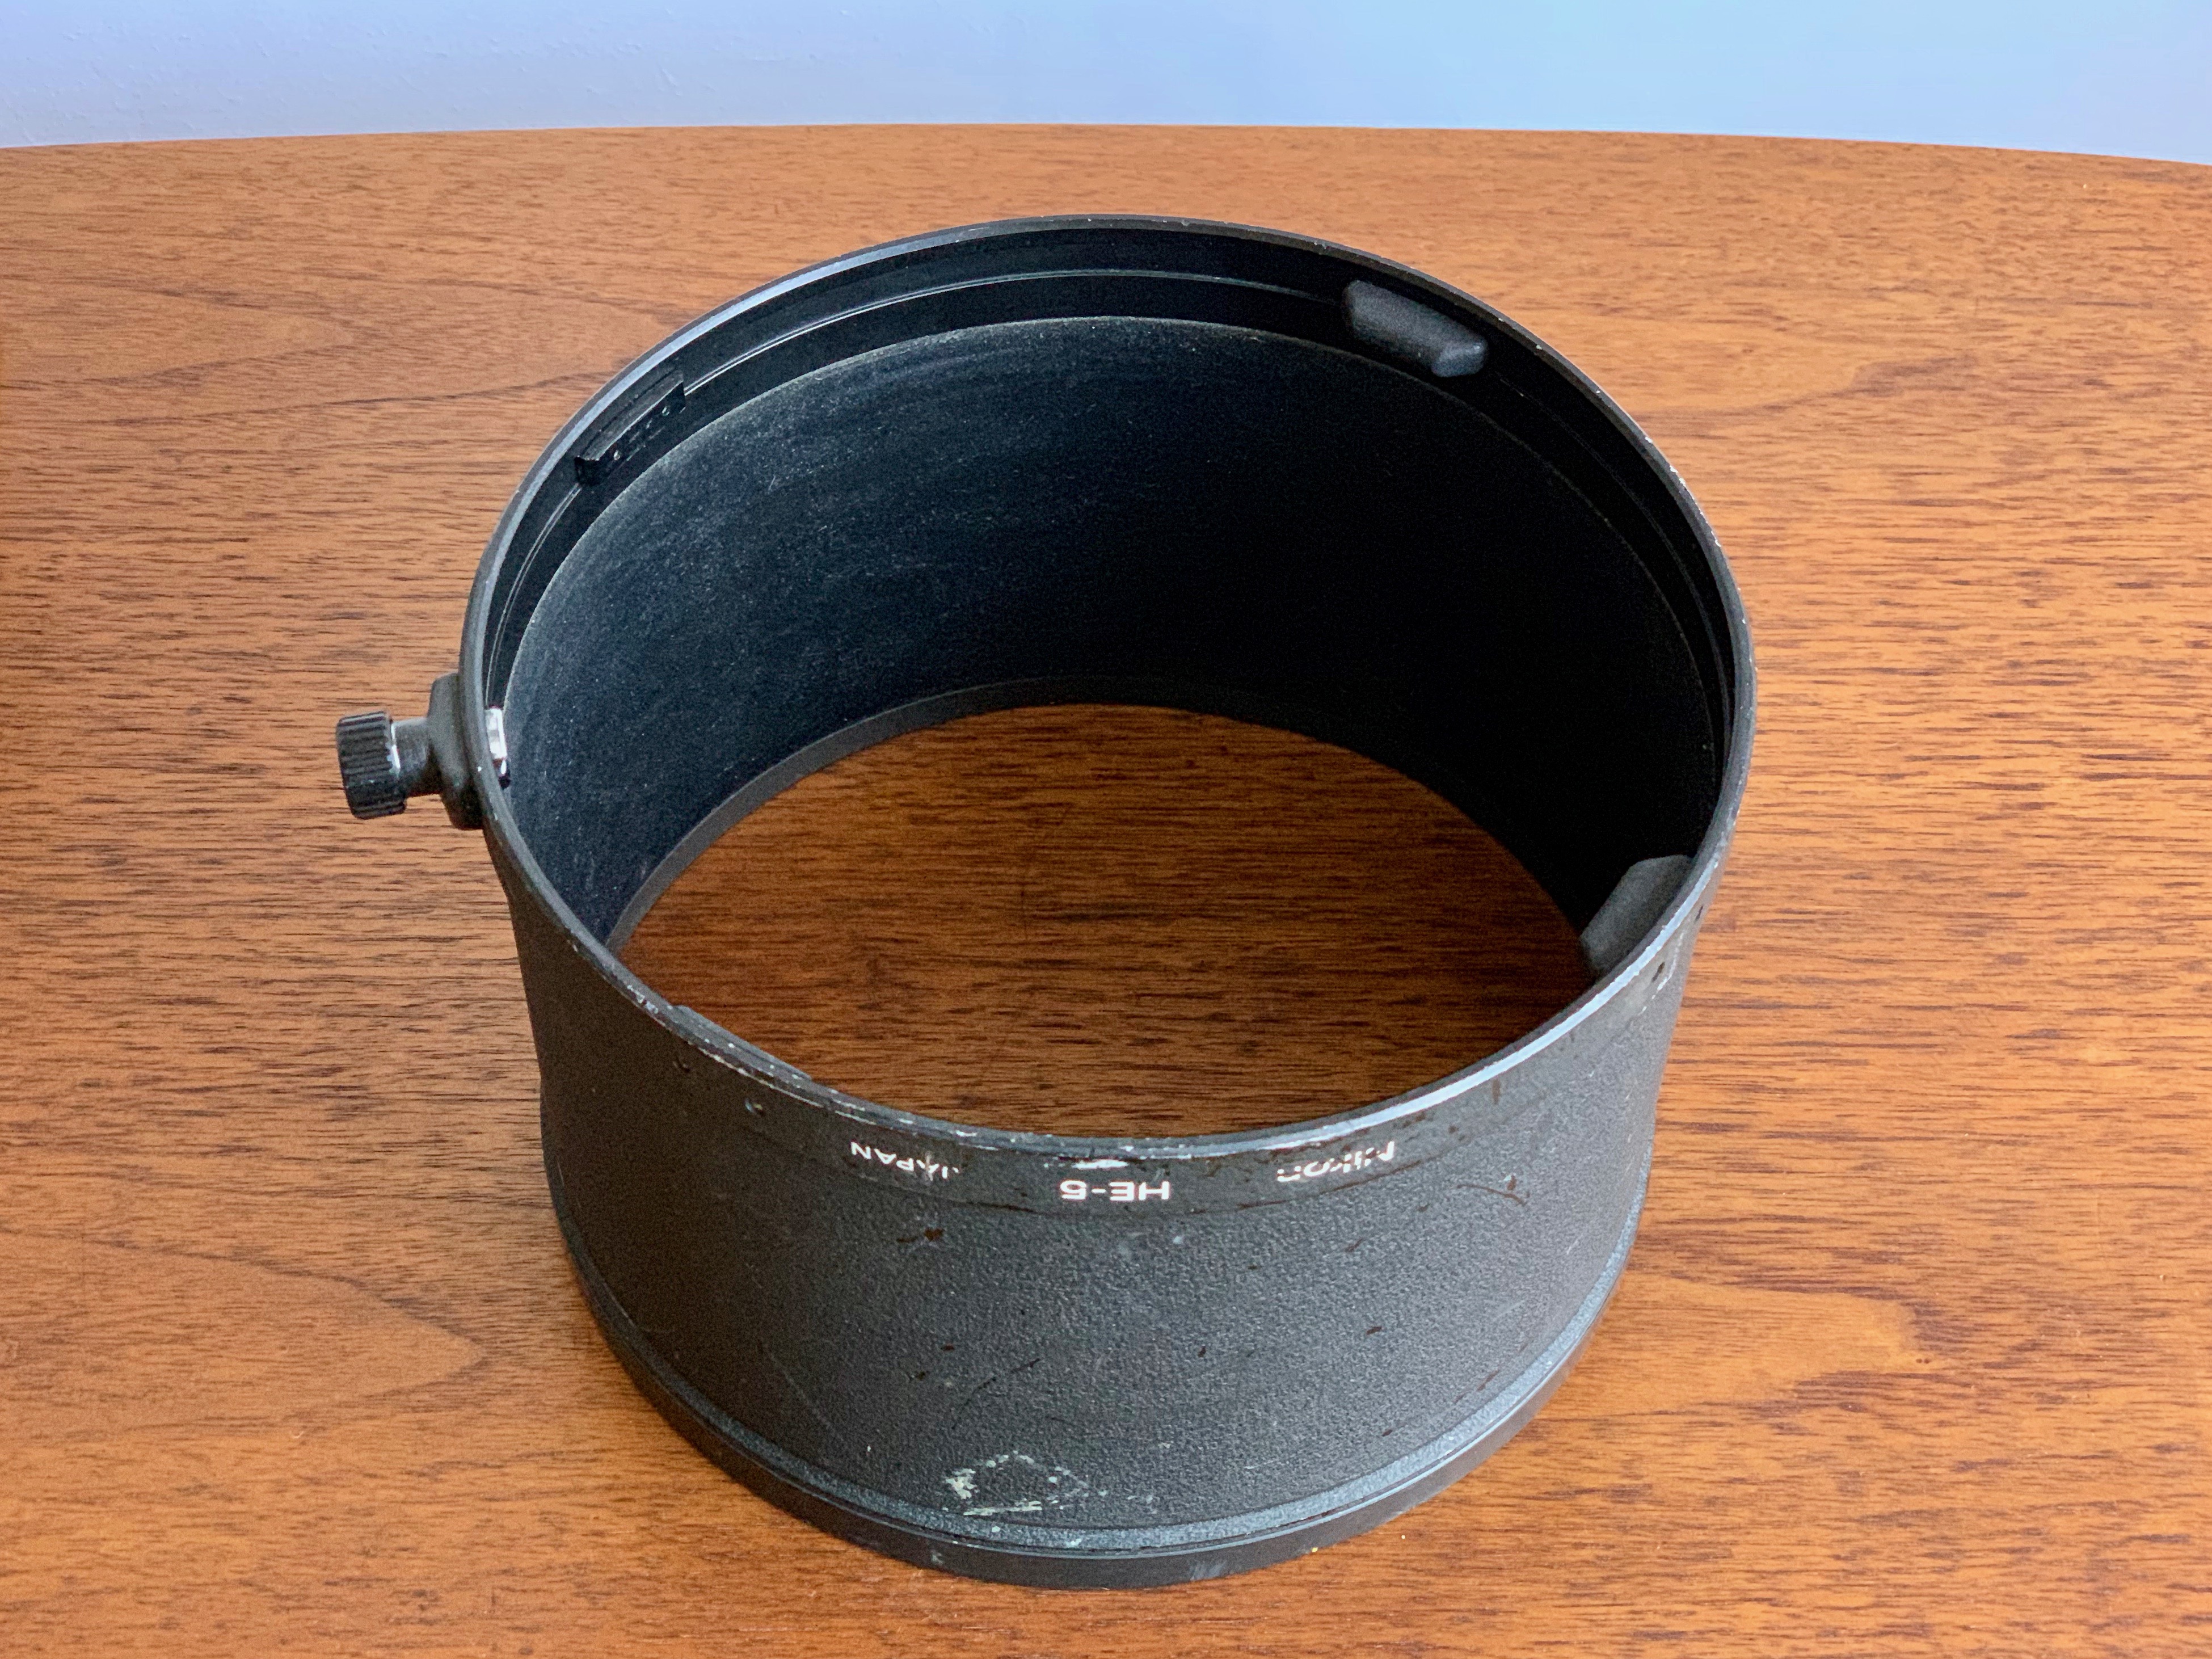
Nikon HE-5 Lens Hood Extension
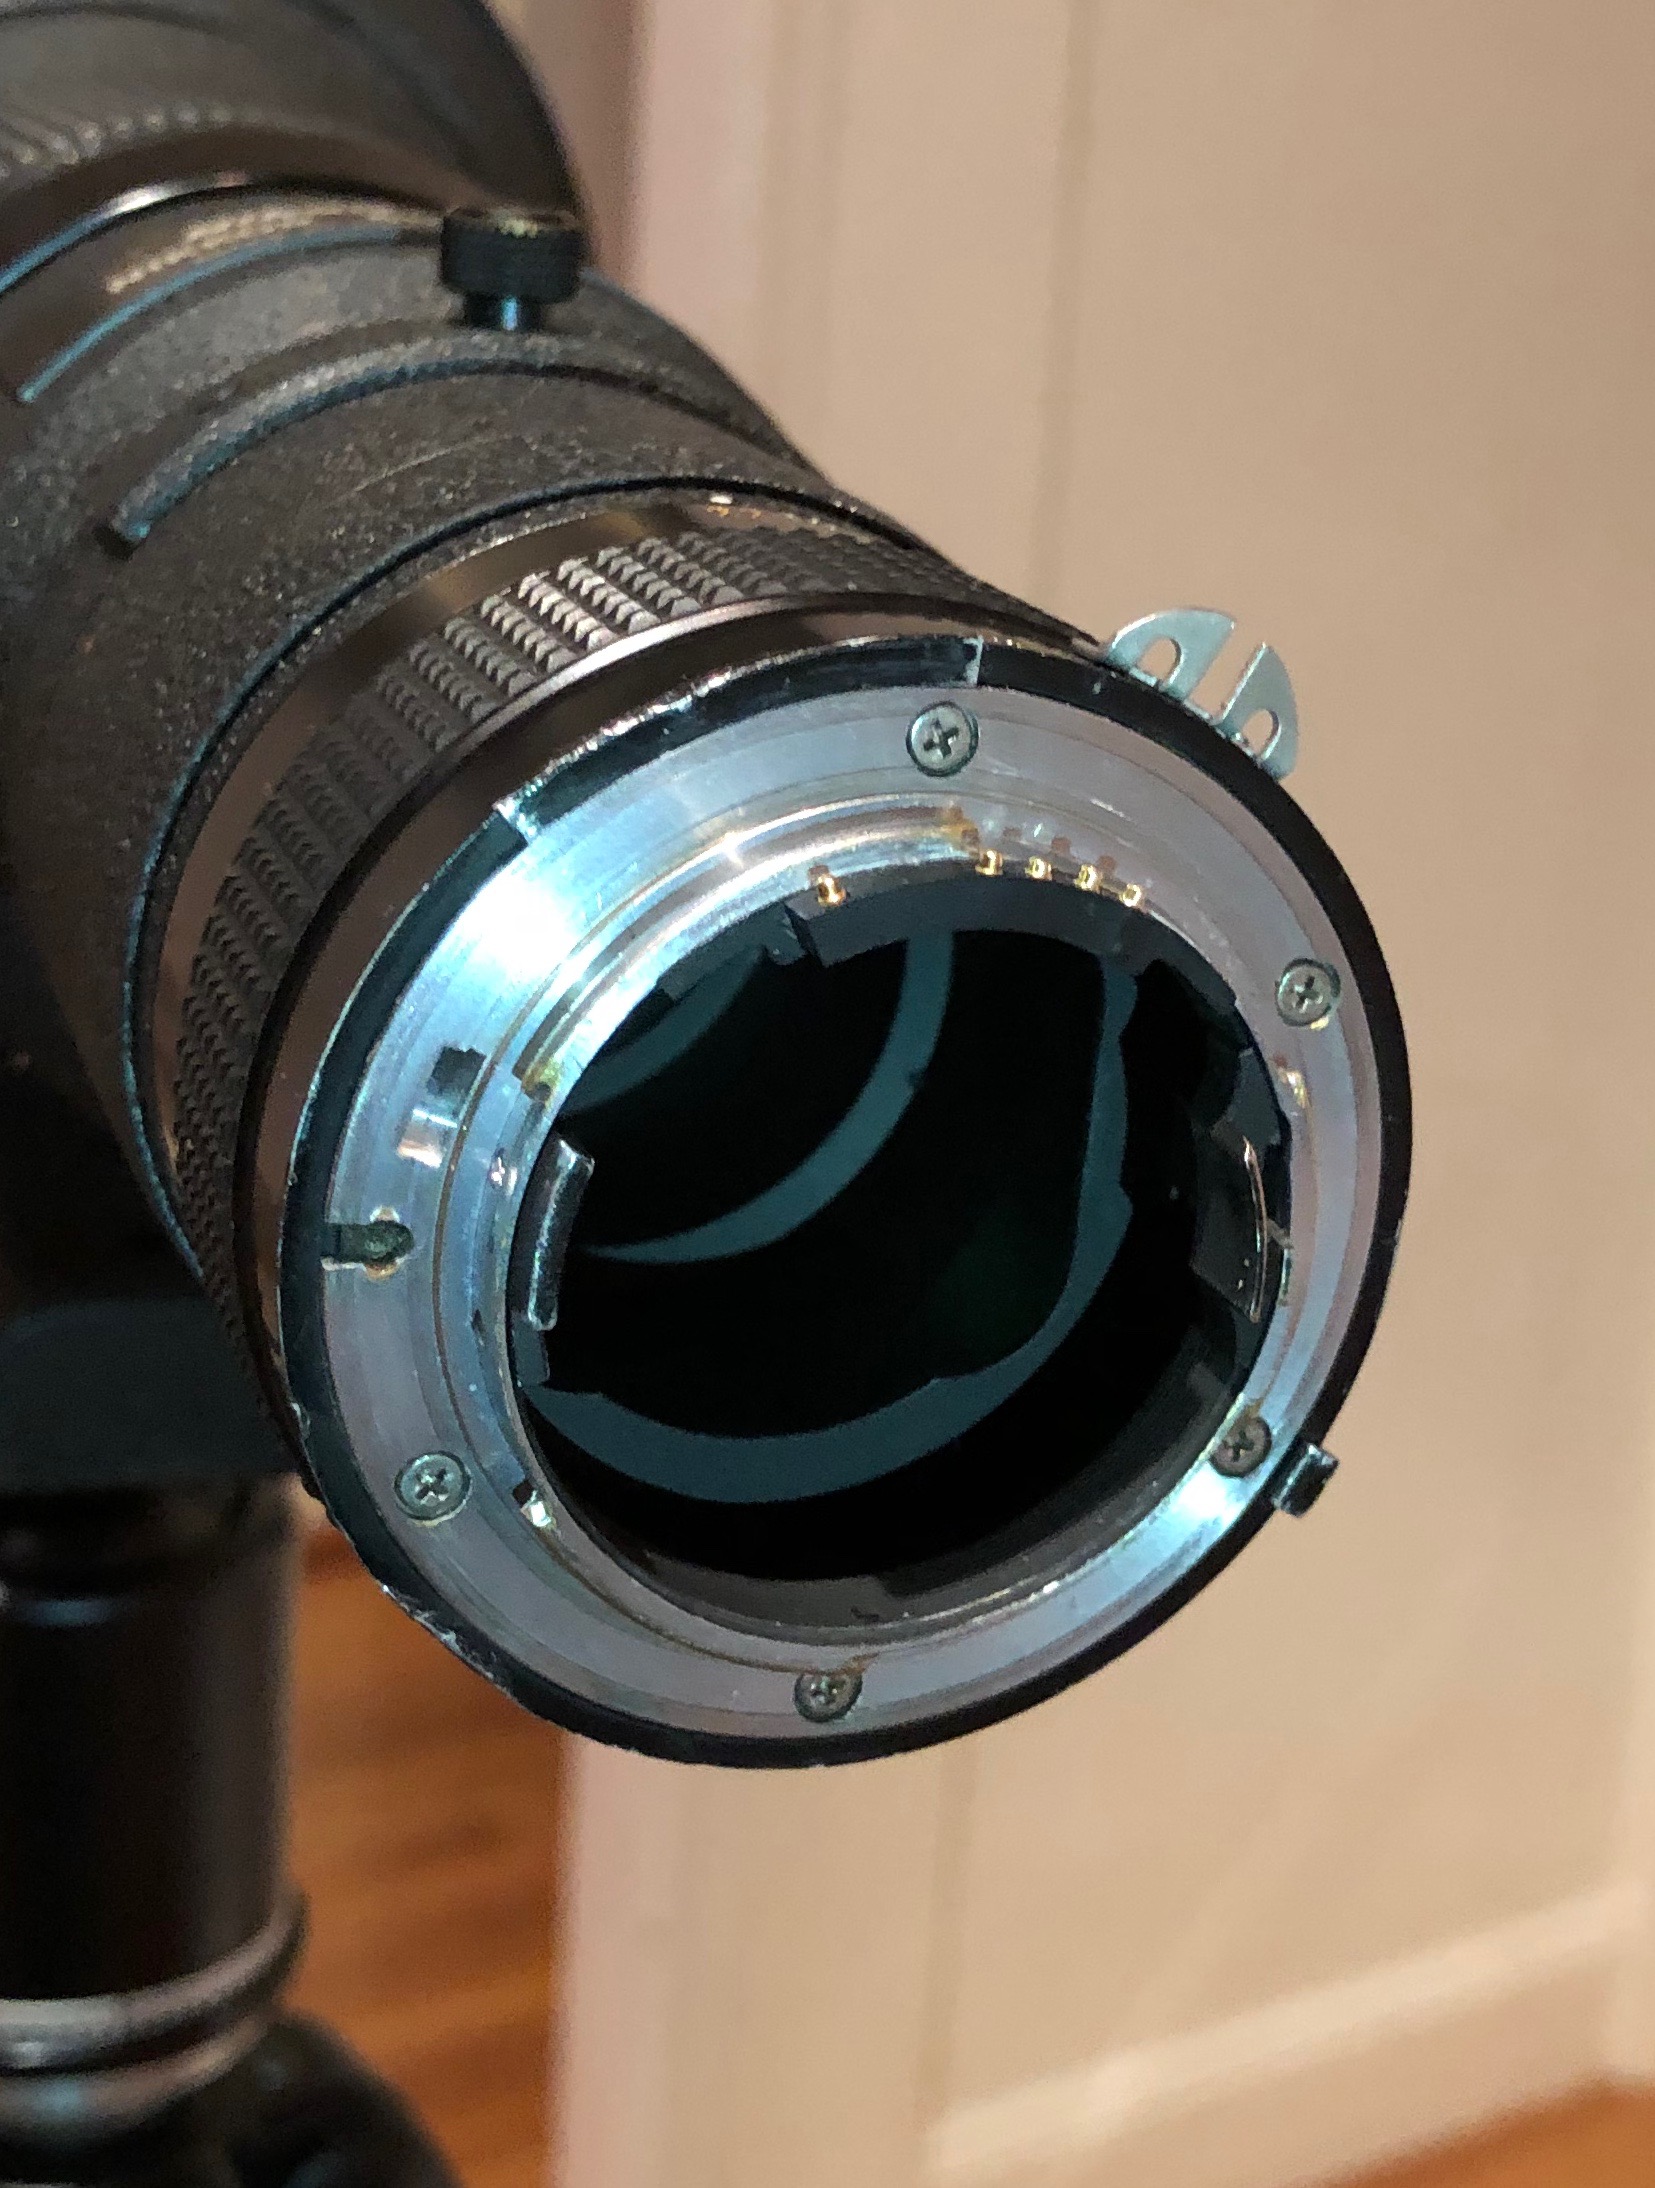
My foray back into panoramic photography gave me an excuse to buy a DSLR. Owning a DSLR has given me an excuse to search eBay for deals on interesting camera lenses. In December that led to the purchase of a Nikon 600mm f/4 AiS manual focus super-telephoto lens. My particular copy appears to have been owned by the Dallas Morning News at some point—as that's written on the side of its trunk case. I trust it is a good retirement activity for this lens to look at birds and airplanes; activities which I also enjoy. It's incredibly heavy and impractical to carry around, but along with my modified TC-20E III, it's pretty much like looking through a telescope. I also added a dandelion CPU to the lens to get some of the benefits of more modern kit, like focus priority shutter and EXIF lens info.

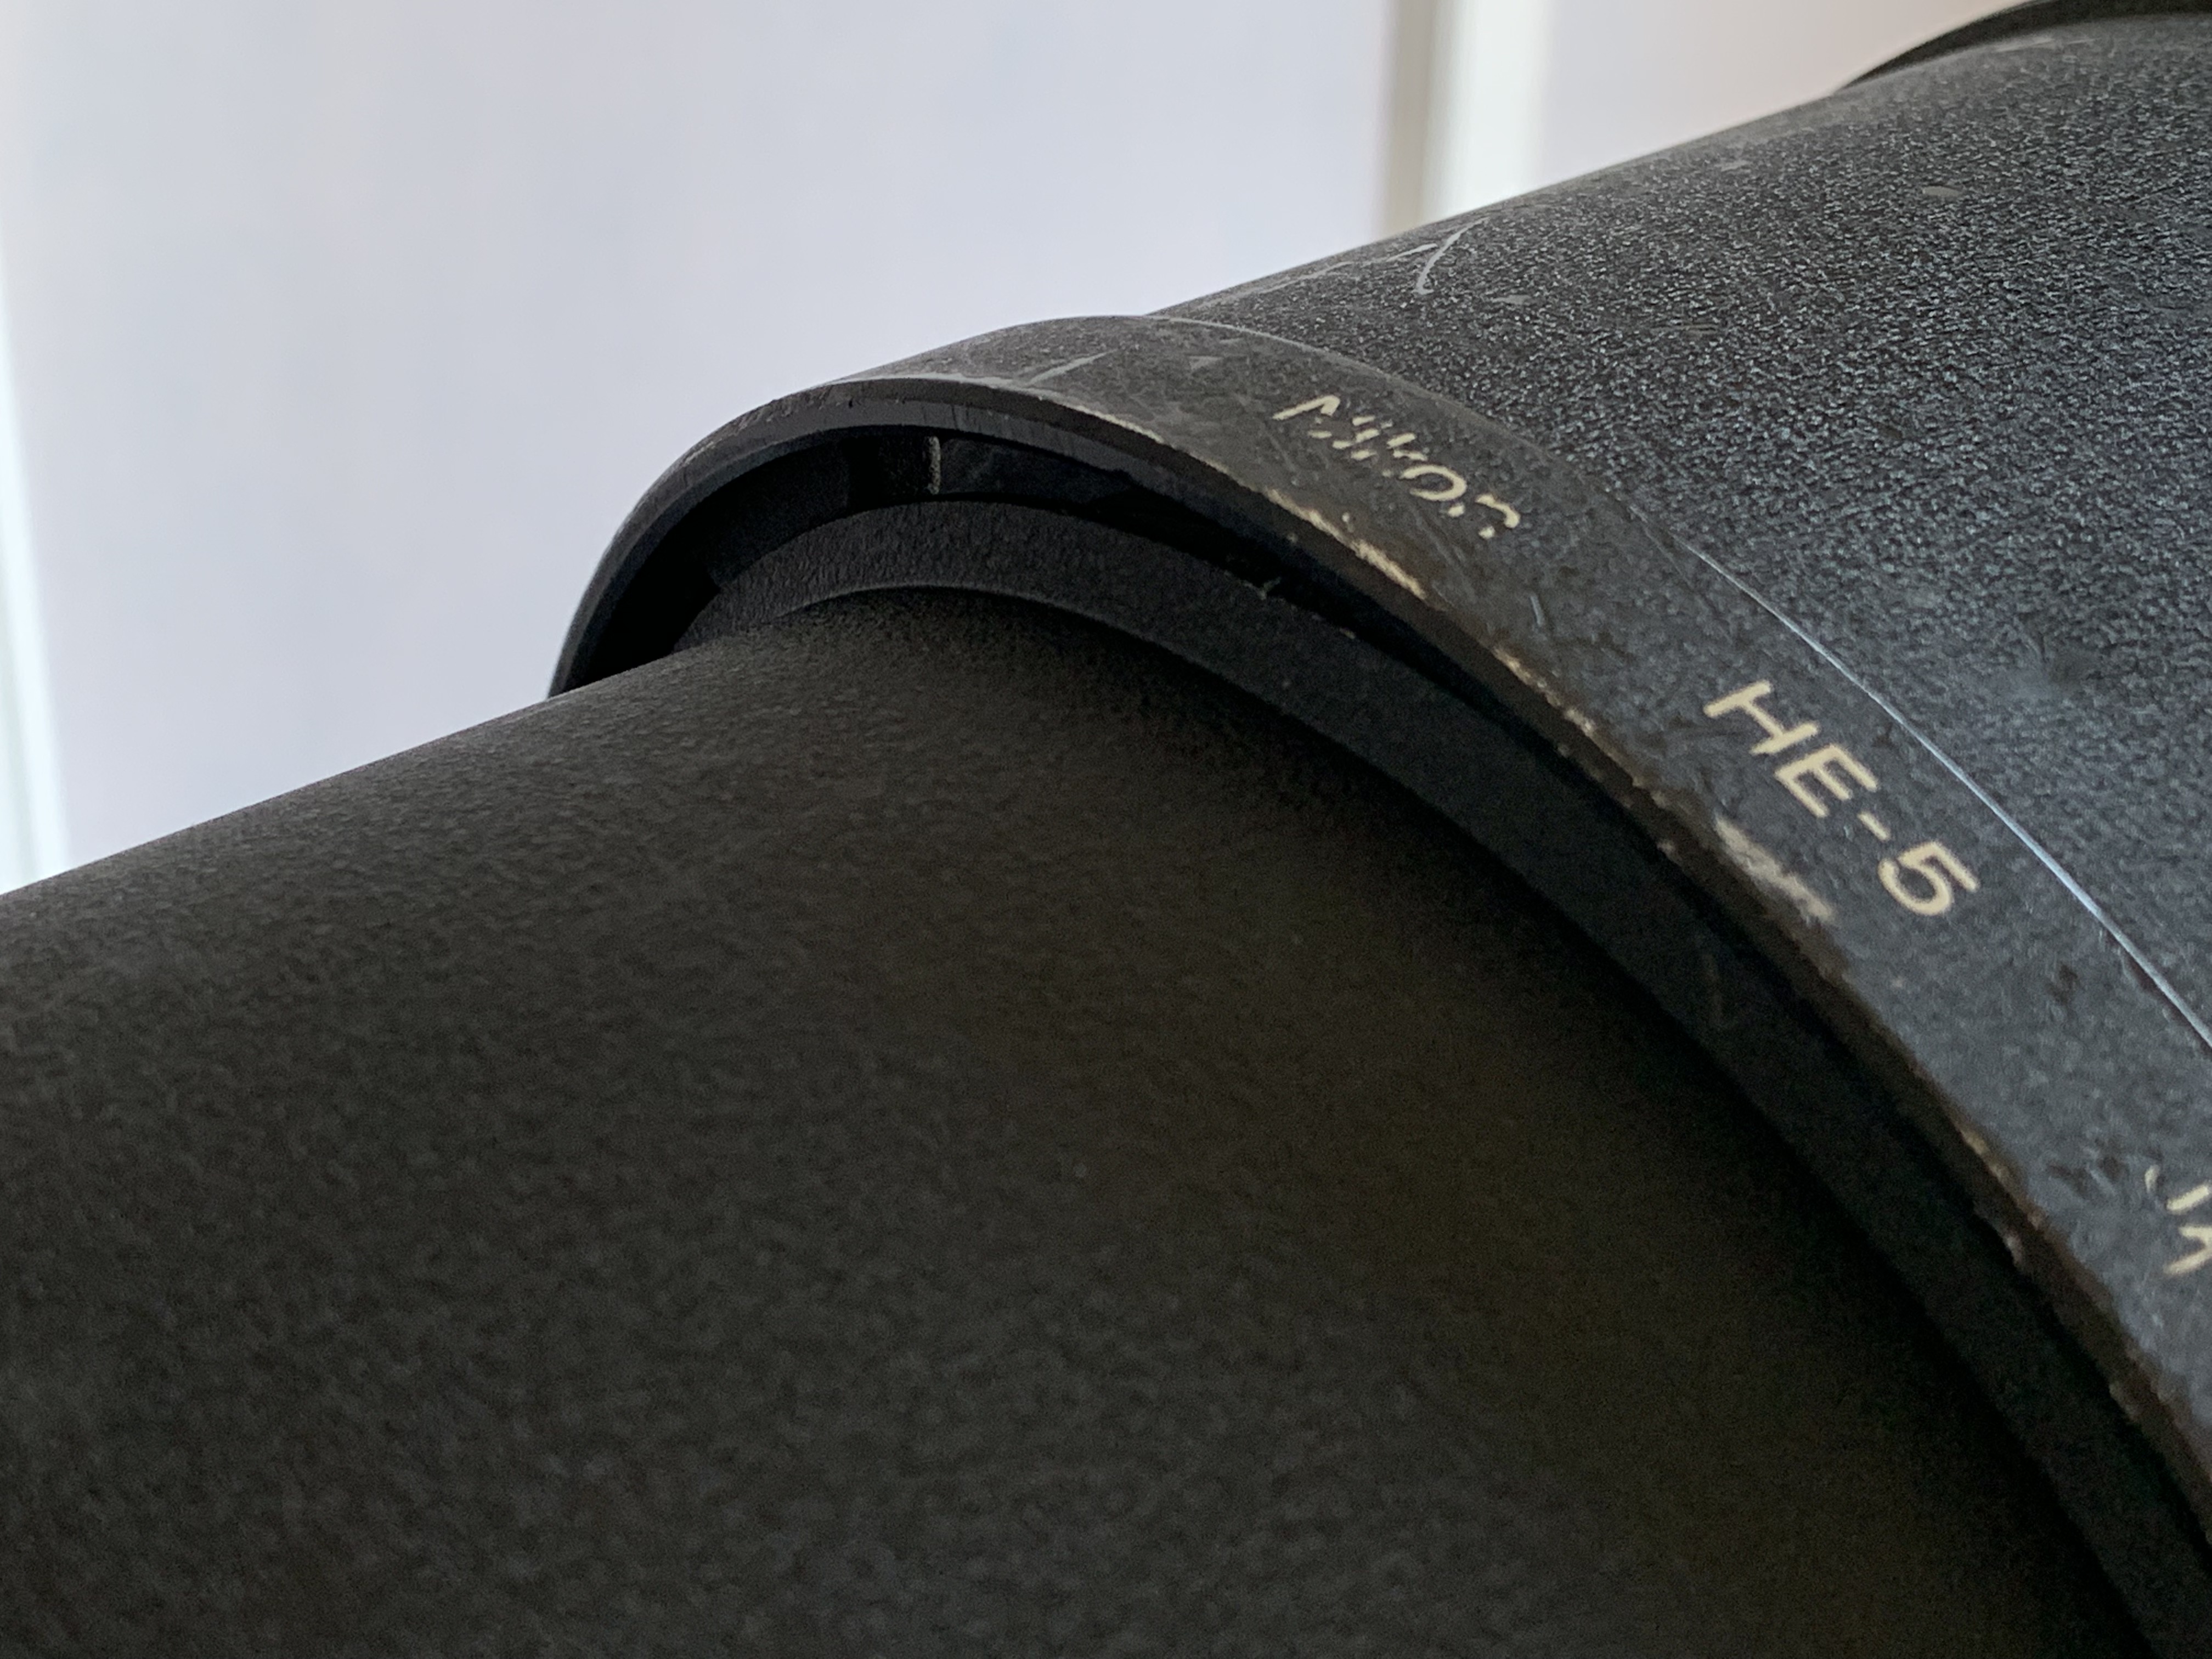
That excellent eBay deal unfortunately meant there were a few compromises, like the beat up case. The most significant was that the lens was missing the HE-5 Hood Extension. Having such a large front element meant that it's tricky to shade the front element from incident sun exposure, which can cause washed out images and lens flare. It took about 6 months to find a hood on eBay, so I bought the first one I ran across, even bidding it up while on vacation.

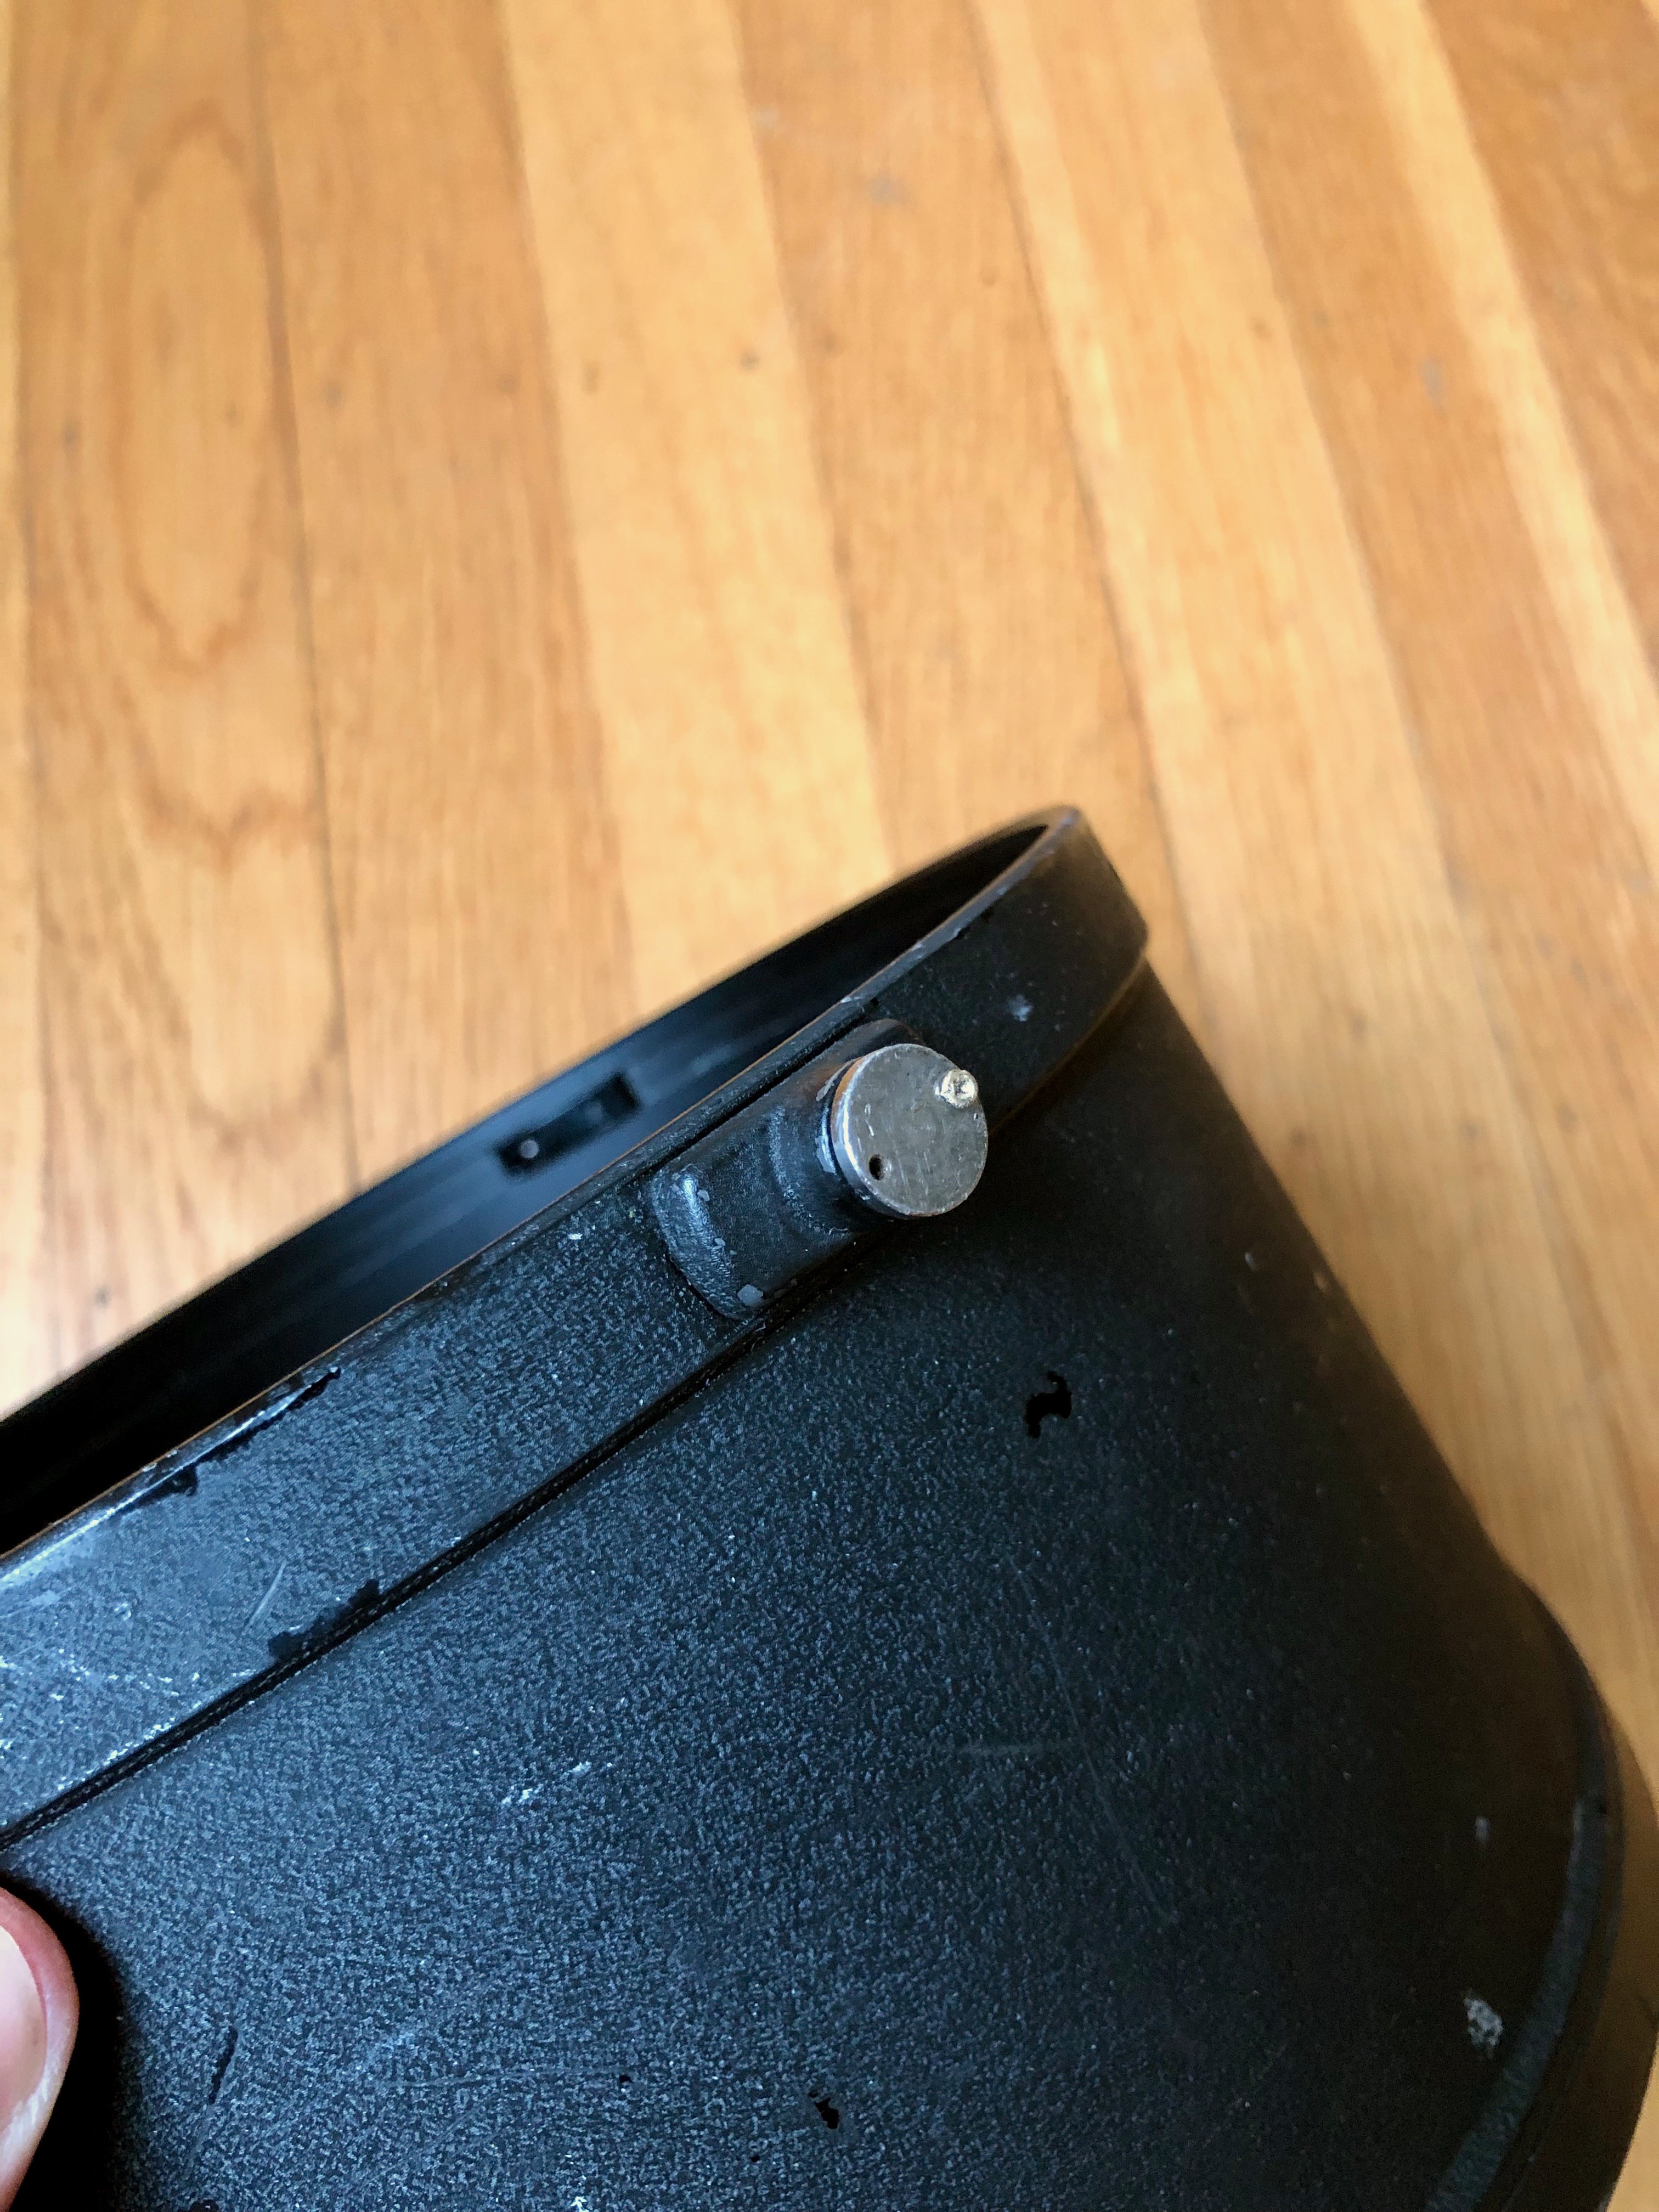
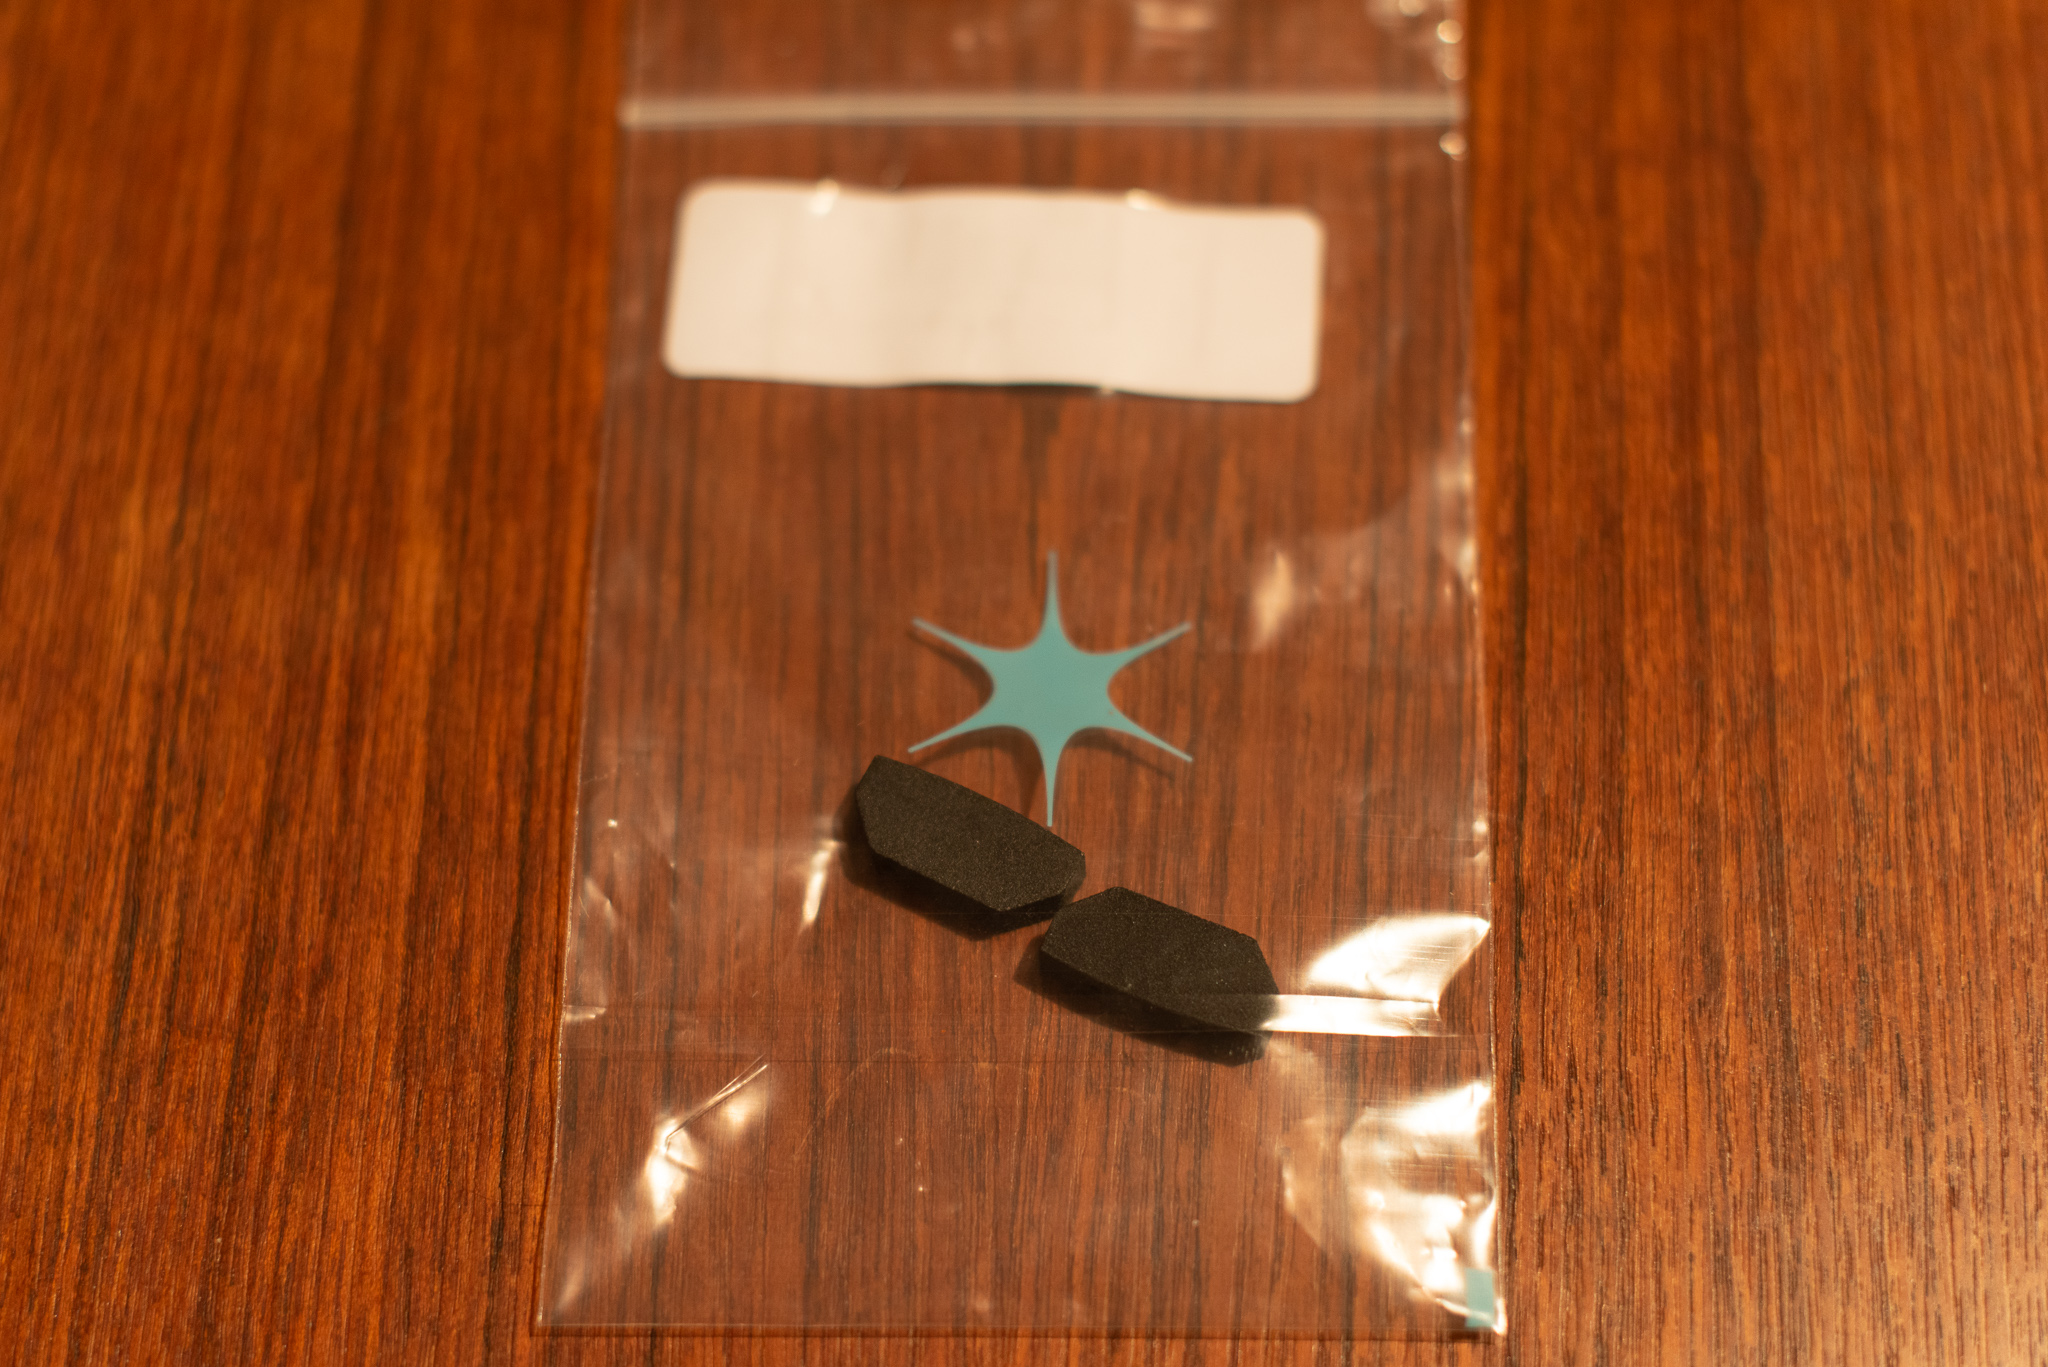
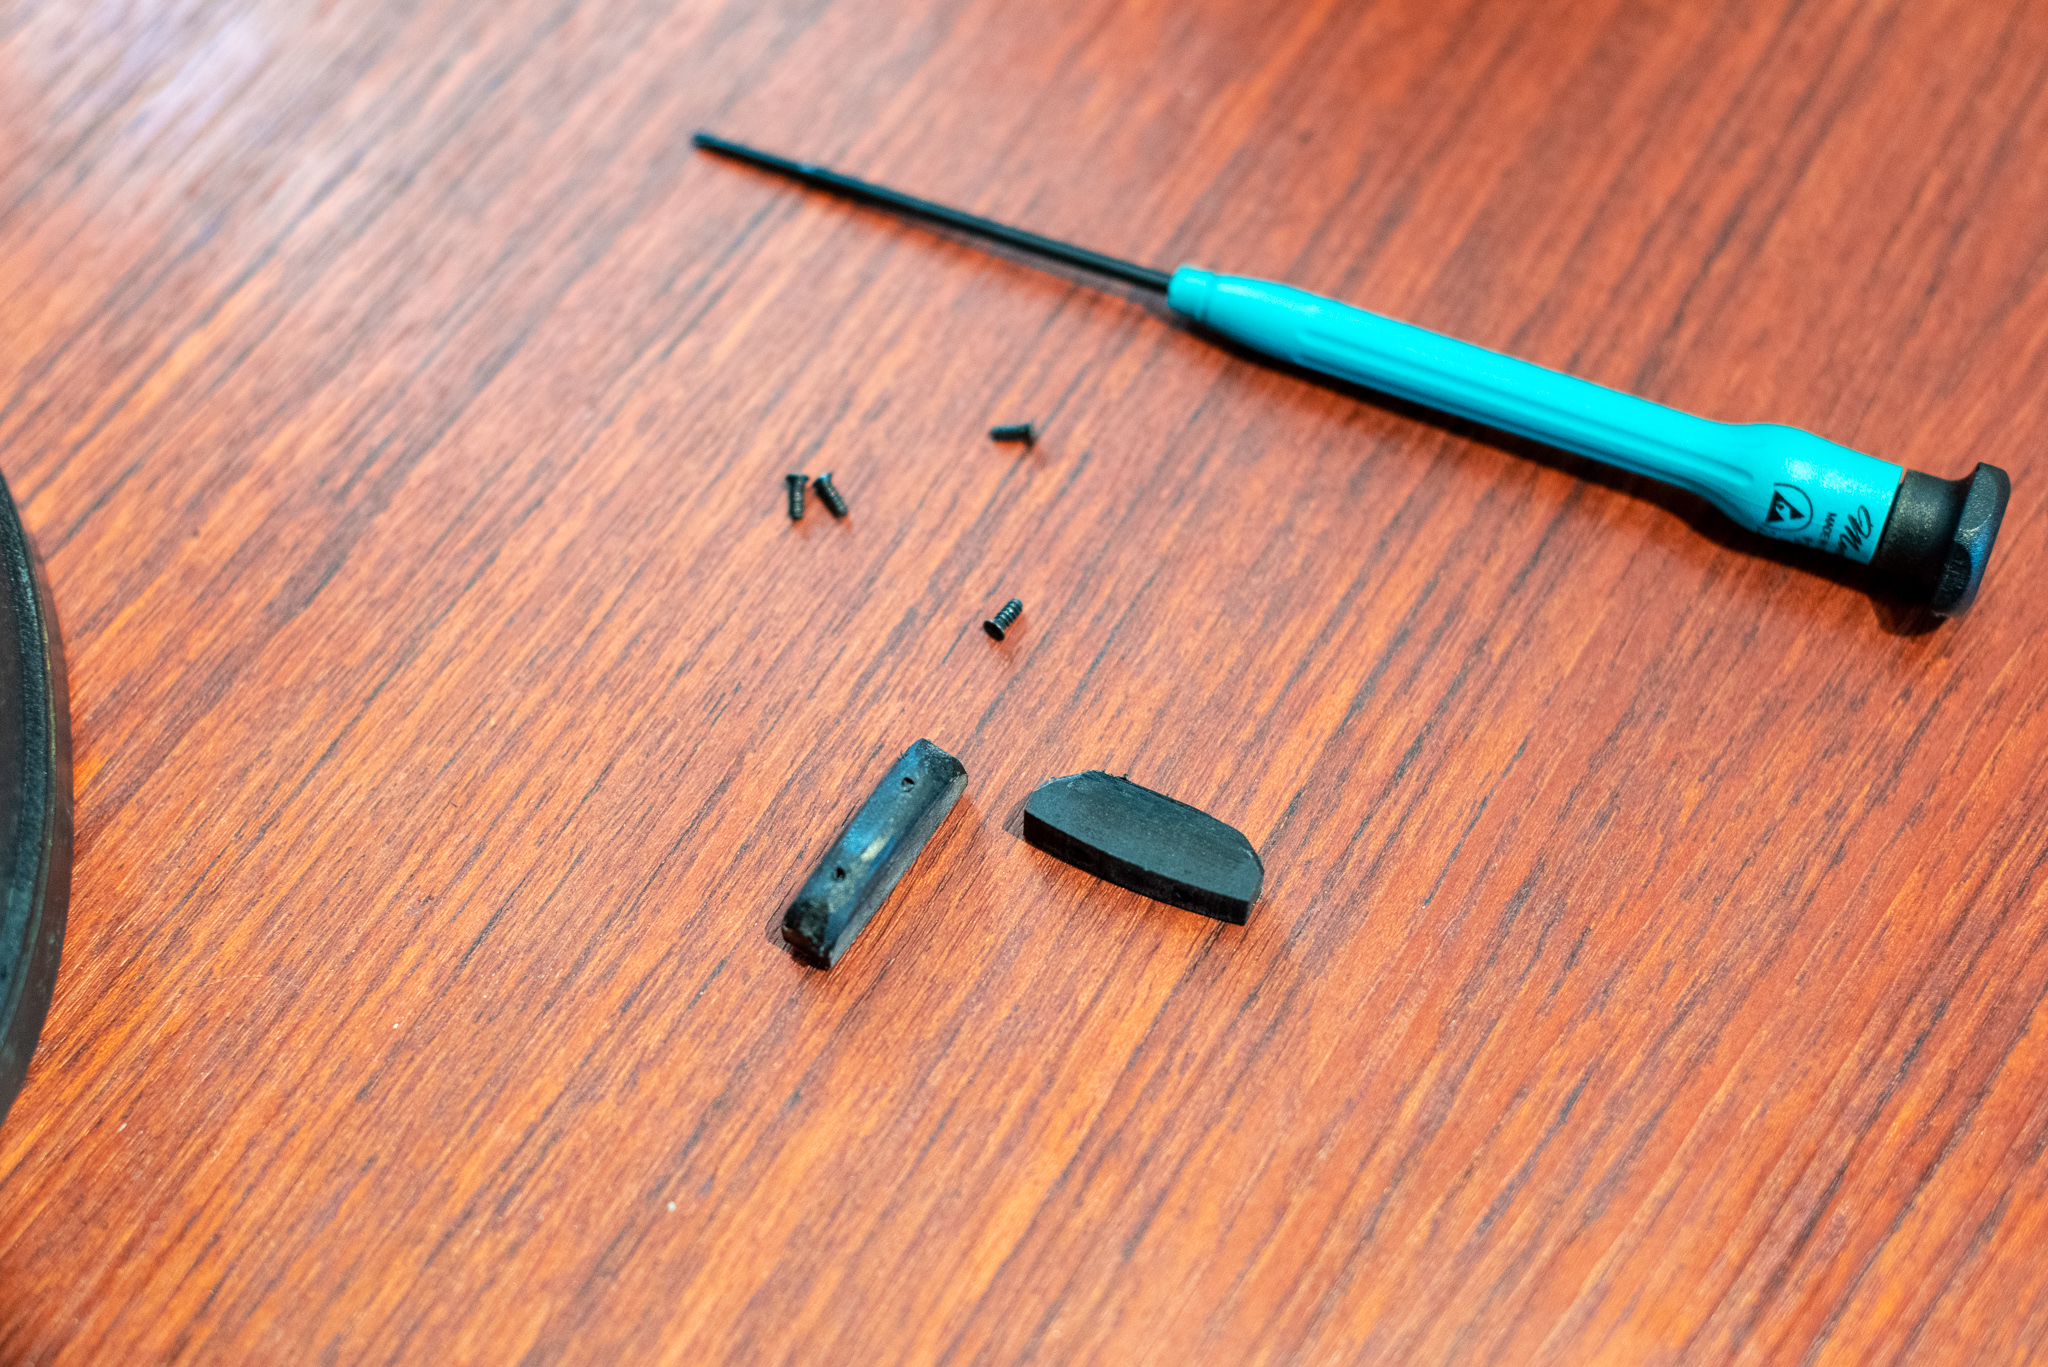
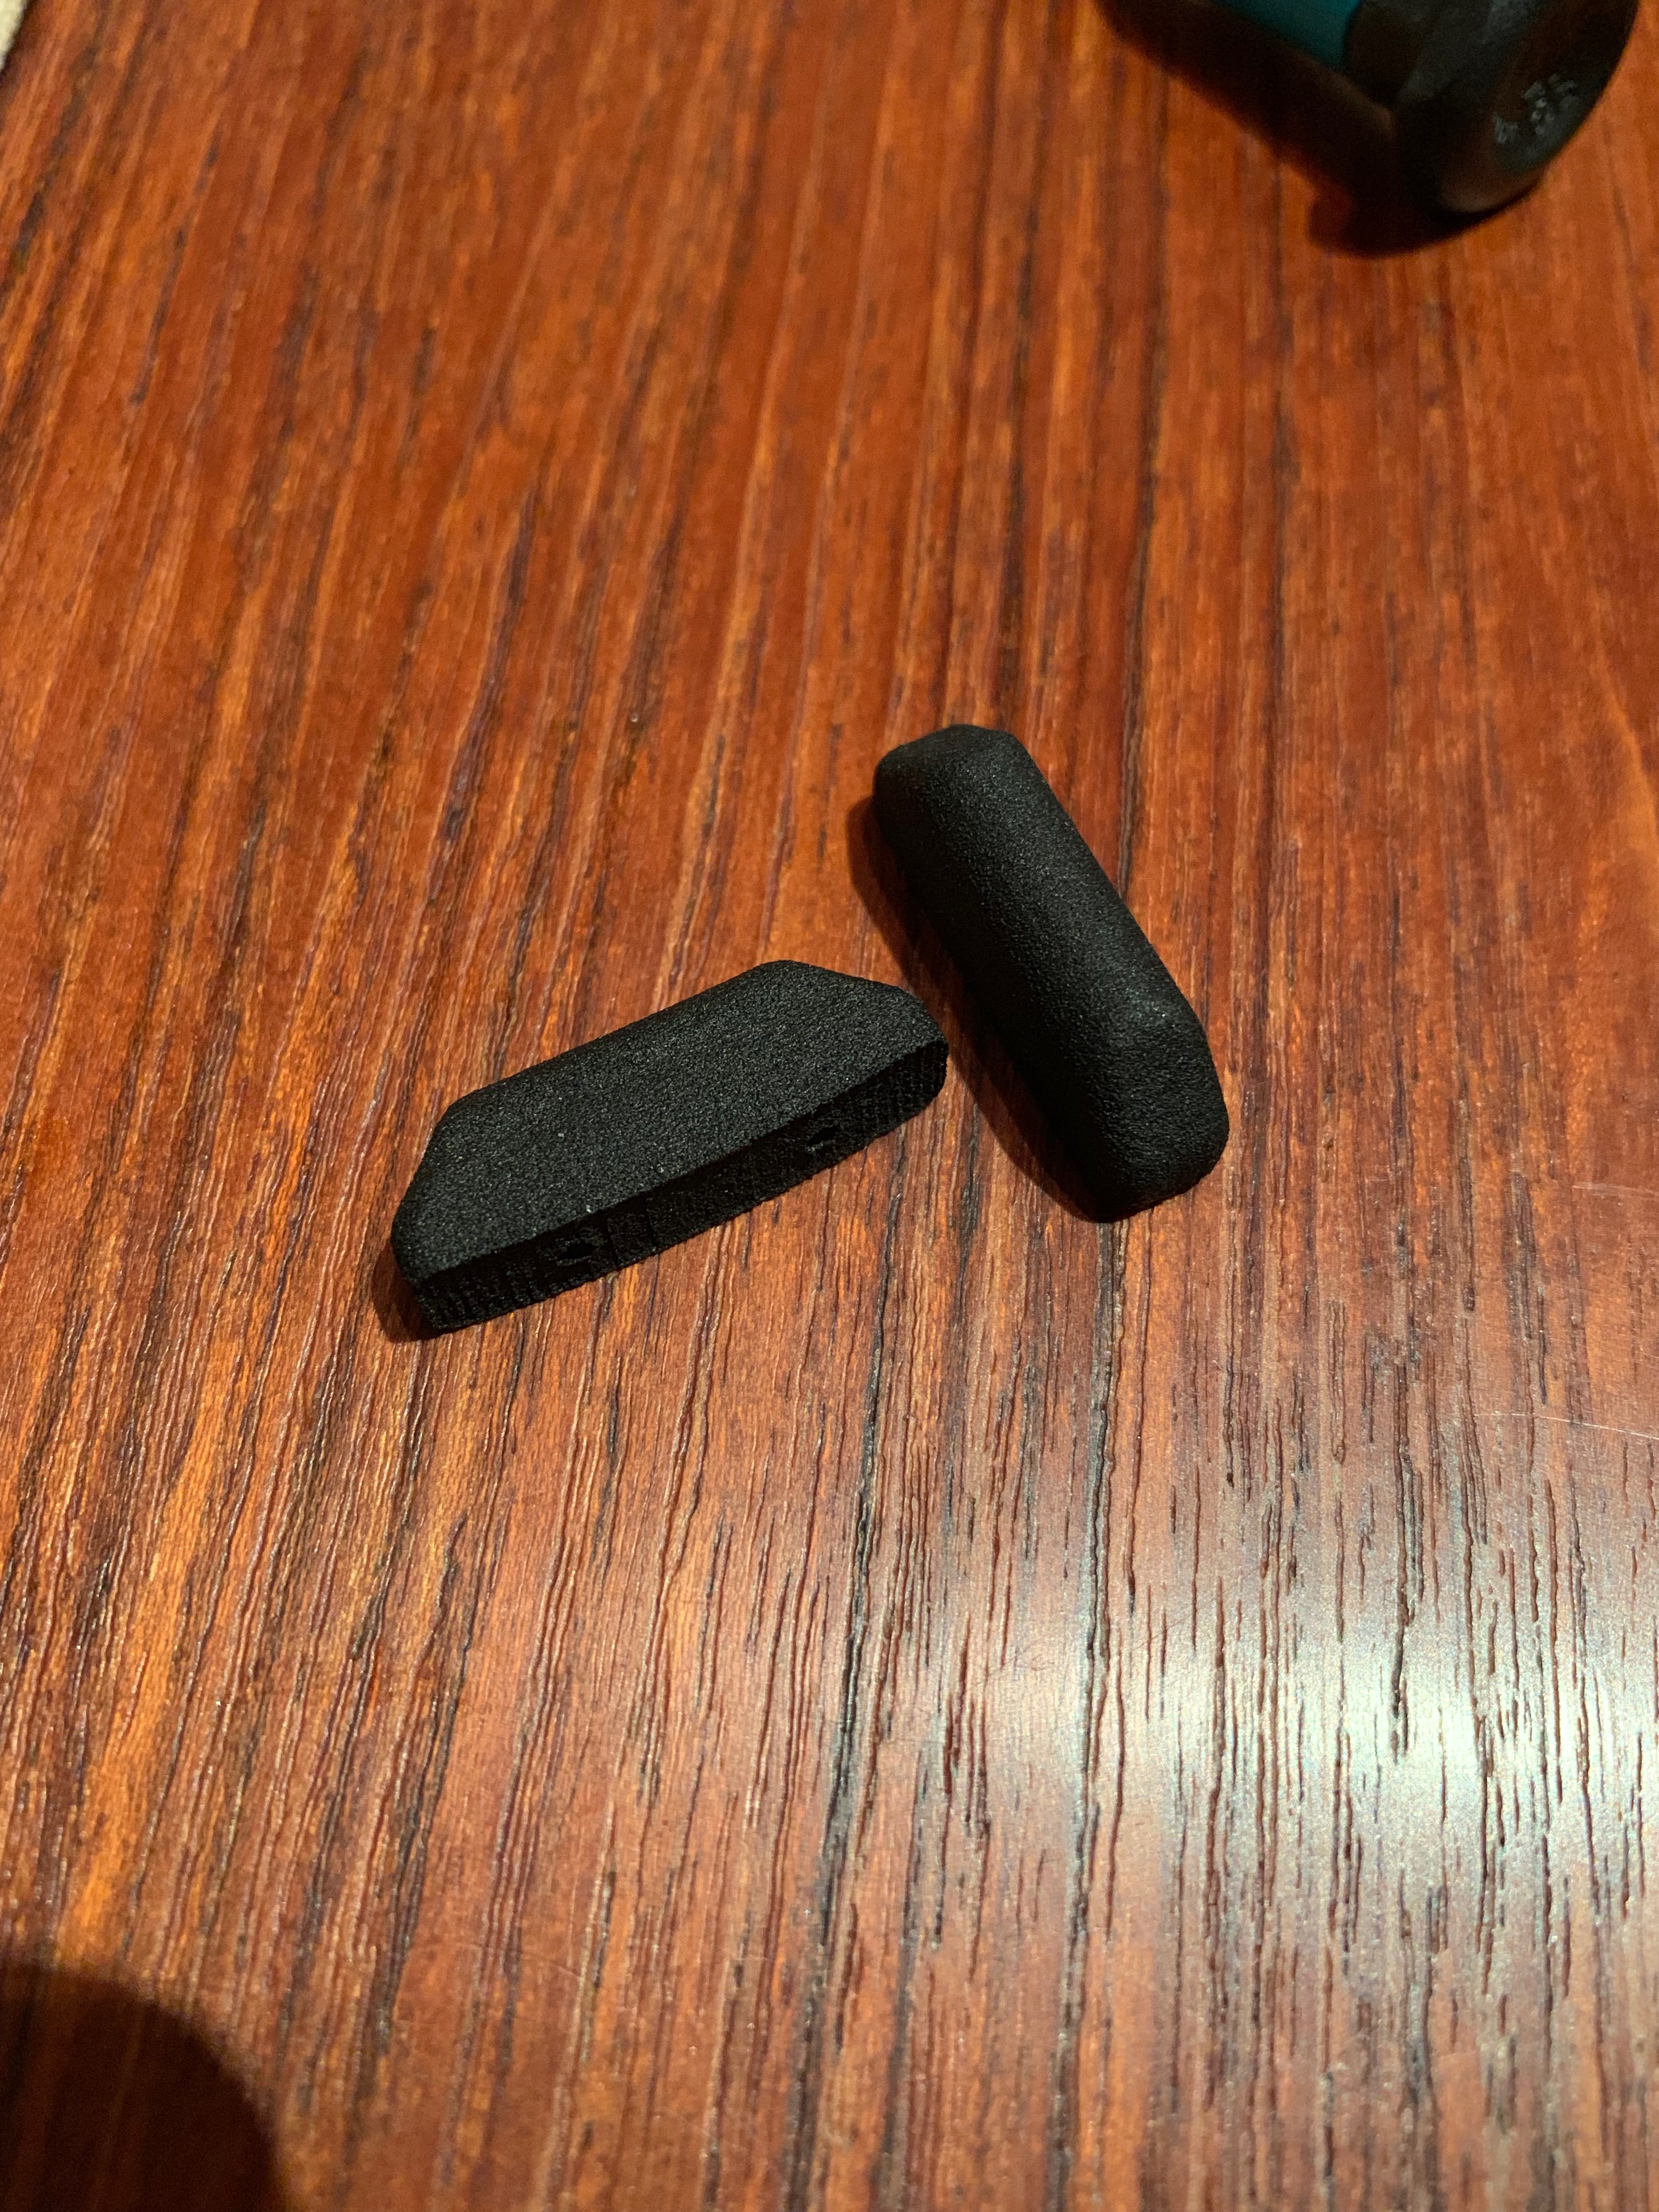
I was elated to finally complete my kit by adding this part—but it turned out upon receipt, the hood extension wouldn't mount to the end of my lens. After a bit more research online, I was able to determine there were 2 plastic mounting tabs missing from the hood. These were subtle and frankly I hadn't noticed them on any pictures of hoods while researching and purchasing the hood online. The seller was happy to help get things straightened out, but had no ability to magically conjure up these parts. I decided that instead this would be an opportunity to restore a rare old piece of equipment and keep it from the scrap heap. The missing knob was easy (albeit expensive) to come by from Nikon, as the part is still used on modern lenses. The screw on the new ones is a bit longer, so I just removed the black aluminum cap and screwed it into place. Next were those pesky tabs. I knew it'd be impossible to find original tabs I needed, so I studied all the photos I could find, approximated what size they'd need to be to mount the lens, and started modeling in Fusion 360. I asked for some help on the DPReview forums, and got some help from the community there. A quick trip to the Shapeways website, and I had my first revision in hand.

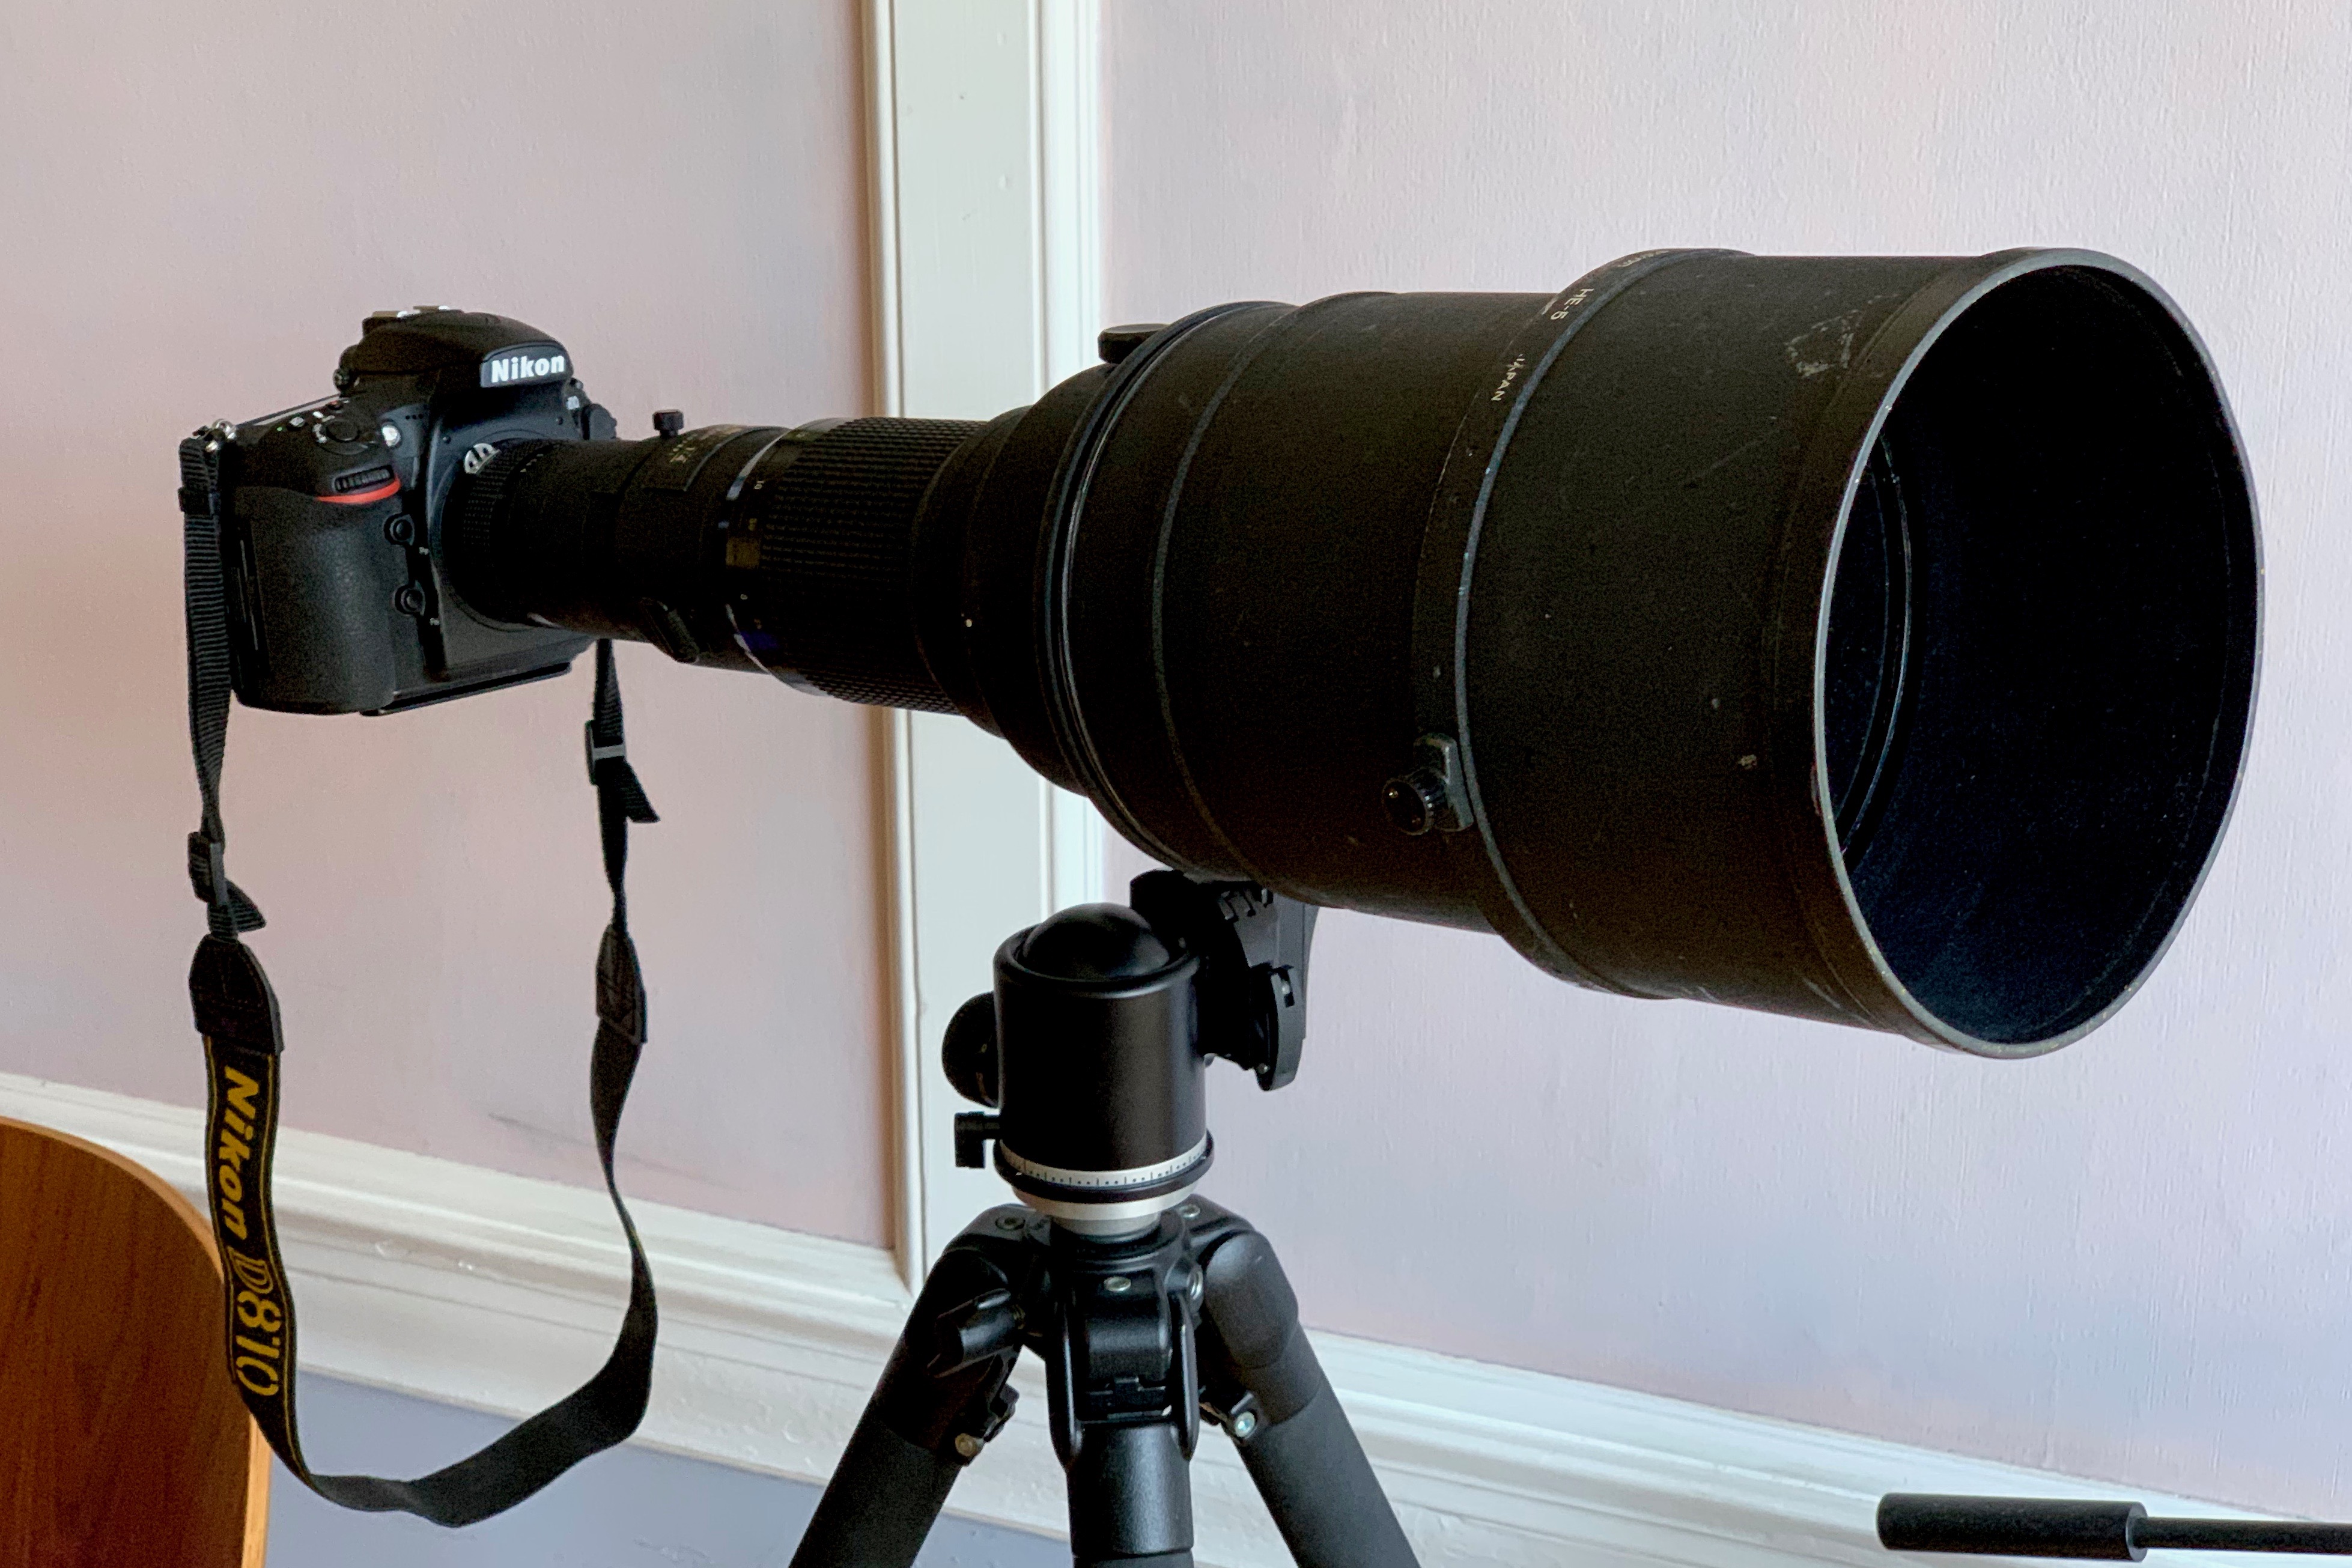
I still have a bit of restoration to do on the 600mm f/4 AiS. I need to craft a workable lens cap and the rubber ring on the end of the lens is still missing (anybody know of reputable 3d-gasket printing outfit?), but these all seem doable now that I've got a working hood extension!
I'm looking forward to more birding expeditions this fall, no matter the angle of the sun. :)

subscribe via RSS